Owner’s Manual HIGH SPEED COMMERCIAL COMBINATION OVEN Keep these instructions for future reference. If the equipment changes ownership, be sure this manual accompanies equipment. Please refer to the SAFETY INSTRUCTIONS for important safety information prior to using this oven.
Model Identification When contacting ACP, provide product information. Product information is located on oven serial plate. Record the following information: Any questions or to locate an authorized ACP servicer, call ACP ComServ Service Support. – Inside the U.S.A. or Canada, call toll-free at 866426-2621. – Outside the U.S.A. and Canada, call 319-368-8120. – Email: commercialservice@acpsolutions.
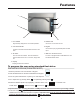
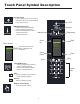
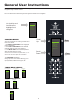
Features 1 5 4 6 2 7 3 3 5 ON/OFF Pad 1 Door Handle Use to turn on and shut oven off. Ergonomically designed for one handed operation. 6 Keypad 2 Unit Serial Number se for time input, programmed pads and data U input. ocated on the lower left hand side and back of the L oven. 7 USB Port / Protective Cover 3 Air Filters he oven is equipped with an USB Data Port. Use T with standard flash drives. he oven has two air filters. Each are located on T the lower sides of the oven.
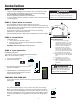
Installation STEP 1 - Unpack Oven • • • • WARNING Inspect oven for damage such as dents in door or inside oven cavity. Report any dents or breakage to source of purchase immediately. Do not attempt to use oven if damaged. Remove all packing materials from oven interior. If oven has been stored in extremely cold area, wait a few hours before connecting power. Excessive Weight Hazard Use two or more people to move and install oven. Failure to do so can result in back or other injury.
General User Instructions COOKING TIPS 1. Metal containers can be used in the AXP with a height no more than 2 inches. Different types of metal conduct heat at different speeds. Aluminum heats faster than stainless steel. Avoid using silcone pans and accessories. 2. Stage cooking aids in retaining the quality of frozen and delicate foods. Finishing baked goods at 0% Microwave, Fan and IR (Radiant) is a great way to get the added browning and crisping without over cooking. 3.
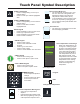
Touch Panel Symbol Description ON / OFF Keypad • Press to preheat oven or turn oven off. (Fan will continue to run if temperature is over 200°F / 95°C). TEMPERATURE Keypad • Press to check set temperature. • Press to change temperature. • Press Number keypads to enter or change temperature. • Press Enter to save.
Touch Panel Symbol Description SCROLL UP Keypad • Press to change setting or move up to another setting. • Press to move up to another highlighted area. Oven Cooling Mode Icon: • The oven fan will continue to run to cool the oven.The oven Cooling Mode Icon appears and stays on until the oven temperature is below 200°F (95°C). • To avoid damage to the convection motor, do not turn off power by unplugging the unit or shutting off the power breaker until the fan stops.
General User Instructions The oven screen displays menu options. The keypad is used to navigate through onscreen menus. The icons below will be used throughout this guide to indicate menu navigation. Use Scroll Up and Scroll Down to highlight food categories 1 Sandwich 2 Meat 3 Vegetarian 4 Seafood 5 Pasta-Pizza 6 Bake-Dess 7 8 9 0 COOKING MENUS Your ovens ship with the cooking screens set to three menu levels. 1. The MENU CATEGORIES screen highlights product categories. 2.
General User Instructions MAIN COOKING MENU After the oven has preheated, the menu appears. The AXP high speed oven comes preprogrammed with several menu items to simplify cooking. Examples of Preprogrammed Menu Items Include: 1. Sandwich 2. Meat 3. Vegetarian 4. Seafood - Breakfast - Poultry - Meat - Seafood - Vegetarian - Breakfast - Lunch - Vegetables - Appetizers - Potatoes 5.
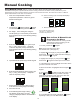
Manual Cooking Using MANUAL COOK (Option 4 has to be set to allow manual cooking see page 18) Use Manual cooking when a specific entered time and cooking power levels are desired. It’s very useful when you are experimenting with new food items. Maximum cook time is 100 minutes. Microwave, Fan and IR can be set to 11 different power levels between 0-100% with 10% increments. 1. After oven has preheated to desired temperature (200-520°F / 95-270°C), press Manual Cook keypad. 10.
Oven Programming ACCESSING THE PROGRAM MENU 1. To access the PROGRAM mode, press the Program keypad. with Scroll Up 2. Then select Edit Scroll Down from the screen. or then select the food 3. Press Enter category, food item to be programed using the or Scroll Down Scroll Up Microwave Power keypad. Cook Time PROGRAM MENU OVERVIEW PROGRAM Add a new menu item ENTER BACK Fan Go to previous screen or SCROLL DOWN 6. Press the Enter keypad and cook settings will appear.
Oven Programming EDITING OR ADDING NEW NAMES FOR MENU CATEGORY OR FOOD CATEGORY OR MENU ITEM 1. Press the Program III. Editing / Adding Name in Menu Item In order to add program settings, you must name your item first. A. Highlight desired Menu Category keypad. with Scroll Up 2. Highlight Edit keypad. keypad and press Enter or Scroll Down 1 Sandwich 2 Meat 3 Vegetarian 4 Seafood 5 Pasta-Pizza 6 Bake-Dess 7 8 9 0 or Scroll Down keypad to 3.
Oven Programming 5. Enter name for category or item using keypad digits for letters, numbers and symbols. [For example: Press Keypad “2” three times for letter “c”] When the correct letter is displayed, wait until cursor moves to the next space. If a correction is necessary, press back to erase one character at a time.See user option 2 for text case options (page 18). DELETING A SINGLE MENU ITEM 1. Press the Program keypad. 2. Highlight Delete keypad. with Scroll Up 3. Press the Enter keypad.
Oven Programming DELETING A WHOLE MENU CATEGORY OR FOOD CATEGORY Deleting a whole menu category or food category will delete all the menu items underneath that group (up to 100 menus for any of the menu category and 10 menu items for the food category). 1. Press the Program keypad. 2. Highlight Delete keypad. with Scroll Up 3. Press the Enter keypad. or Scroll Down or Scroll Down keypad to 4. Using the Scroll Up highlight Menu Category and/or Food Category to delete.
Microwave Only Feature USING OVEN AS A MICROWAVE OVEN . This option is only available if the oven cavity temperature is less than 200°F. To access the MICROWAVE ONLY button, user option #15 (page 18) must be set to allow microwave only mode. The oven default does not have the MICROWAVE ONLY feature activated. When user option MICROWAVE ONLY is on, the MICROWAVE ONLY icon appears in the bottom right corner of the display. _,&,/,0 7. Press the Enter 8. Enter Time using number keypads.
AXP / MXP Care and Cleaning Care and Cleaning Daily Cleaning Recommendations: Follow the recommendations below for proper maintenance of the AXP/MXP oven. Please note: The use of caustic cleaning products or those containing ammonia, phosphates, chlorine, sodium or potassium hydroxide (lye) can damage critical oven parts. Do not use water pressure type cleaning systems. Use of unapproved cleaning agents will void the terms of the warranty.
AXP / MXP Care and Cleaning III. WEEKLY CLEANING 1. Clean Air Filter Remove the air filters located on each side of the oven at the base. Wash filter in a mild detergent solution made with warm water. Rinse and dry thoroughly. Replace filters by sliding back into the side locations. Attention: Included with the oven is a “Best Practices” cleaning poster. Please display the cleaning poster in a prominent location close to the oven. Best Practices: Clean oven daily. Use non-caustic cleaner.
User Options There are several options you can change to customize the operation of the oven for your business. The table below shows these options; the factory setting is shown in bold type. 1. Oven must be off. To turn oven off, press ON/OFF keypad. 2. Press and hold “2” keypad until option screen appears. 3. Choose option by pressing Enter desired option. keypad then use Scroll Up keypad to save and press Stop / Reset 4.
Before Calling for Service To avoid electrical shock which can cause severe personal injury or death, do not remove outer case at any time. Only an authorized servicer should remove outer case. This is a Class A product. In a domestic environment this product may cause radio interference in which case the user may be required to take adequate measures. Problem Possible Cause Oven does not operate Confirm oven is plugged in. Confirm oven is connected to a grounded circuit. Check fuse or breaker.