PRODUCT SUPPORT MANUAL Y1-03-0181 Rev. A FPR-20 Product No. 9466 Field Programmer Reader ACR Electronics, Inc. 5757 Ravenswood Road Fort Lauderdale, Fl 33312 +1(954) 981-3333 • Fax +1 (954) 983-5087 www.acrelectronics.com Email: Info@acrelectronics.
FORWARD Congratulations and thank you for purchasing the ACR FPR-20. The combination of superior design, high quality raw materials and quality controlled manufacturing produce a product that will perform for years to come. The Test Facility at ACR can reproduce some of the harshest environmental conditions known to man. This assures that the life saving devices can stand up to the rigors found in any environment on earth.
SECTION 1 - OVERVIEW 1.1 FPR-20 The FPR-20 (Field Programmer Reader – 20) is designed to be both a re-programming and verification tool for the ACR AquaFix, TerraFix, and AeroFix 406 PLB-200/201. The FPR-20 consists of an adapter jack, a cable, programming head, programming plug adapter and the FPR-20 application software installed on a PC (PC not supplied, see figure 7).
06 GPS I (P/N 2797.2, 2798.2, 2799.2) self tested components: Data Integrity and Memory; 406 MHz Synthesizer; RF Power/Battery 406 GPS I/O (P/N 2797.4, 2798.4, 2799.4) self tested components: Data Integrity and Memory; 406 MHz Synthesizer; RF Power/Battery; GPS header If your beacon flashes two green LED’s, the test has been successfully completed.
• • 1 available serial port. Printer (optional) SECTION 4 – INSTALLING THE FPR-20 SOFTWARE 4.1 Downloading FPR-20 Software The FPR-20 software may be downloaded from the web at http://www.acrelectronics.com/download.html 1) Click on the fpr20.zip file. 2) A file download window will pop up, select Save. 3) A Save As window will pop up, select a folder on your C drive to save this zip file.
3) Type or browse to the correct drive. For example if a CD is used, select browse, select your CD-ROM drive, select the file setup.exe and press ENTER and follow the installation instructions. a. Alternatively, use the file manager or Windows Explorer to find the setup.exe file on the CD, Double click on setup.exe, and follow the installation instructions. 4) Follow the installation directions on the screen. The FPR-20 must be installed in the “C:\Fpr20\” directory.
3. Choose the Country you wish to program into the beacon by either typing the first initial of the name of the Country or scrolling to the Country. You may scroll with the mouse or the scroll buttons. Once you have selected the Country, click the mouse or press Enter on the desired Country. 4. From the Protocol Menu, click on the appropriate protocol. See notes below for clarification of the different protocols. 5. From the Protocol Code Select Menu, select the protocol desired.
. Enter the User Name, if desired. It will appear on the label as entered. 9. Under the CONTROL section, Press the Program Control Button. The program data will be generated and displayed including the HEX ID. All of the information entered and used to make the message can be observed and verified prior to programming the beacon. 10. On the Serial Port Menu there is a button on the bottom right corner for changing the serial port the FPR-20 is connected to.
the message that will be transmitted by the beacon. When done viewing the message, click the Program Setup button to navigate back to the main menu. 5. If the memory read is not completed in approximately fifteen seconds, the read will time out. If this happens, go back to step 3 of this section and continue forward. GPS Test Button - GPS I (P/N 2797.2, 2798.2, 2799.2) - GPS I/O (P/N 2797.4, 2798.4, 2799.
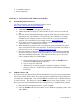
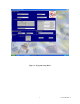
Figure 2 - Program Setup Menu 9 Y1-03-0181 Rev.
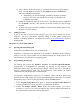
Figure 3 - Program Beacon Menu 10 Y1-03-0181 Rev.
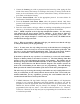
Figure 4 - Memory Read Display 11 Y1-03-0181 Rev.
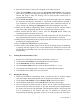
Programming Head Adapter Jack Phone Cable Figure 5 - PC / FPR-20 Cable Connections 12 Y1-03-0181 Rev.
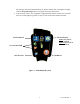
Programming Head Programming Plug Adapter GPS I or I/O Switch LED’s Figure 6 - Programming Head Positioned on top of Beacon (PLB-200) 13 13 Y1-03-0181 Rev.
Figure 7 - FPR-20 Hardware 14 14 Y1-03-0181 Rev.