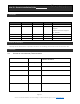
Drive ID – Generic Installation Guide 1 VERSIONING Date 27/06/2020 17/11/2020 Author NEMES Gabor NEMES Gabor Release 0.1 0.2 Company Acrelec Acrelec Comment Creation Updated POE connection diagram Added connection diagram for 12V PSU 2 SCOPE OF THE DOCUMENT The topic of this document is to provide instructions for installing the Drive ID inside the drive thru box. 3 PACKAGING 3.
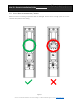
Drive ID – Generic Installation Guide 4 IMPORTANT MEASURES Handling of Drive ID: DO NOT DO The Drive ID Box must not be moved if it is connected electrically. All packaging must be recycled. Unpack it in the presence of an Operations Manager. Page 2/23 Acrelec is a trademark of AKSOR - 3 Rue Louis de Broglie – 77400 St Thibaut des Vignes – France - www.acrelec.
Drive ID – Generic Installation Guide 5 MEANS FOR INTERVENTION 5.1 NUMBER OF TECHNICIANS / NUMBER OF DAYS At least 1 person, and about 30 min per Drive ID Box. 5.2 TOOLS NEEDED If the device is installed outside of a speaker post or canopy Percussion + drill bit Spanner Level Cutter 5.3 TOOLS NEEDED If the device is installed inside of a speaker post or canopy Cutter Page 3/23 Acrelec is a trademark of AKSOR - 3 Rue Louis de Broglie – 77400 St Thibaut des Vignes – France - www.acrelec.
Drive ID – Generic Installation Guide 6 POSITION PRE-REQUISITES • • • • • The device must be placed perpendicular to the Drive-Thru lane The front of the device must face the Drive Thru lane The device should be approximately 6ft away from the driver The device should be installed between 4.5 - 5.5 ft from the ground There should be no metal between the device and the driver Page 4/23 Acrelec is a trademark of AKSOR - 3 Rue Louis de Broglie – 77400 St Thibaut des Vignes – France - www.acrelec.
Drive ID – Generic Installation Guide 7 MOUNTING STEPS EXTERNAL INSTALLATION 7.1 WARNING / SAFETY IMPORTANT: prior to any manipulation of the devices, shut off the main power supply at the main circuit breaker. 7.2 SUMMARY OF STEPS If the speaker post enclosure or canopy is entirely made out of metal, the Drive ID device must be installed on the exterior of the stanchion.
Drive ID – Generic Installation Guide 7.3 STEP 1 OPEN THE SPEAKER POST / CANOPY Make sure that no existing components will be damaged. Ensure there’s enough space to run the network cable, before start drilling. Page 6/23 Acrelec is a trademark of AKSOR - 3 Rue Louis de Broglie – 77400 St Thibaut des Vignes – France - www.acrelec.
Drive ID – Generic Installation Guide 7.4 STEP 2 DRILL MOUNTING HOLES To fix the device 4 mounting holes needs to be drilled on the enclosure. Page 7/23 Acrelec is a trademark of AKSOR - 3 Rue Louis de Broglie – 77400 St Thibaut des Vignes – France - www.acrelec.
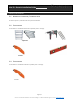
Drive ID – Generic Installation Guide 7.5 STEP 3 DRILL HOLE FOR ETHERNET CABLE As the device is fixed on the exterior of the speaker post a hole needs to be drilled on the speaker post to connect to the restaurant network. The opening needs to have at least 15mm diameter to allow the RJ45 connector to pass through. B A C A• Jack 12V DC: power connector. Connect the Drive ID Box to the 12V power supply inside the Drive Thru Box.
Drive ID – Generic Installation Guide 7.6 STEP 4 TEMPORARILY FIX THE DEVICE WITH DOUBLE TAPE To ease screwing of the device and to maintain proper position, apply double sided tape between the two sticker holders. Page 9/23 Acrelec is a trademark of AKSOR - 3 Rue Louis de Broglie – 77400 St Thibaut des Vignes – France - www.acrelec.
Drive ID – Generic Installation Guide 7.7 STEP 5 FIX AND SECURE DEVICE Use attached self-tapping screws to fix device. Page 10/23 Acrelec is a trademark of AKSOR - 3 Rue Louis de Broglie – 77400 St Thibaut des Vignes – France - www.acrelec.
Drive ID – Generic Installation Guide 7.8 STEP 6 CONNECT CABLING Once the device is fixed, connect the ethernet cable to RJ45 port on the back of the device. Follow below cabling diagram to ensure that the device is both powered and connected to the restaurant network. Connection diagram – POE (Power Over Ethernet) injector Page 11/23 Acrelec is a trademark of AKSOR - 3 Rue Louis de Broglie – 77400 St Thibaut des Vignes – France - www.acrelec.
Drive ID – Generic Installation Guide Connection diagram – 12V power supply Page 12/23 Acrelec is a trademark of AKSOR - 3 Rue Louis de Broglie – 77400 St Thibaut des Vignes – France - www.acrelec.
Drive ID – Generic Installation Guide 7.9 STEP 8 TEST DEVICE WITH SMARTPHONE APP Once the device is installed test it with the smart phone application When the app is opened it automatically searches for antennas Open the SBL–DriveThruPOC application Page 13/23 Acrelec is a trademark of AKSOR - 3 Rue Louis de Broglie – 77400 St Thibaut des Vignes – France - www.acrelec.
Drive ID – Generic Installation Guide Confirmation of the message successfully received. No errors were detected. Message sent with detailed information Before sending message the Page 14/23 Acrelec is a trademark of AKSOR - 3 Rue Louis de Broglie – 77400 St Thibaut des Vignes – France - www.acrelec.
Drive ID – Generic Installation Guide 8 MOUNTING STEPS INTERNAL INSTALLATION 8.1 WARNING / SAFETY IMPORTANT: prior to any manipulation of the devices, shut off the main power supply at the main circuit breaker. 8.
Drive ID – Generic Installation Guide 8.3 STEP 1 OPEN THE SPEAKER POST / CANOPY Make sure there is enough room to install device inside. Pay attention to existing components. Page 16/23 Acrelec is a trademark of AKSOR - 3 Rue Louis de Broglie – 77400 St Thibaut des Vignes – France - www.acrelec.
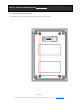
Drive ID – Generic Installation Guide 8.4 STEP 2 APPLY DOUBLE SIDED TAPE To fix the device put two stripes of double sided on the front of the device. Wipe the inside of the enclosure where the device will be affixed. There should be no dust/dirt between the tape and the enclosure. Page 17/23 Acrelec is a trademark of AKSOR - 3 Rue Louis de Broglie – 77400 St Thibaut des Vignes – France - www.acrelec.
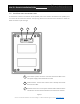
Drive ID – Generic Installation Guide 8.5 STEP3 ATTACH DEVICE Once the surface is cleaned and tape is applied attach device to the enclosure. Press on both top and bottom of the back of enclosure for 30 seconds. 8.6 STEP 4 CONNECT CABLING Once the device is fixed, connect the ethernet cable to RJ45 port on the back of the device. Follow below cabling diagram to ensure that the device is both powered and connected to the restaurant network.
Drive ID – Generic Installation Guide 8.7 STEP 5 TEST DEVICE WITH SMARTPHONE APP Once the device is installed test it with the smart phone application When the app is opened it automatically searches for antennas Open the SBL–DriveThruPOC application Page 19/23 Acrelec is a trademark of AKSOR - 3 Rue Louis de Broglie – 77400 St Thibaut des Vignes – France - www.acrelec.
Drive ID – Generic Installation Guide Confirmation of the message successfully received. No errors were detected. Message sent with detailed information Before sending message the Page 20/23 Acrelec is a trademark of AKSOR - 3 Rue Louis de Broglie – 77400 St Thibaut des Vignes – France - www.acrelec.
Drive ID – Generic Installation Guide 9 COPYRIGHTS © 2021, AKSOR – All rights reserved No part of this publication may be reproduced, photocopied, stored on a retrieval system, or transmitted without the express prior written consent of the publisher. Information in this document is subject to change without notice. AKSOR shall not be liable for errors contained herein.
Drive ID – Generic Installation Guide FCC Warnning: This equipment has been tested and found to comply with the limits for a Class B digital device, Pursuant to part 15 of the FCC Rules. These limits are designed to provide reasonable protection against harmful interference in a residential installation. This equipment generates, uses and can radiate radio frequency energy and, if not installed and used in accordance with the instructions, may cause harmful interference to radio communications.
Drive ID – Generic Installation Guide ISED Statement ‐ English: This device complies with Industry Canada license‐exempt RSS standard(s). Operation is subject to the following two conditions: (1) This device may not cause interference, and ( 2) This device must accept any interference, including interference that may cause undesired operatio n of the device. The digital apparatus complies with Canadian CAN ICES‐3 (B)/NMB‐3(B).