Acronis Backup Advanced for vCloud Update 3 QUICK START GUIDE
Copyright Statement Copyright © Acronis International GmbH, 2002-2014. All rights reserved. “Acronis” and “Acronis Secure Zone” are registered trademarks of Acronis International GmbH. "Acronis Compute with Confidence", “Acronis Startup Recovery Manager”, “Acronis Active Restore”, “Acronis Instant Restore” and the Acronis logo are trademarks of Acronis International GmbH. Linux is a registered trademark of Linus Torvalds. VMware and VMware Ready are trademarks and/or registered trademarks of VMware, Inc.
Table of contents 1 What is Acronis Backup Advanced for vCloud? ..................................................................4 2 Software requirements ....................................................................................................4 3 Components ....................................................................................................................5 4 What you need to start ...........................................................................................
This document describes how to quickly install and start using Acronis Backup Advanced for vCloud. This document outlines the product usage and enables immediate "field testing." For more information about administering Acronis Backup Advanced for vCloud, please refer to the Administrator's Guide that you can open by clicking the Help link in the web interface of the product.
3 Components Acronis Backup Advanced for vCloud consists of multiple components that need to be installed on separate machines. Agents for VMware run as virtual appliances in the vCloud resource group. The default settings of the agent machine: 1 GB of memory, 6 GB of disk space, and two CPU. Management Server needs to be installed in the management cluster, on a virtual machine running Windows. Minimum requirements for the machine: 3 GB of memory, 30 GB of disk space, and two CPU.
4 What you need to start Make sure that: vCloud Director is installed and configured. You have the Acronis Backup Advanced for vCloud installation package. The package consists of: You have license keys in a TXT file. For multiple license keys, the text format is one line per key. Acronis Backup Advanced setup program. Agent for vCloud OVF template. The script enable_remote_sql_access.js. You have a virtual machine to install the management server on.
5 Step-by-step instructions The following steps will guide you through the installation and basic use of Acronis Backup Advanced for vCloud. They describe how to: Install and configure the main components of the product and the required software. Enable the backup service for an organization. Back up organization's virtual machines. Apply a backup plan to the virtual machines. Overwrite a virtual machine with its earlier version. Recover a virtual machine. 5.
Note You can use an existing RabbitMQ Server user account with permissions equal to or higher than those given by the commands above. Acronis Backup Advanced for vCloud Agent for vCloud will use this account to receive event notifications from vCloud Director. Remember the account credentials, as you will be asked for them when configuring Agent for vCloud. 6. Open a web browser and go to the RabbitMQ Server Web UI located at: http://:15672/.
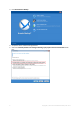
3. Click Install Acronis Backup. 4. Accept the terms of the license agreement. 5. Select the Centrally monitor and configure backing up of physical and virtual machines check box.
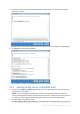
6. Provide the license for Acronis Backup Advanced for vCloud. Enter your license keys or import them from a text file. 7. Choose whether the machine will participate in the Acronis Customer Experience Program (CEP). 8. Click Install to proceed with installation. 9. On successful installation, click Finish to close the wizard window. 5.2.2 Running the SQL Server configuration script 1. Copy the script enable_remote_sql_access.js that is distributed with the product, to the management server machine.
Where: and are the user name and password for the new account. -p is an optional parameter that enables you to specify the port to use. For example: C:\>cscript enable_remote_sql_access.js User 123 If you do not specify the port, it will be chosen automatically. Examine the port number that was chosen by the script: Port 1433 is picked Important. Remember the credentials and the port number. You will be asked for them when configuring Agent for vCloud. 5.2.
2. Сlick Connect to a management server. 3. Specify the host name or IP address of the current machine and the administrator credentials under which you installed the management server.
4. In the Navigation tree, click Virtual machines and then click Configure VMware vCenter integration. 5. Select the Enable integration with the following vCenter Server check box. 6. Specify the IP address or name of the vCenter Server for the resource group. Provide credentials of the vCenter Server administrator. Details. The management server will use this account when deploying agents. The agents will use this account to connect to the vCenter Server.
If the network uses static IP addresses, or if you prefer to deploy the agents manually, or if the automatic deployment fails, clear the Automatically deploy... check box. You will need to perform a few additional steps described in "Deploying Agent for VMware" (p. 14). 8. Click OK to confirm the changes. The virtual machines managed by the vCenter Server appear in the Virtual machines section of the Navigation tree.
b. In Network interface, select the network interface that provides access to the management server, the vCenter Server for the resource group, the cluster virtual machines, and the backup storage. c. The Network configuration link enables you to select whether the agent will use a dynamic (provided by a DHCP server) or a static IP address. If you want to leave the default setting of using a dynamic address, skip this step.
To install the agent, deploy the OVF template to your management cluster. Map the network in the OVF template to a network that provides access to the management cluster virtual machines and to the RabbitMQ Server host. For general information about deploying an OVF template, refer to the following VMware knowledge base article: http://pubs.vmware.com/vsphere-50/topic/com.vmware.vsphere.vm_admin.doc_50/GUID-6C847F7 7-8CB2-4187-BD7F-E7D3D5BD897B.html. 5.2.
3. Delete the old time zone settings: rm -f /etc/localtime 4. Specify the new time zone settings: ln -s /etc/localtime For example: ln -s /usr/share/zoneinfo/US/Eastern /etc/localtime Configuring connection parameters 1. Go to the /opt/acronis/vcd-agent/bin folder and run the configure.sh command. All available configuration scenarios are shown. 2. Choose the Initial agent configuration scenario. 3.
following format: nfs://Server/ExportPath:/PathInExportFolder (note the colon before the final slash). For information about how to properly configure the export folder, see the "Configuring an NFS storage" section of the Administrator's Guide. Configuring network settings The machine with Agent for vCloud has two network adapters: eth0 for the internal network and eth1 for the external network.
When connecting from an internal network: is the fully qualified domain name, or the IP address of the Agent for vCloud host in this network. For example, https://vcloudagent.vcloud.example.com/ or https://10.200.200.10/ When connecting from an external network: is the URL of the backup service as it appears on the public side of a firewall, load balancer, NAT/reverse proxy, and other network components that you may have in front of your infrastructure.
6. Click Configure. 7. On the Backup storage tab, in Backup storage, specify the path to the shared folder allocated for storing organization's backups. If authentication is required to access the folder, specify the credentials of a user account that has read/write permissions for this folder. 8. Confirm the changes. 5.4 Backing up virtual machines 1. Select the organization. 2. Click Open. You are now in the organization administrator's interface. 3.
You can select a virtual machine either from the vApp to which the machine belongs, or from the All virtual machines list. 4. Click Back up now. The software can simultaneously back up as many as 10 virtual machines. The default number is 5. When the backup starts, up to five of the machines will have the Backing up protection status. The backup progress for a selected machine is displayed in the machine details area on the right. All of the organization's backups are displayed on the Backup storage tab.
Currently, you can select from the backup plans that are initially delivered with the software. A backup plan contains the following instructions for the backup service: Schedule: When and how often to do backups Retention rules: How long to store the backups Backup options: Whether to exclude specific files and folders (Exclusions); to send notifications about backup operation results (Notifications); and to encrypt backups (Encryption) 5. Click OK.
When the recovery starts, the machine will have the Recovering protection status. The progress of recovery is shown in the machine details area on the right. After the recovery is completed, the information about its success or failure is shown in the machine details area. 5.7 Recovering a virtual machine This is a common recovery procedure.
4. In Target vApp, specify the vApp to which the machine will be recovered. By default, the original vApp is selected. If the original vApp no longer exists in the organization, you can recreate the original vApp and recover the machine to it. To do so, select Recreate original vApp. The vApp will be created with parameters that it had when the machine was backed up. 5. In Name of the recovered machine, type a name that the recovered machine will have in the vApp.
The service shows the volumes, files, and folders that were present on the machine at that time. Volumes that you cannot recover files from are not shown. Select the files and folders that you want to recover, and then click OK. After the recovery is completed, the link to download the .zip file appears on the Backup storage tab in the machine details area on the right. The link is valid for 24 hours. You can use the link only when you are logged in to the service. The files are stored in the .