Acronis® Backup & Recovery ™ 10 Advanced Server Virtual Edition Quick Start Guide
Table of Contents 1. Main components .................................................................................................. 3 2. License server......................................................................................................... 3 3. Supported operating systems ................................................................................. 3 3.1. Agents ....................................................................................................................
This document describes how to install and start using Acronis Backup & Recovery 10 Advanced Server Virtual Edition. 1. Main components Acronis Backup & Recovery 10 Advanced Server Virtual Edition contains the following main components. • Acronis Backup & Recovery 10 Agent for ESX/ESXi: Backs up virtual machines on a VMware ESX/ESXi host without installing agents inside each virtual machine.
Acronis Backup & Recovery 10 Agent for Hyper-V installs on Windows Server 2008 x64 Edition with Hyper-V as an add-on to Acronis Backup & Recovery 10 Agent for Windows. It is highly recommended that Integration Services are installed in the guest systems. 3.2.
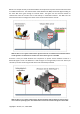
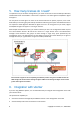
Below is an example of how you would distribute the components to protect virtual machines hosted on a VMware ESX server. The communication traffic between the AMS, ALS and the Agent residing on the same ESX server goes through its internal switch. The agent uses the external network to communicate with the console and to save backups in networked locations. The AMS uses the external connection to manage other hosts and to communicate with the console. AMS and ALS run on a regular virtual machine.
5. How many licenses do I need? To implement any of the above configurations, you need one license for Acronis Backup & Recovery 10 Advanced Server Virtual Edition. The license is required to run either Agent for ESX/ESXi or Agent for Hyper-V. You may want to install agents on some of the virtual machines for specific purposes, such as filelevel backup or executing pre/post backup commands inside the guest system.
• automatically register virtual machines created by Acronis Backup & Recovery 10 in the vCenter inventory • automatically deploy and configure Agent for ESX/ESXi to any ESX/ESXi server, that is not necessarily managed by the vCenter. The vCenter integration functionality is delivered as an add-on to Acronis Backup & Recovery 10 Management Server. The add-on is installed by default during the management server installation or update.
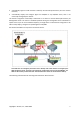
VMware API ESX1 VM1 VM2 VA1 VMware API ESX2 VM3 VM1 VM2 VA2 VM3 AMS Console Working without vCenter integration The AMS controls the virtual appliances. Each of the appliances manages backup and recovery of virtual machines hosted on its host using VMware API. VMware vSphere API ESX1 VM1 VM2 VMware vSphere API VA1 VM3 ESX2 VM1 VM2 VA2 VM3 VMware vSphere API vCenter Server AMS Console Working with vCenter integration The AMS controls the virtual appliances.
7. Preparing to start Make sure that you have: • A machine running Windows, with at least 512 MB of physical memory. • A license key for Acronis Backup & Recovery 10 Advanced Server Virtual Edition in a TXT or EML file. For multiple license keys, the text format is one line - one key. • The setup program, which you can download from the http://www.Acronis.com/enterprise/download/ Acronis Web site at: 8.
7. Log on to the machine as an administrator. 8. Open the shared network folder where the setup file is. 9. Copy the folder's content to a local folder. 10. Double click the setup file icon. Installing the license server Skip these steps if you are installing the trial product version. 1. Click Install Acronis License Server. 2. Click Next in the welcome window. 3. Accept the terms of the license agreement. 4. Specify the file containing the list of license keys. Details.
Installing the management console 1. On the machine where you are running the VMware vSphere client, double click the setup file icon. 2. Click Install Acronis Backup & Recovery 10. 3. Click Next in the welcome window. 4. Accept the terms of the license agreement. 5. Specify the name or IP address of the Acronis License Server, or type your trial license key. 6. Select Acronis Backup & Recovery 10 Advanced Server Virtual Edition. 7. Click Install the centralized management components. 8.
appear as not manageable (grayed out). To be able to back up the machines, deploy Acronis Backup & Recovery 10 Agent for ESX/ESXi to their host servers. What else you can do View a virtual machine's power state (stopped or running) in the Power state column. To view a virtual machine's operating system, number of processors or memory size, select the machine and expand the Information bar. Right-click the table heading to add these columns to the default view. 8.1.4.
4. In Type, select Unmanaged. 5. In Path, click Change and then specify the path to the network share where the backups will be stored. Click OK. When prompted, provide access credentials for the shared folder. 6. Click OK. You can see the vault name in the Navigation tree under Vaults > Centralized. Click the vault name to check its free space and contents. 8.1.6. How to install VMware Tools Before you start, please install VMware Tools on every virtual machine you are going to back up.
8. Click OK to create the backup plan. The backup starts immediately. The machines will be backed up one after another. 8.2.2. Monitoring the task progress and results After a short time during which the backup tasks are created, you are taken to the All physical machines view. The corresponding virtual appliance and its Information > Backup plans and tasks tab are selected. Here you can see the backup plan's execution state: Running.
4. Expand the archive from which you want to recover a virtual machine and then select the backup. Details. If there are multiple archives in the vault, you can find the archive by the name of the machine you have backed up. The machine name is included in the archive name. If there are multiple backups in the archive, you can find the backup by the time of its creation displayed in the Created column. If you are still not sure, click View content > As files to explore the backup content. 5.
8.4.1. Creating a backup policy In this step, you will set up a backup policy to back up entire machines to the centralized vault you have created. Such policy can be applied to physical or virtual machines or groups of them. 1. In the Navigation tree, right-click Backup policies, and then click Create backup policy. 2. Under What to back up, in Items to back up selection rules, click Change and select [All volumes] from the drop-down list. Details.
8.4.4. • • • What else you can do Create policies to back up individual volumes of virtual machines Schedule policies, set up retention rules for backups created by the policies, customize policies using various backup options Apply policies to any of the groups resulting from integration with the vCenter When you apply a policy to a group, keep in mind that only the machines managed by Agent for ESX/ESXi will be backed up.