Acronis Disk Director Server 10.
Copyright © Acronis, Inc., 2000–2010. All rights reserved. Windows and MS-DOS are registered trademarks of Microsoft Corporation. All other trademarks and copyrights referred to are the property of their respective owners. Distribution of substantively modified versions of this document is prohibited without the explicit permission of the copyright holder.
Table of contents Table of Contents CHAPTER 1. INTRODUCTION .............................................................................................................. 5 1.1 WHAT IS ACRONIS DISK DIRECTOR SERVER? ...................................................................................... 5 1.2 WHAT’S NEW IN ACRONIS DISK DIRECTOR SERVER 10.0? ................................................................... 5 1.3 SOFTWARE USE CONDITIONS ........................................................
Table of contents A.7 FORMATTING HARD DISKS ................................................................................................................ 88 A.8 FILE SYSTEMS .................................................................................................................................... 89 A.9 FILE SYSTEM MAIN SPECIFICATIONS ................................................................................................. 89 APPENDIX B. GLOSSARY ........................................
Introduction Chapter 1. Introduction 1.1 What is Acronis Disk Director Server? Acronis Disk Director Server is a complex program that includes partition manager and hard disk data editing tools.
Introduction diskdirectorcmd.exe utility. The file is located in a folder where Acronis Disk Director Server has been installed, by default it is C:\Program Files\Acronis\DiskDirector. • Viewing logs Acronis Disk Director Server now keeps working logs. They store information about implemented partition operations, including reasons for failure, if any.
Installation And Use Chapter 2. Installation And Use 2.1 System Requirements To take full advantage of Acronis Disk Director Server you should have: • A PC-compatible computer with a Pentium or similar CPU • 128 MB RAM • A floppy or a CD-RW/DVD-RW drive • A mouse (recommended) 2.2 • • • • • Supported operating systems Windows Windows Windows Windows Windows 2.3 2.3.1 NT Server 2000 Server 2000 Advanced Server 2003 Server 2003 Server x64 Edition.
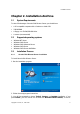
Installation And Use creating bootable media (see Chapter 9 “Bootable Media Builder”). You might not need this tool if you purchased a boxed product that contains a bootable CD. If you have another Acronis product with its own Bootable Media Builder, such as Acronis True Image, installed on your computer, the installation program will automatically detect it and will not install another Bootable Media Builder regardless of your setting.
Installation And Use A power loss, turning off the PC or pressing the Reset button on your PC during the repartitioning procedure could result in partition damage and data loss. Please take all necessary precautions and following these simple rules: 1. Create a disk image of the disk on which partitions are to be reconfigured. This will ensure that your data will not be lost under any circumstances. Almost all current PCs feature CD-RW drives.
Installation And Use You can switch between modes at any time (see 3.1.3 «Switching modes»). 2.7.3 Running from bootable diskettes or CD Previously, we explained how to create bootable diskettes or a CD (see 2.2 «Installation Process»). While working with Acronis Disk Director Server, you may need to use the bootable media: (1) after a serious Windows failure or (2) to work on a Linux-based PC. (See also Chapter 9 «Bootable Media Builder».
Beginning The Work Chapter 3. Beginning The Work 3.1 Acronis Disk Director Server Logical Organization Acronis Disk Director Server provides two operation modes (see 2.7 «Running Acronis Disk Director Server»): • «Automatic partition operations» mode is designed for the most frequent operations suitable for the majority of users • «Manual partition operations» mode for any partition operations.
Beginning The Work 3.2 Acronis Disk Director Server Main Window The program is controlled through the main window. It includes the menu, toolbar, and disk and partition tree (shown/hidden through the View menu). This represents the computer disk and partition list. The main window appearance differs depending on the selected operation mode (see 3.1 «Acronis Disk Director Server Logical Organization»).
Beginning The Work Acronis Disk Director Server main window, Manual Mode Disk and partition information The main window shows the partition’s disk number, assigned letter, label, type, status, size, free space size and file system. Disk and partition information is also provided in the partition and disk tree. The bottom part of the main window graphically indicates the selected disk and its partitions as rectangles with basic data on them (label, letter, size, type, file system). 3.
Beginning The Work • Hide/Unhide — hide/unhide a partition • Set Active — set an active partition • Resize Root — resize FAT16 partition root • Change Bytes per i-node — resize i-node table (Linux Ext2/Ext3) • Change Cluster Size — change FAT16/FAT32 partition cluster size • Change Type — change partition type • Recover — recover deleted or damaged partitions (see Chapter 6Chapter 7 «Working with Acronis Recovery Expert»).
Beginning The Work 3.4.3 Viewing delayed operations All pending operations are added to the pending operations list. You can view it in the Pending Operations window by clicking Operations Show: Pending operations list This organization enables you to control all planned operations, double-check your intended work, and undo operations fully or partially, if needed. 3.4.
Beginning The Work You can always change any operation parameter, including type, file system, size, location, etc. before performing the operation. Using Change type, Convert, Move, Resize, and similar operations, you will also see that your actions do not result in creating new pending operations. These actions will only change the existing pending operation parameters.
Beginning The Work 3.4.7 Wizard operations Pending partition operations created by Acronis Disk Director Server wizards differ in that a user must provide a list of operation parameters to perform them. Each parameter is entered on a separate wizard page. Entering operation parameters, you change wizard pages using Back and Next buttons until you reach the Preview page with the Finish button. On the Preview wizard page, you can click Back to return and change any operation parameter.
Beginning The Work Acronis Disk Director Server shows the wizard and its results as a user action by creating the list of operations. Any pending actions can be fully undone by any of the mentioned methods, i.e. pressing Undo Last Action will undo a user action and all operations planned by the wizard. 3.5 Protecting Acronis Disk Director Server With A Password You should always be aware of possible unauthorized access to your data.
Beginning The Work 3.6 Viewing logs Acronis Disk Director Server allows users to view its working logs. They provide information about partition operations, including reasons for failure, if any. To invoke the log window, select Show log on the toolbar or from the Tools menu. The log browsing window contains two panes: the left one features the log list, while the right one shows selected log contents. The left panel can contain up to 50 logs.
Automatic Partition Operations Chapter 4. Automatic Partition Operations The «Automatic partition operations» mode enables you to perform the following typical operations: • Create a new partition • Increase partition free space • Copy a partition Recover partitions These operations are performed with wizards, enabling you to enter operation parameters step-by-step and return to any step as needed. Each parameter is provided with detailed instructions.
Automatic Partition Operations Partition creation method selection window 2. If you want to create a partition using unallocated disk space: 1. Set the switch to Unallocated space. 2. The wizard will offer to create a partition on the largest unallocated area. For example, if you have 5 GB and 12 GB unallocated areas, the wizard will offer to create a partition on the 12 GB area.
Automatic Partition Operations 4. On the next wizard page, select partition type — Active (Active Primary), Primary or Logical. 5. Typically Primary is selected to install an operating system to a partition. If the partition is for data storage, select Logical. 6. Select Active if you want to install an operating system on this partition to boot at startup. Note that if you enter a size of more than 2 GB, you will not be able to use the FAT16 file system on this partition.
Automatic Partition Operations Partition file system selection window Selecting a partition file system results in partition formatting, i.e. creating partition data storage structures – boot record, file allocation table, etc. 8. On the next wizard page, you will be asked to select a partition letter. Partition Logical Drive Letter selection window At startup, an operating system assigns letters (C:, D:,…) to partitions.
Automatic Partition Operations Hard disk partitions are not only assigned letters, but are also numbered. That means some operating system partitions are assigned letters and numbers, in others, only numbers. Create-, delete- and move-partition operations, as well as hiding/unhiding a partition and direct letter change may result in problems running applications, opening files (as some shortcuts become unusable) or booting an operating system.
Automatic Partition Operations Assigning a partition a new letter or hiding it will prevent only its applications and files from running or opening. Other partitions will not be affected by these operations. OS startup problems may appear if you directly change the letter assigned to the system partition or a partition with PAGEFILE.SYS swap file.
Automatic Partition Operations 2. On the Select Hard Disk Drive wizard page, select a disk on which to create a partition. Partition disk selection page Note that this wizard page represents physical disks actually connected to your PC. The next page shows logical disks (or partitions) on the selected physical disk. See also Appendix B «Glossary» — «Physical disk», «Logical disk». 3.
Automatic Partition Operations The window of existing partition selection to create a new partition By creating a partition using the free space of other partitions, Acronis Disk Director Server can collect it in such a way that the final partition size is not smaller than 110% of data-occupied space. When creating a partition with the switch set to Free space of the existing partitions, you provide a small partition size.
Automatic Partition Operations In this case, you will have to return to the previous wizard page and select a different partition from which to take the necessary space. 4 On the Partition Size wizard page, enter the size of the created partition (the wizard automatically determines minimum and maximum partition sizes). Created partition size window 5 The next wizard pages provide partition type, file system, letter (if you work in Windows NT/2000/XP), and optional labeling.
Automatic Partition Operations Click Finish on the last wizard page to allow Acronis Disk Director Server to create a pending operation list for new partition creation (these actions may only modify an existing operation. See 3.4.5 «Modifying pending operations»). 4.
Automatic Partition Operations «Enlarging a partition at the expense of another partition» is described above: see 4.1 «Creating A New Partition». Selecting a partition to use to increase free space 4. On the next wizard page, you will see the maximum size available for the selected partition. You must select the size yourself. Entering the size to increase partition free space 30 Copyright © Acronis, Inc.
Automatic Partition Operations Note that although selected partition size is increased at the expense of other partition space, unallocated space also will be used if needed. Unallocated space is automatically considered to be the maximum partition size. 5. In the last Preview wizard window, you will see a graphical representation of the new partition structure, including the resized partition.
Automatic Partition Operations Selecting a partition to copy 3. On the next Partition Location wizard page, a record of copied partition parameters will be created. The page for selecting a disk location for partition copy You will have to select a copy location on one of the disks, among existing partitions. To make your selection, click before or after a partition to mark where you want to locate the copy. In this example, the copy will be located before the PROGRAM(H:) partition in the figure below.
Automatic Partition Operations The copy will be located after the PROGRAM(H:) partition in the figure below. The figure below shows the result of locating a partition copy after clicking after the PROGRAM(H:) partition. You can locate a copy anywhere on your disk(s). The copy partition wizard will automatically perform all necessary operations, even if it has to resize or move other partitions. 1. The selected disk might lack space for a copy.
Automatic Partition Operations The page to select a partition, which will be partly used for a copy location If you do not select a partition to be partly used as the copy location on the Select Partitions wizard page and there is not enough unallocated disk space, you will see an error message: Error message showing not enough disk space for a partition copy In that case, the wizard will prompt you to select a partition from which to take some space.
Automatic Partition Operations The page for partition copy size selection The minimum copy size is determined by the data area size of a copied partition. The maximum size is determined by the available disk space. It includes the space taken from a partition and unallocated disk space. By copying a partition at the expense of existing partition free space, Acronis Disk Director Server can take the partition space to make sure that partition size is not smaller than 110% of data-occupied space. 3.
Manual Partition Operations Chapter 5. Manual Partition Operations Unlike the «Automatic partition operations» mode (see 3.1), the «Manual partition operations» mode is intended for experienced users only, and offers much wider operation lists. Manual operation parameters are entered in the dialog boxes. To switch to the «Manual partition operations» mode, select View -> Manual mode. 5.
Manual Partition Operations 3. In the Create Partition window, enter a partition label and select a file system and partition type (Primary — Logical) from the list; you can also enter partition size and location using a mouse or by direct input to Partition size, Unallocated space before (and Unallocated space after) fields. As a rule, Primary is selected if a partition is to contain an operating system. If a partition is meant for data storage, Logical should be selected.
Manual Partition Operations 1. Select a hard disk and a partition to copy. Selecting a partition to copy 2. Select Disk Copy or a similar item in the Operations sidebar list or click the selected partition to another free space on the toolbar. 3. Acronis Disk Director Server will automatically compare the size of a copied partition and disk free space as shown in the Copy Partition window.
Manual Partition Operations 4. 5. Select the unallocated disk space to copy a selected partition to it. In the next wizard page, enter partition copy type (Logical — Primary), size and location. While copying a partition, you might have to change its type. For example, you have to copy a primary partition, but there are already four primary partitions on the disk. You will be able to copy it only as a logical partition.
Manual Partition Operations For example, Windows 98/Me, unlike Windows NT/2000/XP, does not let users assign random letters to partitions, so you must move a partition to assign it the necessary letter. • Work with some older OS (MS-DOS, Windows NT 4.0), that can boot only from binary partitions located in the beginning of the disk • Speed up partition operations For example, you might have a special partition for a swap file.
Manual Partition Operations Unallocated space available for partition moving Note that the unallocated space is smaller than moved partition size, but its data area is smaller than unallocated space. Therefore, moving the partition with its data intact is possible. If there is not enough free space to copy a partition on a hard disk, no unallocated space will be available for selection. 4. Select free space to move the selected partition to. 5.
Manual Partition Operations Entering moved partition parameters The size and location of a partition copy can be provided with a mouse click or by entering data into the Unallocated space before, Partition size (and Unallocated space after) fields. 6. By clicking OK in the Move partition window, you'll add a pending operation to partition moving (your actions may only undo or modify already existing operation; see 3.4.5 «Modifying pending operations»).
Manual Partition Operations If you need to resize and/or move a partition: 1. Select the hard disk and a partition to be resized. 2. Select Disk Resize or a similar item in the Operations sidebar list, or click Resize/move the selected partition on the toolbar. 3. Resize the partition in the Resize Partition window: (1) Hold the mouse button and drag a corresponding partition rectangle side until you get the proper size in the Partition size field.
Manual Partition Operations Acronis Disk Director Server features a wizard for performing more complex partition resizing (see 4.2 «Increasing Partition»). Simple partition resizing lets you increase partition size only if there is free (unallocated) space before or after a partition. The wizard lets you perform more complex operations such as increasing partition free space at the expense of other partitions.
Manual Partition Operations Selecting folders to be moved 4. Distribute the source partition free space between the two resulting partitions. Distributing the source partition free space Please keep in mind, that you are distributing not overall partition size, but just free space at this step. The program will automatically count how much space is necessary for the folders being moved to the new partition, and will add the specified free space share to that size.
Manual Partition Operations 5. By clicking Proceed, you'll add a pending operation (your actions may only undo or modify already existing operation; see 3.4.5 «Modifying pending operations»). The new partition structure will be graphically represented in the Acronis Disk Director Server main window. 5.1.6 Merging partitions You can merge two partitions, even if their file systems are different. All data will stay intact and reside on the resulting partition.
Manual Partition Operations Merging an NTFS partition to a partition with file system not supporting security options (for example, FAT32 partition), will result in loss of security settings (partition ownership data and access permissions). With the opposite action (merging a non-secured partition to the secured one), the target partition security settings will be assigned to the resulting partition. 5.1.
Manual Partition Operations The Explore operation shows the real partition contents, read from the disk. If there are some operations pending, like splitting a partition, you will not be able to explore partitions until the operations are committed or canceled. However, operations on folders/files in Explore window are executed immediately. 4. 5.1.8 When you’re finished exploring, click OK. Changing partition labels The partition label is an optional attribute.
Manual Partition Operations 2. Select Disk Format or a similar item in the Operations sidebar list, or click Format the selected partition on the toolbar. 3. Enter the partition label in the Format Partition window. Format Partition window 4. Select a file system to be created on a partition after formatting. Acronis Disk Director Server supports the following file systems (see A.
Manual Partition Operations 5.1.10 Deleting a partition After a partition is deleted, its space is added to unallocated disk space. It can be used for a new partition or to resize an existing partition. If you need to delete a partition: 1. Select a hard disk and a partition to be deleted. 2. Select Disk Delete or a similar item in the Operations sidebar list, or click Delete the selected partition on the toolbar. 3.
Manual Partition Operations Attention! Deleting a partition destroys all its data, including files and folders! Deleting a system partition will make a PC inoperable. Take special care when performing this operation. Deleting a partition Windows 98/Me can change the order of letters assigned to other partitions. As a result, some shortcuts might stop working. A detailed discussion of partition letter assignment rules for various operating systems appears in 4.1 «Creating A New Partition». 5.1.
Manual Partition Operations Partition check results window 5.1.12 Defragmenting a partition Defragmentation is reorganizing file storage on a hard disk partition. Defragmentation is the process of eliminating file fragmentation, which causes files to be spread across the disk after operations. File fragmentation significantly reduces PC and server performance, especially when intensive I/O operations are taking place.
Manual Partition Operations Run partition defragmentation window 4. Defragmentation results are shown in the Defragment Partition window. Partition defragmentation results window 5.1.13 Wiping unallocated hard disk space PC hard disks can contain a substantial amount of confidential information. Often users forget that private information must be completely destroyed to avoid unauthorized access to it — simply deleting an old file is not sufficient. Windows tools do not guarantee data destruction.
Manual Partition Operations 2. Select Disk Wipe or a similar item in the Operations sidebar list, or click the selected unallocated space on the toolbar. 3. In the Wipe Unallocated Space window, enter a number of disk passes (up to 99), Wipe For information about the Acronis Disk Director Server data wiping algorithm see the commentary for 5.1.10 «Deleting a partition». Hard disk passes number window 4. By clicking OK, you'll add a pending operation of unallocated disk space wiping. 5.1.
Manual Partition Operations Hard disk clearing parameters window 4. By clicking OK, you'll add a pending operation of hard disk clearing. Deleting hard disk partitions does not destroy disk sector contents. They can be restored by special means, if needed. Therefore, if you need to destroy confidential information, set the switch to Delete partitions and destroy data! For information about the Acronis Disk Director Server data wiping algorithm see the commentary for 5.1.10 «Deleting a partition».
Manual Partition Operations Change letter window 4. By clicking OK in the Change letter window, you'll add a pending operation to partition letter assignment (your actions may only undo or modify already existing operation; see 3.4.5 «Modifying pending operations»). The new partition structure will be graphically represented in the Acronis Disk Director Server main window. Only Windows NT/2000/XP lets you change letters assigned to partitions. Windows 98/Me assigns letters to partitions automatically.
Manual Partition Operations The main difference between FAT32 and FAT16 is the support of higher-capacity folders, files and disks, and more flexible root organization that features unlimited size and long file-name support. (For more details see A.9 «File System Main Specifications».) Converting FAT16 to FAT32 You would convert a FAT16 partition to FAT32 in the following cases: 1. If you need a partition larger than 2 GB. 2.
Manual Partition Operations If you need to hide a partition: 1. Select a disk and a partition to hide in the list in the Acronis Disk Director Server main window. 2. Execute operation of partition hiding by selecting Disk Advanced Hide or a similar item in the Advanced sidebar list, or by clicking Hide the selected partition on the toolbar (or select it from partition or the graphical representation context menu). 3.
Manual Partition Operations 2. Select Disk Advanced Unhide or a similar item in the Advanced sidebar list, or click Unhide the selected partition on the toolbar (or select it from partition or the graphical representation context menu). 3. By clicking OK in the Unhide Partition window, you'll add the pending operation to partition unhiding (your actions may only undo or modify an existing operation, See 3.4.5 «Modifying pending operations»).
Manual Partition Operations Set Active Partition 3. By clicking OK in the Set Active Partition window, you'll add the pending operation of setting active partition (your actions may only undo or modify an existing operation. See 3.4.5 «Modifying pending operations»). The new partition structure will be graphically represented in the Acronis Disk Director Server main window. The partition will be marked Act in the Flags field.
Manual Partition Operations 3. Enter the new root size (a number of elements) in the Resize Root window. Resize FAT16 root window FAT16 can contain a maximum of 65,520 elements. 4. 5.2.7 By clicking OK, you'll add the pending operation of FAT16 partition root resizing (your actions may only undo or modify an existing operation. See 3.4.5 «Modifying pending operations»).
Manual Partition Operations Cluster size window 4. 5.2.8 By entering a new cluster size and clicking OK in the Cluster Size window, you'll add the pending operation of cluster resizing (your actions may only undo or modify an existing operation, See 3.4.5 «Modifying pending operations»). Changing partition type Each partition record includes the «partition type field». It is a hexadecimal value that defines the file and operating system suitable for a partition.
Manual Partition Operations Partition type window 4. By clicking OK in the Partition type window, you'll add the pending operation of partition type changing (your actions may only undo or modify an existing operation, See 3.4.5 «Modifying pending operations»).
Manual Partition Operations 2. Select Disk Advanced Change Bytes per i-node or a similar item in the Advanced sidebar list, or click Change the number of bytes per i-node on the toolbar (or select it from partition or the graphical representation context menu). If you select a partition with another file system, mentioned sidebar and context menu items will be unavailable. 3. Enter the new amount of bytes per descriptor (i-node) in the Change bytes per i-node window. Resize i-node window 4.
Working in the command-line mode Chapter 6. Working in the command-line mode Acronis Disk Director Server supports the command-line mode for most important partition operations with diskdirectorcmd.exe utility. Using command-line mode you can: • Create partition • Delete partition • Resize partition. Also you can get information on hard disk partition structure using the command /list. 6.1 Supported commands diskdirectorcmd.
Working in the command-line mode Deletes a partition. Supported options: /partition:[partition number] Specifies the partition will be deleted. The list of available partitions is provided by /list command Partition numbers are specified as , e.g.: /partition: 1-1,1-2,3-1. /resize_partition Resizes the existing partition. Options /partition:[partition number] Specifies the partition number. /size:[partition size in sectors] Sets the new partition size (in sectors).
Working with Acronis Recovery Expert Chapter 7. Working with Acronis Recovery Expert Acronis Recovery Expert allows recovery of hard disk partitions accidentally deleted or damaged due to a hardware or software failure. It uses a wizard interface. You can run Acronis Recovery Expert in the following ways.
Working with Acronis Recovery Expert Acronis Recovery Expert checks to see if your hard disks contain unallocated space. If you have none, then it makes no sense to search for deleted partitions. If you have unallocated space, it may have contained one or more partitions. Acronis Recovery Expert will search unallocated space thoroughly – either automatically or manually. 7.1 Automatic Recovery You can recover deleted partitions automatically or manually.
Working with Acronis Recovery Expert Deleted partitions search progress The information about hard disk partitions is stored in a special disk area – the 1st sector of 0th cylinder, 0th head – called the partition table. This sector is called a boot sector or the master boot record (MBR). Acronis Recovery Expert not only checks the partition table for deleted partitions, but also scans the entire disk surface. Therefore the recovery process might take some time to complete.
Working with Acronis Recovery Expert A deleted partition found Note that you do not have to select partitions for recovery in the automatic mode. Acronis Recovery Expert will recover all partitions found. The Recovered Partitions window shows a partition to recover as a part of hard disk partition structure, marking it with an icon in the upper right corner of its rectangle.
Working with Acronis Recovery Expert If you exit Acronis Disk Director Server without confirming the partition recovery operation, it will be canceled. 7.2 Manual Recovery Set the switch to Manual in the Recovery mode window to select the manual recovery mode. Selecting manual recovery mode The next Searching Method window enables you to select one of two deleted partition searching methods: 1) Fast; 2) Complete.
Working with Acronis Recovery Expert Searching method selection The Searching for Deleted Partitions window shows you parameters of a partition that existed on the selected unallocated space before it was deleted. A deleted hard disk partition found by Acronis Recovery Expert Unlike in the automatic recovery mode, you do not have to wait until the search for deleted hard disk partitions is finished in the manual mode.
Working with Acronis Recovery Expert The manual recovery mode allows you to select all found partitions for recovery. For example, if one of your partitions was deleted intentionally and another by mistake, the manual mode enables you to select and recover only the partition you deleted by mistake. Partitions are selected for recovery by clicking them. Click the partition rectangle to select the deleted partition and continue recovery.
Working with Acronis Disk Editor Chapter 8. Working with Acronis Disk Editor 8.1 General information Acronis Disk Editor is a professional-grade program that performs a variety of actions on a hard disk: restore boot records and files and folder structure, find lost clusters, remove computer virus code from a disk and much more. This program has much to offer a beginner as well. It can be used as an educational tool.
Working with Acronis Disk Editor 8.3 Main Window of the Program The main window shows the numbers of disk and sector where the internal program cursor is positioned. It usually contains information about the work of various modes. Below the main window of the program is the view as partition table mode. The main window in the view as partition table mode To make the information contained in this field sensible, the current sector should be the MBR or the extended partition table.
Working with Acronis Disk Editor The current editing position is shown by the cursor that can be either in the left or right part of the window In this section of the guide, all examples of Acronis Disk Editor’s main window view modes are given for demonstration purposes.
Working with Acronis Disk Editor see that the Save sector item in Edit menu will become enabled as well as the appropriate toolbar button. If you do not save your changes, you effectively reject them. Save sector operation If you have made changes in a hard disk sector and decide to exit the editor without saving them, you will see a warning about saving your changes. Saving modified sector 8.
Working with Acronis Disk Editor Write to a file To read a block from a file and insert it into a disk sector, you must place the cursor on the necessary sector byte and then select Read from file… menu item. The selection of this menu item will result in opening the Read from file window. In this window, enter the file name and its path or locate a file by clicking the Browse… button.
Working with Acronis Disk Editor View menu The editor offers seven view modes: • hex • partition table • FAT16 boot sector • FAT32 boot sector • FAT32 FS info sector • NTFS boot sector • FAT folder 8.7 Search The Search menu allows you to search a hard disk for some line and to go to a disk sector according to its absolute offset. Search Menu Selecting the Search item in the same menu will give you access to functions for searching lines in the disk being edited.
Working with Acronis Disk Editor The Search dialog window A search line can be set both as char and numeric (hexadecimal) values. During a search, you can ignore letter case as well as search for a given line at a given offset inside the sector. During a search, disk data is interpreted according to the encoding selected. If you selected a search mode without letter case matching, not only case but also elements above the characters will be ignored.
Working with Acronis Disk Editor 8.8 Working with Different Encodings The main window of the program features a list of encodings available in Acronis Disk Editor. This list is shown closed and dropped down below. The closed and dropped-down list of encodings The list of encodings is intended for correct interpretation of hard disk sector contents. Selecting the necessary encoding, you will be able to view sector contents correctly.
Bootable Media Builder Chapter 9. Bootable Media Builder 9.
Bootable Media Builder Selecting components to place on the bootable media Acronis Disk Director Server offers the following components: • Disk Director full version Includes support of USB, PC Card and SCSI interfaces along with the storage devices connected via them, therefore is highly recommended. • Disk Director safe version Doesn’t include USB, PC Card, or SCSI drivers. Recommended for use in case of problems with running Full version.
Bootable Media Builder Selecting type of the bootable media 4. If you are creating a CD, diskettes or any removable media, insert the blank disk so the program can determine its capacity. If you chose to create a bootable disk ISO image, specify the ISO file name and the folder where to place it. If you chose to save bootable data on PXE server, specify the server and provide the user name and password to access it. 5.
Hard Disk And File Systems Appendix A. Hard Disk And File Systems These appendices contain additional information about hard disk construction and data storage, partitions, file systems and interaction of operating systems with hard disks. A.1 Hard Disk Organization All hard drives have basically the same structure. Inside the case, there are several disks with a magnetic coating set on a single axis (spindle). A special motor provides the necessary rotation speed to the spindle, e.g.
Hard Disk And File Systems A.2 Hard Disk Partition After low-level formatting creates disk sectors, partitions must be created on the disk. A partition is an area on a hard disk that can be used to install an operating system and/or used as data storage. Creating separate sections on a disk is called partitioning. (Think of slicing a pie into different pieces.) Disk partitions are analogous to separate, physical disk drives and do not depend on each other.
Hard Disk And File Systems • Create a primary partition with a single logical disk • Create an extended partition and divide it into logical partitions (disks) • Set the active partition (a partition to boot an operating system from) Typical hard disk partition structure can look like: MBR Primary partition 1-1. System logical disk C:. Extended partition 1-2. Logical partition 1-5 Logical disk D:. Logical disk E:. Logical disk F:.
Hard Disk And File Systems A.5 Extended Partitions The extended hard disk partition was developed as a way to avoid the four-primarypartitions limit. The extended partition is used only for creating a desired number of logical partitions. An extended partition does not contain any data directly. A.
Hard Disk And File Systems A.8 File Systems The logical structure that has been created on the hard disk is supported by means of the operating system. The file system itself presents the information on the disk as an ensemble of files and folders. For the user, a file is a unit of storage of logically connected information, including texts, graphics, and sound. For data storage organization, a file is a chain of connected sectors or clusters. A cluster is a unit of several sectors.
Hard Disk And File Systems Table 1. Windows file systems. File system FAT16 FAT32 NTFS Operating systems Almost all Windows 95OSR2/98/Me, 2000/XP, Linux Windows NT/2000/XP, Linux (for reading) Max. partition size 4 GB (2 GB for 2 TB 16 EB Max. file size Limited by partition size 4 GB Limited by partition size Max. file-name length 255 255 32767 Restoration (logging) No No Yes Max. files in root Set at formatting Unlimited Unlimited Max.
Hard Disk And File Systems A.9.2 FAT16 The FAT16 file system is widely used by DOS (DR-DOS, MS-DOS, PC-DOS, etc.), Windows 95/98/Me, Windows NT/2000/XP operating systems and is supported by most other systems. Main features of FAT16 are the file allocation table (FAT) and clusters. The FAT is the core of the file system. To increase data safety, it is possible to have several instances of the FAT (there are usually two of them). A cluster is a minimum data storage unit in the FAT16 file system.
Hard Disk And File Systems A.9.3 FAT32 The FAT32 file system appeared in Windows 95 OSR2 and is also supported by Windows 98/Me and Windows 2000/XP. FAT32 grew out of FAT16. The main differences between FAT32 and FAT16 are 28-bit cluster numbers and more flexible root folder implementation, which is not limited in size.
Glossary Appendix B. Glossary Absolute sector. All the sectors of a hard disk can be numbered sequentially, starting with zero. Such numbered sectors are called absolute. Active partition. One of the primary partitions of a hard disk is usually active. Default MBR code tries to boot an operating system from the active partition of the first hard disk. Letter assignment in Microsoft operating systems depends on which partitions are active. Bad cluster. A cluster that contains bad sectors.
Glossary Cylinder. A group of all the tracks on all the magnetic platters of a hard disk that can be accessed without moving the magnetic head. Access to the data inside one cylinder is much faster than moving the head from one cylinder to another. Disc. A non-magnetic storage media (compact disc, CD-RW or DVD). Disk. A magnetic storage media (floppy disk or hard disk). (Note: Disc and Disk are often used interchangeably.) Drive.
Glossary Hidden partition. A partition that is somehow made invisible to the operating system. Usually partitions are hidden by changing their type. Label. An optional name that can be assigned to a partition to simplify its identification. Usually has the same limitation as file names. For example, FAT partitions have labels up to 11 characters long, but may contain spaces. Letter (of a drive, partition). All operating systems that are DOS-compatible use Latin letters to identify drives and partitions.
Glossary MBR can contain not more than one partition entry and one table entry. This simplifies the partition structure greatly – all the logical partitions form one chain. Partition table. It is the table that contains the information about partitions and links to other partition tables. A partition table cannot have more than four entries. The main partition table is located in the hard disk MBR, and the other partition tables are called extended.