
User's Manual
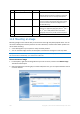
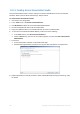
Table Of Contents
- 1 Introduction
- 1.1 What is Acronis® True Image™?
- 1.2 New in this version
- 1.3 Backups created in Acronis True Image 2020 or later
- 1.4 System requirements and supported media
- 1.5 Installing Acronis True Image 2021
- 1.6 Activating Acronis True Image 2021
- 1.7 Trial version information
- 1.8 Upgrading Acronis True Image 2021
- 1.9 Technical Support
- 2 Getting started
- 3 Basic concepts
- 3.1 Basic concepts
- 3.2 The difference between file backups and disk/partition images
- 3.3 Full, incremental and differential backups
- 3.4 Deciding where to store your backups
- 3.5 Using Acronis Nonstop Backup
- 3.6 Backup file naming
- 3.7 Integration with Windows
- 3.8 Wizards
- 3.9 FAQ about backup, recovery and cloning
- 4 Backing up data
- 4.1 Backing up disks and partitions
- 4.2 Backing up files and folders
- 4.3 Backing up mobile devices
- 4.4 Backing up Office 365 data
- 4.5 Backup options
- 4.5.1 Scheduling
- 4.5.2 Backup schemes
- 4.5.3 Notifications for backup operation
- 4.5.4 Excluding items from backup
- 4.5.5 Image creation mode
- 4.5.6 Backup protection
- 4.5.7 Pre/Post commands for backup
- 4.5.8 Backup splitting
- 4.5.9 Backup validation option
- 4.5.10 Backup reserve copy
- 4.5.11 Removable media settings
- 4.5.12 Error handling
- 4.5.13 File-level security settings for backup
- 4.5.14 Computer shutdown
- 4.5.15 Acronis Cloud cleanup
- 4.5.16 Online backup protection
- 4.5.17 Performance of backup operation
- 4.5.18 Selecting a data center for backup
- 4.5.19 Laptop power settings
- 4.5.20 Wi-Fi networks for backup to Acronis Cloud
- 4.6 Operations with backups
- 4.6.1 Backup operations menu
- 4.6.2 Backup activity and statistics
- 4.6.3 Sorting backups in the list
- 4.6.4 Replicating backups to Acronis Cloud
- 4.6.5 Validating backups
- 4.6.6 Backup to various places
- 4.6.7 Adding an existing backup to the list
- 4.6.8 Cleaning up backups, backup versions, and replicas
- 4.6.9 Removing data from Acronis Cloud
- 5 Recovering data
- 5.1 Recovering disks and partitions
- 5.2 Recovering files and folders
- 5.3 Searching backup content
- 5.4 Recovery from Acronis Cloud
- 5.5 Recovering Office 365 data
- 5.6 Recovery options
- 6 Archiving data
- 7 Protecting family data
- 8 Antivirus and antimalware protection
- 9 Synchronizing data
- 10 Disk cloning and migration
- 11 Tools
- 11.1 Acronis Media Builder
- 11.2 Making sure that your bootable media can be used when needed
- 11.3 Acronis Startup Recovery Manager
- 11.4 Try&Decide
- 11.5 Acronis Secure Zone
- 11.6 Adding a new hard disk
- 11.7 Security and Privacy Tools
- 11.8 Mounting an image
- 11.9 Unmounting an image
- 11.10 Working with .vhd(x) files
- 11.11 Importing and exporting backup settings
- 11.12 Acronis Universal Restore
- 12 Troubleshooting
- 13 Glossary of Terms
- Acronis Active Protection
- Acronis Drive
- Acronis Notary
- Acronis Secure Zone
- Acronis Startup Recovery Manager
- Archive
- Archiving operation
- Backup
- Backup operation
- Backup settings
- Backup version
- Backup version chain
- Bootable media
- Data synchronization
- Differential backup
- Differential backup version
- Disk backup (Image)
- Full backup
- Full backup version
- Image
- Incremental backup
- Incremental backup version
- Mobile backup
- Nonstop backup
- Nonstop protection
- Notarization
- Notarized backup
- Notarized file
- Online backup
- Recovery
- Suspicious process
- Sync
- Validation
- Version of synced file
183 Copyright © Acronis International GmbH, 2003-2020
3. [optional step] On the Drive letter step, select a letter to be assigned to the virtual disk from the
Mount letter drop-down list. If you do not want to mount a partition, select Do not mount in the
list or clear the partition's check box.
4. Click Proceed.
5. After the image is connected, the program will run File Explorer, showing its contents.
11.9 Unmounting an image
We recommend that you unmount the virtual disk after all necessary operations are finished, as
maintaining virtual disks takes considerable system resources.
To unmount an image, perform one of the following:
In File Explorer, right-click the disk icon and click Unmount.
Restart or shut down your computer.
11.10 Working with .vhd(x) files
Acronis backups (.tib files) of disks or partitions can be converted to virtual hard disks (.vhd(x) files).
How to use .vhd(x) files
You can boot your computer from the converted .vhd(x) file to test whether the backup is valid
and can be recovered to a bootable operating system.
You can keep a converted .vhd(x) file for emergency situations. For example, if your computer
cannot start and you need to run it right away, you can boot from the .vhd(x) file.
In Windows 7, you can mount a .vhd(x) file as an additional drive. The .vhd(x) file may contain
any partitions – system or non-system.
You can run a converted .vhd(x) file as a virtual machine.
Limitations and additional information
A file backup cannot be converted to a .vhd(x) file.
To boot from a converted .vhd(x) file, it must contain:
System partition of the same computer. You cannot boot other computers using the
same .vhd(x) file.
Windows 7 or later operating system.
Any changes you make to a booted or mounted .vhd(x) file are saved to it. If you boot from
a .vhd(x) file and make changes to the data that was not backed up, these changes will affect
your live system.
The standalone versions of Acronis True Image 2021 that start when booting from the bootable
media do not support conversion operations.
Acronis True Image 2021 cannot convert .tib files that contain dynamic volumes which were
originally located on more than one disk drive (for example, spanned or striped dynamic
volumes).
11.10.1 Converting Acronis backup
Users of the Enterprise and Ultimate editions of Windows 7 and later Windows versions can convert
a .tib image of the system partition into the .vhd(x) format if they want to use the converted .vhd(x)
file for booting the operating system. Or, they may want to get the ability to mount images without
using Acronis True Image 2021.