Table of contents 1 Introduction ....................................................................................................................6 1.1 What is Acronis® True Image™ 2016? .......................................................................................6 1.2 New in this version ....................................................................................................................6 1.2.1 1.3 System requirements and supported media .................................
.9 Wizards ....................................................................................................................................37 4 Backing up data ............................................................................................................. 38 4.1 Backing up disks and partitions ...............................................................................................38 4.2 Backing up files and folders ............................................................
5.4.7 5.4.8 Performance of recovery operation ............................................................................................................ 88 Notifications for recovery operation ........................................................................................................... 88 6 Archiving data................................................................................................................ 91 6.1 What is data archiving? .........................................
11.1.2 Making sure that your rescue media can be used when needed ........................................................... 119 11.2 Acronis Startup Recovery Manager .......................................................................................123 11.3 Try&Decide ............................................................................................................................124 11.3.1 11.3.2 11.3.3 Using Try&Decide ....................................................................
1 Introduction In this section What is Acronis® True Image™ 2016? ....................................................... 6 New in this version..................................................................................... 6 System requirements and supported media ............................................. 7 Installing Acronis True Image 2016 ..........................................................10 Activating Acronis True Image 2016 ........................................................
Recover data from any backup located in Acronis Cloud, including backups from PCs, Macs, and devices running iOS and Android. Resolve some product-related issues. Data archiving—Acronis True Image 2016 scans the folders that you selected and analyzes how often you use your data. Relying on that analysis you will be able to easily transfer the rarely used files to Acronis Cloud. This operation saves the free space on your hard drives and helps keep your data in perfect order.
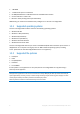
1 GB RAM 1.5 GB of free space on a hard disk CD-RW/DVD-RW drive or USB flash drive for bootable media creation Screen resolution is 1152 x 720 Mouse or other pointing device (recommended) Additionally, you need to have administrator privileges to run Acronis True Image 2016. 1.3.2 Supported operating systems Acronis True Image 2016 has been tested on the following operating systems: Windows XP SP3 Windows 7 SP1 (all editions) Windows 8 (all editions) Windows 8.
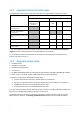
1.3.4 Supported Internet connection types The table below shows which Internet connection types are supported by the product functions.
1.4 Installing Acronis True Image 2016 Installing Acronis True Image 2016 To install Acronis True Image 2016: 1. Run the setup file. Before starting the setup process, Acronis True Image 2016 will check for a newer build on the website. If there is one, the newer version will be offered for installation. 2. Read: The terms of the license agreement. The participation terms of the Acronis Customer Experience Program. 3. If you accept the terms of both documents, click Install.
You can activate Acronis True Image 2016 either on your computer or from another computer, if your computer is not connected to the Internet. Activation on a computer connected to the Internet If your computer is connected to the Internet, the product will be activated automatically.
To reactivate Acronis True Image on your computer, choose from the list the same computer by its old name. 1.6 Trial version information General limitations The trial version of Acronis True Image 2016 works only during the trial period of 30 days. It has the following limitations: Disk cloning is disabled. When booting from an Acronis bootable media, the only available operation is recovery.
Updating Acronis True Image 2016 To update Acronis True Image: 1. Start Acronis True Image 2016. 2. On the sidebar, click Account. If there is a new version available, you will see the appropriate message next to the current build number. 3. Click Download and install. Before you start downloading, please make sure that your firewall won't block the download process. 4. When the new version is downloaded, click Install now.
2 Getting started In this section User interface language ...........................................................................14 Protecting your system ............................................................................14 Backing up all data on your PC .................................................................16 Backing up your files ................................................................................18 Cloning your hard drive...............................................
2.2.1 Step 1. Backing up your computer When should I back up my computer? Create a new backup version after every significant event in your system. Examples of these events include: You bought a new computer. Important system update. You reinstalled Windows on your computer. You configured all system settings (for example, time, date, language) and installed all necessary programs on your new computer.
How many backup versions do I need? In most cases, you need 2-3 backup versions of your entire PC contents or your system disk, with a maximum of 4-6 (see above for information about when to create backups). Remember, the first backup version (the full backup version) is the most important. It is the biggest one, because it contains all data stored on the disk. Further backup versions (the incremental and differential backup versions) may be organized in different schemes.
If you want to back up your system partition only, refer to Backing up disks and partitions (p. 38) for details. When you select Entire PC as a backup type, Acronis True Image backs up all your internal hard drives in disk mode. The backup contains the operating system, installed programs, system settings, and all your personal data including your photos, music, and documents. The recovery from an Entire PC backup is also simplified. You only need to choose the date to which you want to revert your data.
6. [optional step] Click Options to set the options for the backup, including Schedule (p. 42), Scheme (p. 44), and Password protection (p. 52). For more information see Backup options (p. 40). 7. Click Back up now. When you back up your data to Acronis Cloud, the first backup may take a considerable amount of time to complete. Further backup processes will likely be much faster, because only changes to files will be transferred over the Internet. 2.
2.5 Cloning your hard drive Why do I need it? When you see that the free space on your hard drive is not enough for your data, you might want to buy a new, larger hard drive and transfer all your data to the new drive. The usual copy operation does not make your new hard drive identical to the old one. For example, if you open Windows Explorer and copy all files and folders to the new hard drive, Windows will not start from the new hard drive.
3. On the Source Disk step, select the disk that you want to clone. 4. On the Destination Disk step, select the destination disk for the cloned data. If any disk is unpartitioned, the program will automatically recognize it as the destination and bypass this step. 5. On the Finish step, ensure that the configured settings suit your needs, and then click Proceed. By default, Acronis True Image 2016 shuts down the computer after the clone process finishes.
Case 1. How to recover computer if Windows works incorrectly? 1. Start Acronis True Image 2016. 2. On the sidebar, click Backup. 3. From the backup list, select the backup that contains your system disk. The backup can be located on local, network storage, or Acronis Cloud. 4. Depending on the backup type, click Recover PC or Recover disks. 5. In the opened window, select the backup version (the data state from a specific date and time). 6.
5. Select the system partition (usually C) on the What to recover screen. Note that you may distinguish the system partition by the Pri, Act flags. Select the System Reserved partition (if any), as well. 6. You may leave all settings of the partitions without changes and click Finish. 7. Check the summary of operations, and then click Proceed. 8.
5. An email message will be sent to the address you specified. Open this message and confirm your wish to create an account. How to sign in To sign in to your Acronis account: 1. On the sidebar, click Account, and then click Sign in or create an account. 2. Enter your registration email address and password, and then click Sign in. How to sign out To sign out of your Acronis account: 1. On the sidebar, click Account. 2. Click your email address, and then choose Sign out. 2.
If you use the trial version of the product, an unlimited storage space and 30-day free subscription will be assigned to your account automatically. See details in Trial version information (p. 12). Please note that Acronis Cloud is a subject of Fair Usage Policy for holders of Acronis True Image license. See more details at: https://kb.acronis.com/atih2015/fairusage. The full Acronis Cloud subscription is included in Disk Director.
3 Basic concepts In this section Basic concepts ..........................................................................................25 The difference between file backups and disk/partition images ............26 Full, incremental and differential backups ..............................................27 FAQ about backup, recovery and cloning ................................................29 Deciding where to store your backups ....................................................
Back up your old disk drive, and then recover it to the new one. Backup file format Acronis True Image usually saves backup data in the proprietary tib format using compression. The data from .tib file backups can be recovered only through Acronis True Image, in Windows or in the recovery environment. Acronis Nonstop Backup uses a special hidden storage for data and metadata. The backed up data is compressed and split into files of about 1 GB.
2. File system meta data, including service files, file allocation table (FAT), and partition boot record. 3. File system data, including operating system (system files, registry, drivers), user data and software applications. 3. System Reserved partition, if any. 4. EFI system partition, if any (applicable to GPT disk backups only). What is excluded from disk backups? To reduce image size and speed up image creation, by default Acronis True Image 2016 only stores the hard disk sectors that contain data.
1.tib, 2.tib, 3.tib, 4.tib - full backup versions. Additional information A full backup version forms a base for further incremental or differential backups. It can also be used as a standalone backup. A standalone full backup might be an optimal solution if you often roll back the system to its initial state or if you do not like to manage multiple backup versions.
On the other hand, incremental versions require more work for the program to provide recovery. In the example above, to recover the entire work from 4.tib file, Acronis True Image reads data from all backup versions. Therefore, if you lose an incremental backup version or it becomes corrupted, all later incremental versions are unusable.
backup, the program copies both used and unused hard disk sectors and the backup file will usually be significantly larger. Will my system disk backup include drivers, documents, pictures, etc.? - Yes, such a backup will contain the drivers, as well as the contents of the My documents folder and its subfolders, if you kept the default location of the My documents folder. If you have just a single hard disk in your PC, such a backup will contain all of the operating system, applications and data.
3.5 Deciding where to store your backups Acronis True Image 2016 supports quite a few of storage devices. For more information, refer to Supported storage media. The table below shows possible backup destinations for your data.
3.5.1 FTP connection Acronis True Image 2016 allows you to store your backups on FTP servers. To create a new FTP connection, when selecting a backup storage click FTP connection, and in the opened window provide: Path to the FTP server, for example: my.server.com Port User name Password To check your settings, click the Test connection button. The computer will try to connect to the specified FTP server.
3.6 Using Acronis Nonstop Backup Acronis Nonstop Backup provides easy protection of your disks and files. It allows you to recover entire disks, individual files and their different versions. The main purpose of Acronis Nonstop Backup is continuous protection of your data (files, folders, contacts, etc.), though you can use it to protect partitions as well. If you choose to protect an entire partition, you will be able to recover the partition as a whole using the image recovery procedure.
3.6.1 Acronis Nonstop Backup data storage Acronis Nonstop Backup data storage can be created on local hard disk drives (both internal and external). In many cases an external hard disk will be the best choice for Nonstop Backup data storage. You can use an external disk with any of the following interfaces: USB (including USB 3.0), eSATA, FireWire, and SCSI. You can also use an NAS as the storage, but with one limitation - it must be accessible with the SMB protocol.
Rebooting the computer will reset the load and the restart count. If the system overloads again, Acronis Nonstop Backup will pause. Why does Acronis Nonstop Backup sometimes cause a high CPU load? - This is the expected behavior of Acronis Nonstop Backup. This may happen on restart of a paused Acronis Nonstop Backup if a considerable amount of protected data has been modified during the pause.
Acronis True Image 2016 button on the taskbar. The Acronis Recovery tab in the Properties window of a file. Shortcut menu commands. Windows Start menu The Start menu displays Acronis commands, tools and utilities. They give you access to Acronis True Image functionality, without having to start the application. Acronis True Image 2016 button on the taskbar The Acronis True Image 2016 button on the Windows taskbar shows the progress and result of Acronis True Image 2016 operations.
3.9 Wizards When you use the available Acronis True Image 2016 tools and utilities, the program will in many cases employ wizards to guide you through the operations. For example, see the screen shot below. A wizard window usually consists of the following areas: 1. This is the list of steps to complete the operation. A green checkmark appears next to a complete step. The green arrow indicates the current step. When complete all the steps, the program displays the Summary screen in the Finish step.
4 Backing up data In this section Backing up disks and partitions................................................................38 Backing up files and folders .....................................................................39 Backup options.........................................................................................40 Operations with backups .........................................................................59 4.
Acronis Cloud—Sign in to your Acronis account, and then click OK. If you do not have an Acronis account, click Create account, type your email address, password, and then click the Create account button. Refer to Acronis account (p. 22) for details. Your external drive—When an external drive is plugged into your computer, you can select it from the list. Browse—Select a destination from the folder tree.
6. In the opened window, select the check boxes next to the files and folders that you want to back up, and then click OK. 7. Click the Backup destination icon, and then select a destination for backup: Acronis Cloud—Sign in to your Acronis account, and then click OK. If you do not have an Acronis account, click Create account, type your email address, password, and then click the Create account button. Refer to Acronis account (p. 22) for details.
After you have installed the application, all options are set to the initial values. You can change them for your current backup operation only or for all backups that will be created in future. Select the Save the settings as default check box to apply the modified settings to all further backup operations by default. If you want to reset all the modified options to the values that were set after the product installation initially, click the Reset to initial settings button.
4.3.1 Scheduling The Schedule tab allows you to specify the backup and validation schedule settings. You can choose and set up one of the following backup or validation frequencies: Nonstop (p. 33)—The backup will run every five minutes. Monthly (p. 43)—The operation will be executed once a month or several times a month on the selected dates. Upon event (p. 44)—The operation will be executed upon an event. Daily (p. 43)—The operation will be executed once a day or more frequently.
Additionally, you can set a time delay to start backup after the system startup. For example, to start backup 20 minutes after system startup, type 20 in the appropriate box. If you schedule a backup to a USB flash drive or validation of a backup that is located on a USB flash drive, one more check box appears: Run when the current destination device is attached.
4.3.1.4 Upon event execution parameters You can set up the following parameters for the Upon event operation execution: Event User logon – the operation will be executed each time the current user logs on to the OS. System shutdown or restart – the operation will be executed at every computer shutdown or reboot. User logoff – the operation will be executed each time the current user logs off the OS. System startup – the operation will be executed at every OS startup.
Single version (p. 45) - select this scheme if you want to use the smallest backup storage. Differential - select to create only differential backups after an initial full backup. Version chain (p. 45) - this may be the optimal scheme in many cases. Incremental - select to create a full version after every five incremental versions. This is the default scheme. Custom (p. 46) - select to set up a backup scheme manually. You can easily change the backup scheme for a pre-existing backup.
According to the specified schedule (or when you run backup manually) the program creates: 1 full and 6 incremental backup versions, then again 1 full and 6 incremental versions and so on. The versions will be stored for 1 month. After the period the program analyzes if the oldest backup versions may be deleted. It depends on the version chain consistency.
Delete version chains older than [defined period] (available for incremental and differential methods only) - Select this option to limit the age of backup version chains. The oldest version chain will be deleted only when the most recent backup version of this chain is older than the specified period. Store no more than [n] recent versions (available for full method only) - Select this option to limit the maximum number of backup versions.
Examples of custom schemes 1. File backup “Daily incremental version + weekly full version” Case: You have files and/or folders you work with every day. You need to save your daily work results and want to be able to recover data state to any date for the last three weeks. Let’s see how you can do this using a custom backup scheme. 1. Start configuring a file backup. Refer to Backing up files and folders for details. 2.
9. In the Disk Backup window, check that all settings are correct and click Back up now. If you want your first backup to be run only at the time you specified in the Scheduler, click the down arrow to the right of the Back up now button and select Later in the drop down list. 4.3.3 Notifications for backup operation Sometimes a backup or recovery procedure can last an hour or longer. Acronis True Image 2016 can notify you when it is finished via email.
If the test message sending fails, then perform the following: 1. Click Show extended settings. 2. Configure additional email settings: Enter the e-mail sender address in the From field. If you are not sure what address to specify, then type any address you like in a standard format, for example aaa@bbb.com. Change the message subject in the Subject field, if necessary. Select the Log on to incoming mail server check box. Enter the incoming mail server (POP3) in the POP3 server field.
How to use the default exclusion settings After you have installed the application, all the exclusion settings are set to the initial values. You can change them for your current backup operation only or for all backups that will be created in future. Select the Save as default check box to apply the modified settings to all further backup operations by default.
4.3.4.1 Excluding online data Before you start a backup, you can reduce the backup size by excluding data that does not need to be backed up. Acronis True Image 2016 now allows you to exclude your local data that is uploaded or synchronized with third-party Cloud services, such as Dropbox or Microsoft OneDrive. This data is already reliably protected and can be easily downloaded to your computer. Therefore you can exclude it to reduce the backup size and to speed up the backup process.
4. Having specified the backup settings, click OK. How to get access to a password-protected backup Acronis True Image asks for the password every time you try to modify the backup: Recover data from the backup Edit settings Delete Mount Move To access the backup, you must specify the correct password. 4.3.7 Pre/Post commands for backup You can specify commands (or even batch files) that will be automatically executed before and after the backup procedure.
4.3.8 Backup splitting Acronis True Image 2016 cannot split already existing backups. Backups can be split only when being created. Large backups can be split into several files that together make up the original backup. A backup can also be split for burning to removable media. The default setting - Automatic. With this setting, Acronis True Image 2016 will act as follows.
4.3.10 Backup reserve copy Backup reserve copy is an independent full backup version created immediately after a normal backup. Even when you create an incremental or differential backup version containing only data changes, the reserve copy will contain all the data selected for the normal backup. You can save reserve copies of your backups on the file system, a network drive, or a USB flash drive. Please, be aware that CD/DVDs are not supported as locations for reserve copies. To make a reserve copy: 1.
4.3.12 Backup comment This option allows you to add comments to the backup. Backup comments may help you to find the necessary backup later, when recovering data by using bootable media. If a backup does not have comments, type your comment in the comments area. When a comment already exists, you can edit it after clicking Edit. 4.3.
To eliminate this kind of problem, you can disable preserving file security settings in backups. Then the recovered files/folders will always inherit the permissions from the folder to which they are recovered (parent folder or disk, if recovered to the root). Or, you can disable file security settings during recovery, even if they are available in the backup. The result will be the same.
Select the Store no more than … recent versions check box and enter a value that limits the maximum number of all versions in the storage. 4.3.17 Online backup protection To protect your data on Acronis Cloud from unauthorized access, you can use encryption. In this case, your data will be stored on Acronis Cloud in an encrypted form. To encrypt and decrypt your data, the program needs the password, that you should specify when you configure the online backup.
To select a data center: 1. On the Online Backup Options screen, click Advanced, and then click Data center. 2. Select the country that is closest to your current location. 4.3.19 Performance of backup operation Compression level You can choose the compression level for a backup: None - the data will be copied without any compression, which may significantly increase the backup file size. Normal - the recommended data compression level (set by default).
4.4.1 Backup operations menu The backup operations menu provides quick access to additional operations that can be performed with the selected backup. The backup operations menu can contain the following items: Edit settings - allows editing of the current backup settings. Reconfigure (for online backups) - allows you to bind a selected online backup to the current computer. To do this, click this item and reconfigure settings of the backup.
4.4.2 Backup list icons While working with the backup list you will see special icons. The icons give you the following information: Backup type Backup current state Backup type icons Entire PC backup Disk-level backup File-level backup Nonstop backup Backup state icons The last backup failed. The backup is in progress. The last backup was paused by user. The last backup was stopped by user. 4.4.
Validating backups in Windows To validate an entire backup: 1. Start Acronis True Image 2016, and then click Backup on the sidebar. 2. From the backup list, select the backup to validate, click Operations, and then click Validate. Validating backups in a stand-alone version of Acronis True Image (bootable media) To validate a specific backup version or an entire backup: 1. On the Recovery tab, find the backup that contains the version that you want to validate.
4.4.5 Adding an existing backup to the list You may have Acronis True Image backups created by a previous product version or copied from another computer. Every time you start Acronis True Image 2016, it scans your computer for such backups and adds them to the backup list automatically. If you have backups that are not shown in the list, you can add them manually. To add backups manually: 1. In the Backup section, click Add backup, and then click Add existing backup.
2. In the Recovery section, click Refresh backups. This will update the backup list. If you cannot find the target backup in the list, or the backup is located on removable media, click Browse for backup, and provide the path to the backup. 3. Depending on type of the backup, go to the Disk backups or File backups tab. 4. Right-click the backup version that you want to delete, and then click Remove. The opened window displays the list of backup versions that will be deleted.
One-time cleanup When your Acronis Cloud is full or is running out of space, we recommend that you use the cleanup tool in Acronis Cloud web application. This tool allows you to free up considerable amount of space on the cloud fast and easy. To clean up Acronis Cloud: 1. Start Acronis True Image 2016 and click Recover on an online backup box. You will be taken to the Acronis Cloud web application. 2. On the Storage status tab, click the Clean up space link in the center of the screen. 3.
5 Recovering data In this section Recovering disks and partitions ...............................................................66 Recovering files and folders .....................................................................79 Recovery from Acronis Cloud ...................................................................80 Recovery options......................................................................................86 5.
Scan the computer for viruses if you suspect that the crash occurred due to a virus or malware attack. Under bootable media, try a test recovery to a spare hard drive, if you have one. Validate the image under bootable media. A backup that can be read during validation in Windows, may not always be readable in a Linux environment.
4. On the Home screen, select My disks below Recover. 5. Select the system disk or partition backup to be used for recovery. When the backup is not displayed, click Browse and specify path to the backup manually. 6. Select Recover whole disks and partitions at the Recovery method step. 7. Select the system partition (usually C) on the What to recover screen. If the system partition has a different letter, select the partition using the Flags column. It must have the Pri, Act flags.
In case of Windows 7 the System Reserved partition will have the Pri, Act flags. You will need to select for recovery both the System Reserved partition and the System partition. 8. At the "Settings of partition C" (or the letter of the system partition, if it is different) step check the default settings and click Next if they are correct. Otherwise, change the settings as required before clicking Next. Changing the settings will be needed when recovering to the new hard disk of a different capacity. 9.
10. When the operation finishes, exit the standalone version of Acronis True Image 2016, remove the rescue media and boot from the recovered system partition. After making sure that you have recovered Windows to the state you need, restore the original boot order. 5.1.1.4 Recovering your system to a new disk under bootable media Before you start, we recommend that you complete the preparations described in Preparing for recovery (p. 66).
9. On the What to recover step, select the boxes of the partitions to be recovered. Do not select the MBR and Track 0 box. Selecting partitions leads to appearance of the relevant steps "Settings of partition ...". Note that these steps start with partitions which do not have an assigned disk letter (as usually is the case with hidden partitions). The partitions then take an ascending order of partition disk letters. This order cannot be changed.
Type. Check the partition type and change it, if necessary. Ensure that the System Reserved partition (if any) is primary and marked as active. Size. Click Change default in the Partition size area. By default the partition occupies the entire new disk. Enter the correct size in the Partition size field (you can see this value on the What to recover step). Then drag this partition to the same location that you saw in the Backup Information window, if necessary. Click Accept. 11.
Specify the partition size, which by default equals the original size. Usually there is no free space after the partition, so allocate all the unallocated space on the new disk to the second partition. Click Accept, and then click Next. 12. Carefully read the summary of operations to be performed and then click Proceed. If your original disk contains a hidden partition created by the PC manufacturer, please proceed to MBR recovery.
Selecting target disk for MBR recovery In this window you should select a hard disk for recovering the Master Boot Record (MBR) along with track 0. Recover disk signature check box If you have selected MBR recovery at the Content selection step, the Recover disk signature check box will be in the bottom left corner. Disk signature is a part of a hard disk MBR. It is used for uniquely identifying the disk media.
4. In the Backup version list, select the backup version you want to recover by its backup date and time. 5. Select the disks to recover. If you need to recover separate partitions, click Recover specific partitions, and then select the partitions to recover. 6. In the recovery destination field below the partition name, select the destination partition. Unsuitable partitions are marked by red lettering.
5.1.2.1 Partition properties When you recover partitions to a basic disk, you can change properties of these partitions. To open the Partition Properties window, click Properties next to the selected target partition. You can change the following partition properties: Letter Size You can resize the partition by dragging the right-side border with your mouse, on the horizontal bar on the screen.
Basic volume or disk. The target volume remains basic. Bare-metal recovery. When performing a so called "bare-metal recovery" of dynamic volumes to a new unformatted disk, the recovered volumes become basic. If you want the recovered volumes to remain dynamic, the target disks should be prepared as dynamic (partitioned and formatted). This can be done using third-party tools, for example, Windows Disk Management snap-in.
Your old and new hard drives work in the same controller mode (for example, IDE or AHCI). Before you start the procedure, please ensure that you have: Bootable rescue media. Refer to Creating bootable rescue media (p. 16) for details. Backup of your system disk created in disk mode. To create this backup, switch to disk mode, and then select the hard drive that contains your system partition. Refer to Backing up disks and partitions (p. 38) for details.
To boot from Acronis bootable media: 1. If you use a USB flash drive as a bootable media, plug it into the USB port. 2. Turn your computer on. During the Power-On Self Test (POST), you will see the key combination that you need to press in order to enter BIOS. 3. Press the key combination (such as, Del, F1, Ctrl+Alt+Esc, Ctrl+Esc). BIOS setup utility will open. Note that BIOS may differ in appearance, sets of items, names, etc.
5. Select backup version (data state on specific date and time). 6. Select the files and folders that you want to recover, and then click Next. 7. Select a destination on your computer to where you want to recover selected files/folders. You can recover data to its original location or choose a new one, if necessary. To choose a new location, click the Browse button. When you choose a new location, the selected items will be recovered by default without recovering the original, absolute path.
Disk recovery from Cloud .........................................................................82 5.3.1 Recovering data from online backups With Acronis True Image 2016 you can browse and recover data that was backed up on Acronis Cloud. If you have backed up data from several computers, select the online backup box for the computer from which you backed up the data you want to recover. To recover files and folders from Acronis Cloud: 1. Start Acronis True Image 2016. 2. On the sidebar, click Backup.
1. In the backup contents, select the file which version you want to recover, then click the gear icon at the right-hand side. Select View versions in the opened menu. 2. In the window that appears, select the required version and then click Recover. 3. Select the version to which you want to rollback. The version's exact date and time will be displayed. Your current version will be reverted to the state it was at that point in time. 4. Click Recover to proceed.
What if recovery has been interrupted Since disk recovery from Acronis Cloud uses an Internet connection and usually takes a long time, the probability of the recovery interruption is higher comparing to recovery from an ordinary hard disk. Possible reasons of recovery interruption: Internet connection has been lost. Connection to Acronis Cloud has been lost. You canceled the recovery, deliberately or accidentally. Electricity supply problem.
3. On the Home screen, select My disks below Recover. 4. To add the online backup of the system disk or system partition to the list of available backups, click Browse. 5. In the directory tree of the opened window, select Acronis Cloud and enter credentials of your Acronis account. 6. Select the backup you want to use for recovery, and click OK.
7. On the Archive selection step, select the online backup and click Next. 8. On the Recovery method step, select Recover whole disks and partitions. 9. On the What to recover step, select the system partition (usually C) and the System Reserved partition (if any). You can also recognize these partitions by the Pri, Act flags. 10. On the "Settings of partition C" (or the letter of the system partition, if it is different) step, change the settings, if necessary.
12. When recovery is complete, exit the standalone version of Acronis True Image 2016, remove the rescue media. Boot from the recovered system partition. After you check that you have recovered Windows to the state you need, restore the original boot order. 5.4 Recovery options You can configure options for the disk/partition and file recovery processes. After you installed the application, all options are set to the initial values.
5.4.2.1 Edit user command for recovery You can specify user commands to be executed before or after recovery: In the Command field type-in a command or select it from the list. Click ... to select a batch file. In the Arguments field enter or select command execution arguments from the list. In the Working directory field type-in a path for command execution or select it from the list of previously entered paths.
Selecting the Overwrite existing files check box will give the files from the backup unconditional priority over the files on the hard disk, though, by default, the more recent files and folders are protected against overwriting. If you want to overwrite those files and folders too, clear the appropriate check box. If you do not need to overwrite some files: Select/clear the Hidden files and folders check box to enable/disable overwriting of all hidden files and folders.
By default all notifications are disabled. Free disk space threshold You may want to be notified when the free space on the backup storage becomes less than the specified threshold value. If after starting a backup Acronis True Image 2016 finds out that the free space in the selected backup location is already less than the specified value, the program will not begin the actual backup process and will immediately inform you by displaying an appropriate message.
Set the port of the incoming mail server. By default the port is set to 110. 3. Click the Send test message button again. Additional notification settings: To send a notification concerning process completion, select the Send notification upon operation's successful completion check box. To send a notification concerning process failure, select the Send notification upon operation failure check box.
6 Archiving data In this section What is data archiving? ............................................................................91 Data archiving vs. Online backup .............................................................91 Archiving your data ..................................................................................92 Accessing your archived files ...................................................................92 6.
Online backup Data archiving Feature purpose Data protection from operating system corruption, hardware failures, and loss of separate files. Cleanup of local storage device and moving data to Acronis Cloud. Data protection Overall protection of all data on a Protection of rarely used and old files, mostly your personal documents, photographs, and so on. computer, especially an operating system. Protection of frequently used files. Source data selection Manual selection.
Windows Explorer Start Windows Explorer, and then click Acronis Archive under Favorites. You can work with the files as if they were stored on an ordinary hard drive. Acronis Cloud Open the Acronis Cloud web application in one of the following ways: 93 Start Acronis True Image 2016, click Archive, and then click In your web browser. Go to https://www.acronis.com/my/online-backup/, log in to your account, and then click Recover my data now.
7 Protecting family data In this section What is family data protection? ..............................................................94 Adding a new device ................................................................................94 Backing up any computer ........................................................................94 Recovering data with Online Dashboard .................................................95 7.
Cloud. These default settings cannot be changed with the web app. If you need to customize the settings, start Acronis True Image 2016 on this device and configure the backup manually. To back up any computer: 1. Open Online Dashboard at: https://cloud.acronis.com. 2. Sign in with your Acronis account. 3. On the Devices tab, find the device that you want to back up. If the device is offline, make sure that it is turned on and connected to the Internet. 4.
8 Synchronizing data In this section About the Sync feature ............................................................................96 How we ensure security of your data ......................................................96 What you can and cannot synchronize ....................................................96 Sync icons .................................................................................................97 Sync creation ................................................................
Two or more folders on two or more computers. A mobile device and Acronis Cloud. See details in What is True Image for mobile devices (p. 103). One or more computers and Acronis Cloud. Acronis Cloud always contains the last versions of the synced files. At the same time you cannot select a folder on Acronis Cloud to participate in a sync, such folder is created automatically. Within one sync process you may assign only one sync folder on every computer.
The file or folder is synchronized. The file or folder is being synced at the moment. The file or folder has not been synchronized because of an error. Sync type icons for synced folders: Your default sync. Sync with Acronis Cloud. Sync between computers synced through a local area network. 8.5 Sync creation Before you begin a new sync creation, please make sure that the following conditions are met: You have an Acronis account and a subscription to the Acronis Cloud service.
As long as Acronis True Image 2016 is installed, you cannot delete the default sync folder. If you delete the folder, for example, using Windows Explorer, it will be recreated during the next program start. The contents of the default sync folder automatically sync with the default sync folders on other computers registered under the same Acronis account. It also automatically syncs with your mobile devices that have True Image app installed.
3. When the appropriate dialog appears, choose which versions you want to delete: All versions. Versions older than one month. Versions older than one week. The program shows how much space will be freed up. Be careful! Deleted versions cannot be restored. 4. Clicking Advanced cleanup allows you to select more cleanup rules. You can apply the cleanup rules for: individual syncs and online backups all syncs and online backups you have on Acronis Cloud 5.
8.8 How to recover a deleted file Sometimes you may delete a file from a sync by mistake. Then, you need to recover the deleted file. This may be possible for the syncs that keep file versions on Acronis Cloud. One condition - the deleted file must not be removed during Cloud clean-up. To recover a deleted file: 1. Start Acronis True Image 2016. 2. On the sidebar, click Sync, select the sync that contains the file to recover, and then click the Acronis Cloud link. 3.
2. Click Synchronization in the left-hand side of the screen. The Computers tab in the Manage synchronization area is displayed by default. 3. Click Unlink to the right of the name of the computer you want to unlink. 4. Click OK in the confirmation message. Unlinking the computer: 102 Removes it from the Computers list. Removes it from all syncs in which the computer participates. Blocks the sync participant certificate.
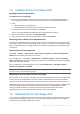
9 Acronis True Image for mobile devices Acronis Cloud might be unavailable in your region. For more information, click here: http://kb.acronis.com/content/4541 Acronis True Image for mobile devices allows you to back up your data to Acronis Cloud, and then recover it in case of loss or corruption. Note that Acronis True Image for mobile devices requires a subscription to Acronis Cloud, so you need to subscribe to Acronis Cloud, first.
9.2 Backing up your mobile device A mobile backup is your guarantee that your data on your mobile device is safe and can be recovered in case of corruption or loss. You can also use the backup to transfer your personal data and settings from your old smartphone to a new one. To back up data on your mobile device: 1. 2. 3. 4. 5. Start Acronis True Image. Sign in to your Acronis account. Select the data categories that you want to back up. Tap Back up now.
2. Sign in to your Acronis account. Acronis True Image detects that there are mobile backups in Acronis Cloud. 3. Tap Recover data. 4. Select the mobile device to recover your data from, and then tap Select. For example, if you want to transfer your data from your old smartphone, select it. 5. Select the data categories that you want to recover, and then tap Recover. 6. Allow Acronis True Image access to your personal data. When the recovery is complete, your data is downloaded to your new device. 9.
10 Disk cloning and migration This operation copies the entire contents of one disk drive to another disk drive. This may be necessary, for example, when you want to clone your operating system, applications, and data to a new, larger capacity disk. You can do it two ways: Use the Clone disk utility (p. 106). Back up your old disk drive, and then recover it to the new one (p. 70). In this section Disk cloning utility ..................................................................................
If the program finds two disks, one partitioned and another unpartitioned, it will automatically recognize the partitioned disk as the source disk and the unpartitioned disk as the destination disk. In such case, the next steps will be bypassed and you will be taken to the cloning Summary screen. 3. On the Source Disk step, select the disk that you want to clone. Acronis True Image 2016 does not support cloning of dynamic disks. 4.
8. On the Finish step, ensure that the configured settings suit your needs, and then click Proceed. If the cloning operation is stopped for some reason, you will have to configure and start the procedure again. You will not lose your data, because Acronis True Image does not alter the original disk and data stored on it during cloning. Cloning a disk containing the currently active operating system will require a reboot. In that case, after clicking Proceed, you will be asked to confirm the reboot.
10.1.2 Manual partitioning The manual transfer method enables you to resize partitions on the new disk. By default, the program resizes them proportionally. To edit a partition: 1. Select the partition, and then click Edit. This will open the Partition Settings window. 2.
Partition type (available only for MBR disks) Partition letter and label Refer to Partition settings (p. 136) for details. 3. Click Accept. Be careful! Clicking any previous wizard step on the sidebar in this window will reset all size and location changes that you've selected, so you will have to specify them again. 10.1.
??name.ext - all files with a .ext extension, having six letters in their names (starting with any two symbols (??) and ending with name), will be excluded. You can enter path to a folder: C:\my pictures - my pictures folder on the C: disk will be excluded. You can edit and remove exclusion criteria using the corresponding buttons on the right pane. 10.
At the command line prompt type: diskpart list disk The screen will show the disks connected to your computer. Find out the disk number for your SSD. Use its size as the reference. select disk N Here N is the disk number of your SSD. clean This operation removes all information from the SSD and overwrites the MBR with the default one. exit exit Start Acronis True Image 2016 and check whether it detects the SSD.
We recommend that you migrate your system to an empty SSD that does not contain partitions (the disk space is unallocated). Note that if your SSD is new and has never been used before, it does not contain partitions. To migrate your system to an SSD: 1. Start Acronis True Image 2016. 2. Create Acronis rescue media, if you do not have it yet. To do this, in the Tools section, click Create bootable media and follow the instructions on the screen. 3.
11 Tools Acronis Tools and utilities include protection tools, mounting tools, clone disk utility, security and privacy utilities, and disk management utilities. Protection tools Acronis Universal Restore media If you recover your image on a computer with a dissimilar hardware configuration, the program may not be able to find some of device drivers in the default folders, especially when the target hardware has a specific mass storage controller.
With this tool you can unmount the temporary logical drives you have created to explore an image. 11.1 Creating bootable rescue media You can run Acronis True Image 2016 from an emergency boot media on a bare-metal system or a crashed computer that cannot boot. You can even back up disks on a non-Windows computer, copying all its data into the backup by imaging the disk in the sector-by-sector mode.
If you use non-optical media, the media must have FAT16 or FAT32 file system. A PE image based on WinPE 3.0 requires at least 256MB RAM to work, for WinPE 4.0 and WinPE 5.0 this requirement is 512 MB. If Acronis Media Builder does not recognize your USB flash drive, you can try using the procedure described in an Acronis Knowledge Base article at http://kb.acronis.com/content/1526.
nomouse, noapic, etc.). These parameters are provided for advanced users. If you encounter any hardware compatibility problems while testing boot from the rescue media, it may be best to contact Acronis Technical Support. To add startup parameters: Enter a command into the Parameters field. You can type several commands, separated by spaces. Click Next to continue.
pci=nobios Disallows use of PCI BIOS; only direct hardware access methods are allowed. For instance, this parameter may be used if you experience crashes upon boot-up, probably caused by the BIOS. pci=biosirq Uses PCI BIOS calls to get the interrupt routing table. These calls are known to be buggy on several machines and they hang the machine when used, but on other computers it is the only way to get the interrupt routing table.
To create a PE image (.iso file) from the resulting .wim file: 1. Select Microsoft Windows AIK Windows PE Tools Command Prompt from the Start menu. Users of Windows 7 should select Microsoft Windows AIK Deployment Tools Command Prompt from the Start menu. If you create WinPE 4.0 ISO, select Windows Kits Windows ADK Deployment and Imaging Tools Environment from the Start menu. 2. Run the copype.cmd script to create a folder with Windows PE files.
appropriate drivers and making the custom rescue CD may take some time. Furthermore, this may be impossible for some models. 4. When the program starts, we recommend you try recovering some files from your backup. A test recovery allows you to make sure that your rescue CD can be used for recovery. In addition, you will check that the program detects all the hard drives you have in your system.
3. When recovering files with the rescue CD you are able to select only a new location for the files to be recovered. Therefore just click Next at the Location selection step. 4. After the Destination window opens, check that all your drives are shown under My Computer. If you store your backups on the network, you should also check that you can access the network. If no computers are visible on the network, but the Computers Near Me icon is found under My Computer, specify network settings manually.
6. Select several files for recovery by selecting their check boxes and then click Next. 7. Click Proceed on the Summary window to start recovery. 8. After the recovery finishes, exit the standalone Acronis True Image 2016. Now you can be reasonably sure that your rescue CD will help you when needed. 11.1.2.
3. Select Acronis True Image 2016 in the boot menu to continue booting from the rescue media. To see the available video modes, press the Enter key when the appropriate message appears. 4. Choose a video mode you think best suitable for your monitor and type its number in the command line. For instance, typing 338 selects video mode 1600x1200x16 (see the below figure). 5. Wait until Acronis True Image 2016 starts and make sure that the quality of the Welcome screen display on your monitor suits you.
3. In the opened window, click Activate. How to use If a failure occurs, turn on the computer and press F11 when you see the "Press F11 for Acronis Startup Recovery Manager" message. This will start a standalone version of Acronis True Image 2016 that differs only slightly from the complete version. Additional information Disk letters in standalone Acronis True Image 2016 might sometimes differ from the way Windows identifies drives.
programs or data. When you turn Try&Decide off, you decide if you want to apply the changes to your computer or you want to discard them. When Try&Decide can help We recommend that you turn Try&Decide on before you try to: Change any system settings, when you are not sure how these changes may affect your computer. Install system updates, drivers, etc. Install unfamiliar applications. Open mail attachments from unknown senders.
Every "soft" reboot of your computer while in the Try mode results in adding up to 500 MB of Try&Decide's housekeeping data into the storage selected for storing virtual changes. Limitations in using Try&Decide If you use Windows 7, Windows 8 or Windows 10, please, be aware that in the Try mode the program may use free disk space quite intensively, even when your computer is idle. This is due to housekeeping activities such as indexing that run in the background.
1. Start Acronis True Image 2016. 2. In the Tools section, click More tools, and then double-click Try&Decide. 3. Set up the Try&Decide options, if necessary. Refer to Try&Decide options and notifications (p. 127) for details. 4. To start the Try mode, click the Try&Decide icon. The program starts tracking all changes made to the OS and files and temporarily stores all the changes on the selected disk. 5. Perform all the changes you wanted to try.
Protected partitions To change this setting: 1. Click the partition letter next to the setting name. The Partition Selection window opens. 2. Select the partitions that you want to protect, and then click OK. By default, Try&Decide protects the system partition (Disk C), though you may choose to protect any other partitions in your system. Storage for virtual changes To change this setting: 1. Click the partition letter next to the setting name. The Storage for Virtual Changes window opens. 2.
If you do not trust the vendor of the software that you want to install, or when the source of the software is unknown, turn on the Try mode before installing this software. If anything goes wrong, discard the changes made in the Try mode. File recovery You have accidentally deleted some files and then emptied the Recycle Bin. Then you have remembered that the deleted files contained important data and now you are going to try to undelete them using the appropriate software.
View the version's details If Acronis Secure Zone is password-protected, any operation, except viewing version details, requires entering the password. Acronis Secure Zone cleanup If there is not enough space in the Acronis Secure Zone for a new backup, you can: Cancel the backup operation, increase the size of the Acronis Secure Zone, and then run the backup again. Cancel the backup operation, manually delete some backups in the Acronis Secure Zone, and then run the backup again.
Note: This operation may require a computer restart. 11.4.2 Acronis Secure Zone location Creating the Acronis Secure Zone To specify a location for the Acronis Secure Zone: 1. Select a hard disk drive to create the Acronis Secure Zone on. 2. Select one or more partitions from which unallocated and/or free space will be taken. The chosen partitions will be resized if necessary to give space to the Acronis Secure Zone. The Acronis Secure Zone cannot be created on dynamic disks and volumes. 3. Click Next.
Drag the slider to the appropriate position or type an exact value. The minimum size is about 50 MB, depending on the geometry of the hard disk. The maximum size is equal to the disk’s unallocated space plus the total free space on all partitions selected at the previous step. When creating/enlarging the Acronis Secure Zone, the program will first use the unallocated space. If the unallocated space is not enough to achieve the desired size, the selected partitions will be decreased in size.
5. Click Next to continue. Acronis True Image 2016 repair or update will not affect the password. However, if the program is removed and then installed again while keeping the Acronis Secure Zone on the disk, the password to the Acronis Secure Zone will be reset. 11.4.5 Removing Acronis Secure Zone Acronis Secure Zone deletion will automatically destroy all backups stored in the zone. Select the partitions to which you want to add the space freed up from Acronis Secure Zone.
Selecting a hard disk ..............................................................................134 Selecting initialization method ..............................................................135 Creating new partitions..........................................................................135 11.5.1 Selecting a hard disk Select the disk that you have added to the computer. If you have added several disks, select one of them and click Next to continue.
11.5.2 Selecting initialization method Acronis True Image 2016 supports both MBR and GPT partitioning. GUID Partition Table (GPT) is a new hard disk partitioning method providing advantages over the old MBR partitioning method. If your operating system supports GPT disks, you can select the new disk to be initialized as a GPT disk. To add a GPT disk, click Initialize disk in GPT layout. To add an MBR disk, click Initialize disk in MBR layout.
3. Click Accept. 11.5.3.1 Partition settings Size To resize the partition, perform one of the following: Point to the partition border. When the pointer becomes a double-headed arrow, drag the pointer to enlarge or reduce the partition size. Type the desired partition size in the Partition Size field. To relocate the partition, perform one of the following: Drag the partition to a new position. Type the desired size in either the Free space before or Free space after field.
Ext4 is a new Linux file system. It has improvements in comparison to ext3. It is fully backward compatible with ext2 and ext 3. However, ext3 has only partial forward compatibility with ext4. ReiserFS is a journaling file system for Linux. Generally it is more reliable and faster than Ext2. Choose it for your Linux data partition. Linux Swap is a swap partition for Linux. Choose it if you want to add more swap space using Linux. Partition letter Select a letter to be assigned to the partition.
Replace your old hard drive with a new one and do not plan to use the old drive any more. Give your old hard drive to your relative or friend. Sell your old hard drive. How to use Acronis DriveCleanser To permanently destroy data on your disk: 1. Click the Start button —> Acronis (product folder) —> True Image —> Tools and Utilities —> DriveCleanser. The Acronis DriveCleanser wizard opens. 2. On the Source selection step, select the disks and partitions that you want to wipe.
Acronis DriveCleanser cannot wipe partitions on dynamic and GPT disks, so they will not be shown. 11.6.1.2 Algorithm selection On the Algorithm selection step, perform one of the following: To use one of the preset algorithms, select the desired algorithm. Refer to Hard Disk Wiping Methods (p. 147) for details. [For advanced users only] To create a custom algorithm, select Custom. Then continue creating on the Algorithm definition step.
To add a new pass: 1. Click Add. The Wiping Pass Adjustment window opens. 2. Choose an option: Write pattern Enter a hexadecimal value, for example, a value of this kind: 0x00, 0xAA, or 0xCD, etc. These values are 1 byte long, but they may be up to 512 bytes long. Except for such values, you may enter a random hexadecimal value of any length (up to 512 bytes).
11.6.1.3 Post-wiping actions In the Post-wiping actions window, you can select actions to be performed on the partitions selected for data destruction. Acronis DriveCleanser offers you three options: No action — just destroy data using the algorithm selected below Delete partition — destroy data and delete partition Format — destroy data and format partition (default). 11.6.
Please, be aware that Windows stores passwords until the session ends, so cleaning the list of network user credentials will not take effect until you end the current Windows session by logging out or by rebooting the computer. To start the System Clean-up wizard, click the Start button —> Acronis (product folder) —> True Image —> Tools and Utilities —> System Clean-up. After you start the wizard, it will search for any traces of user actions stored by Windows.
System components: Recycle Bin Temporary files Hard disk free space Find Computer list Find File list Recently Used Documents list Windows Run List Opened/saved files history User Credentials Windows Prefetch Directory 11.6.2.2 Default clean-up options The default clean-up options are available by clicking the Click to change this setting… link on the Data Destruction Method option page.
Data destruction method System Clean-up utilizes a number of the most popular data destruction methods. Here, you need to select the desired data destruction method. Use common method - if you leave this parameter selected, the program will use the default method (the initial setting is Fast method). If you need another destruction method to be set as a default, click on the corresponding link.
Upon entering the Files setting value, you can browse the files matching the search strings. To do this, click Show Files. You will see a window with the names of the found files. These files will be cleaned. Drive free space Here you can manually specify physical and/or logical drives to clean up free space on. By default, System Clean-up cleans up free space on all available drives.
"Commands" setting Here you can select the commands to remove during Windows Run List clean-up. This template can contain any command names or their parts separated by semicolons, e.g.: *help; cmd; reg* This will result in removing commands with names corresponding to or containing any of the names or parts of names you entered. Network places filter Here you can enter (separated by semicolons) any hostnames or IP addresses of network places, servers, FTP servers, network shares, etc.
If required, you can dig deeper by expanding a component and selecting/unselecting its contents. Having specified the components for clean-up, click the Clean-up button to continue. Windows Vista and Windows 7 do not keep information on file and computer searches. Furthermore, information on opened/saved files is stored in the registry differently, so the wizard shows this information in a different way. 11.6.2.
No. Algorithm (writing method) Passes Record – 0xAA; i.e. 0x00, 0xFF, 0x00, 0xFF, 0x00, 0xFF, 0xAA. 5. Russian: GOST P50739-95 1 Logical zeros (0x00 numbers) to each byte of each th th sector for 6 to 4 security level systems. Randomly selected symbols (numbers) to each byte rd st of each sector for 3 to 1 security level systems. 6. Peter Gutmann's method 35 Peter Gutmann's method is very sophisticated.
Note that you cannot mount an image of the entire disk except in the case when the disk consists of one partition. 3. [optional step] On the Drive letter step, select a letter to be assigned to the virtual disk from the Mount letter drop-down list. If you do not want to mount a partition, select Do not mount in the list or clear the partition's check box. 4. Click Proceed. 5. After the image is connected, the program will run Windows Explorer, showing its contents. 11.
boot. This is because the new hardware is incompatible with critical drivers included in the image. The utility finds and installs drivers for devices that are critical for the operating system start-up, such as storage controllers, motherboard, or chipset. How do I use it? Before you start recovery to dissimilar hardware, ensure that you have: Backup of your system disk (p. 38) or Entire PC backup (p. 16) Acronis bootable media (p. 116) Acronis Universal Boot media (p.
Windows-like representation is selected as a way the disks and volumes are represented. 8. [Optional] Specify Linux kernel parameters. Refer to Bootable media startup parameters (p. 116) for details. 9. Select the Acronis components to place on the media. You can select 32-bit and/or 64-bit components. The 32-bit components can work on 64-bit hardware. However, you need 64-bit components to boot a computer that uses Unified Extensible Firmware Interface (UEFI).
ISO image file You will need to specify the .iso file name and the destination folder. When the .iso file is created, you can burn it onto a CD or DVD. For example, in Windows 7 and later, you can do this using a built-in burning tool. In Windows Explorer, double-click the created ISO image file, and then click Burn. 11. Specify the mass storage drivers to be used by Acronis Universal Boot. You do not have to add the drivers now. You can do this later when you apply Acronis Universal Boot to a computer.
Universal Restore process After you have specified the required settings, click OK. When the process is complete, you will be able to configure the network connection and specify drivers for the video adapter, USB and other devices.
12 Troubleshooting In this section Acronis System Report ...........................................................................154 Acronis Smart Error Reporting ...............................................................155 Sending feedback to Acronis ..................................................................156 How to collect crash dumps ...................................................................157 Acronis Customer Experience Program ...............................................
If you want to create the report file with a custom name, type the new name instead of : SystemReport.exe /filename: To generate a system report under bootable media: 1. Create Acronis bootable rescue media, if you do not have it. See details in Acronis Media Builder. 2. Arrange the boot order in BIOS so as to make your rescue media device (CD, DVD or USB stick) the first boot device. See Arranging boot order in BIOS (p. 78). 3.
When you do not have an Internet connection 1. In the error message window, please click More details and write down the event code. The code may look like this: 0x000101F6 - example of an ordinary event code. 0x00970007+0x00970016+0x00970002 - example of a composite event code. A code of this kind may appear when an error occurred in a low-level program module and then propagated to higher-level modules, resulting in errors in those modules as well. 1.
6. Click Send. 12.4 How to collect crash dumps Because a crash of Acronis True Image 2016 or Windows can be caused by different reasons, each crash case must be investigated separately. Acronis Customer Central would appreciate if you could provide the following information: If Acronis True Image 2016 crashes, please provide the following information: 1. A description of the exact sequence of steps performed before you encountered the issue. 2. A crash dump.
Copyright Statement Copyright © Acronis International GmbH, 2002-2015. All rights reserved. "Acronis", "Acronis Compute with Confidence", "Acronis Recovery Manager", "Acronis Secure Zone", Acronis True Image, Acronis Try&Decide, and the Acronis logo are trademarks of Acronis International GmbH. Linux is a registered trademark of Linus Torvalds. VMware and VMware Ready are trademarks and/or registered trademarks of VMware, Inc. in the United States and/or other jurisdictions.
13 Glossary of Terms A Acronis Secure Zone A secure partition for storing backups (p. 159) on a hard disk. Advantages: enables recovery of a disk to the same disk where the disk's backup resides offers a cost-effective and handy method for protecting data from software malfunction, virus attack, operator error eliminates the need for a separate media or network connection to back up or recover the data B Backup 1. The same as Backup operation (p. 159). 2.
Bootable media Disk backup (Image) A physical media (CD, DVD, USB flash drive or other media supported by a machine BIOS as a boot device) that contains standalone version of Acronis True Image 2016. A backup (p. 159) that contains a sector-based copy of a disk or a partition in packaged form. Normally, only sectors that contain data are copied. Acronis True Image 2016 provides an option to take a raw image, that is, copy all the disk sectors, which enables imaging of unsupported file systems.
N Nonstop backup Nonstop backup actually is a disk/partition or file backup that is created using the Acronis Nonstop Backup feature. This is a set of one full backup version (p. 160) and a sequence of incremental backup versions (p. 160) that are created at short intervals. It gives almost continuous protection of data, that is, it allows recovery of previous data state at any recovery point you need.