
Operation Manual


70 Copyright © Acronis International GmbH, 2002-2015
10. When the operation finishes, exit the standalone version of Acronis True Image 2016, remove
the rescue media and boot from the recovered system partition. After making sure that you have
recovered Windows to the state you need, restore the original boot order.
5.1.1.4 Recovering your system to a new disk under bootable media
Before you start, we recommend that you complete the preparations described in Preparing for
recovery (p. 66). You do not need to format the new disk, as this will be done in the process of
recovery.
Warning! Your old and new hard drives must work in the same controller mode (for example, IDE or AHCI).
Otherwise, your computer will not start from the new hard drive.
To recover your system to a new disk:
1. Install the new hard drive to the same position in the computer and use the same cable and
connector that was used for the original drive. If this is not possible, install the new drive to
where it will be used.
2. Attach the external drive if it contains the backup to be used for recovery and make sure that the
drive is powered on.
3. Arrange the boot order in BIOS so as to make your rescue media device (CD, DVD or USB stick)
the first boot device. See Arranging boot order in BIOS (p. 78).
4. Boot from the rescue media and select Acronis True Image 2016.
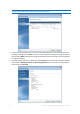
5. On the Home screen, select My disks below Recover.
6. Select the system disk or partition backup to be used for recovery. When the backup is not
displayed, click Browse and specify path to the backup manually.
7. If you have a hidden partition (for example, the System Reserved partition or a partition created
by the PC manufacturer), click Details on the wizard's toolbar. Please remember the location and
size of the hidden partition, because these parameters need to be the same on your new disk.
8. Select Recover whole disks and partitions at the Recovery method step.