
User Guide

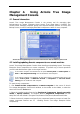
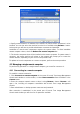
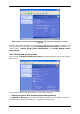
Table Of Contents
- Chapter 1. Introduction
- Chapter 2. Acronis True Image Enterprise Server installatio
- Chapter 3. General information and proprietary Acronis tech
- 3.1 The difference between file archives and disk/partition
- 3.2 Full, incremental and differential backups
- 3.3 Acronis Secure Zone
- 3.4 Acronis Startup Recovery Manager
- 3.5 Acronis Backup Server
- 3.6 Acronis Snap Restore
- 3.7 Acronis Universal Restore
- 3.8 Using dynamic disks and volumes
- 3.9 Backing up to tape drive
- 3.10 Viewing disk and partition information
- Chapter 4. Using Acronis True Image Management Console
- Chapter 5. Using Acronis True Image Enterprise Server (loca
- Chapter 6. Creating backup archives
- Chapter 7. Restoring the backup data
- 7.1 Restore under Windows or boot from CD?
- 7.2 Restoring files and folders from file archives
- 7.3 Restoring disks/partitions or files from images
- 7.3.1 Starting the Restore Data Wizard
- 7.3.2 Archive selection
- 7.3.3 Restoration type selection
- 7.3.4 Selecting a disk/partition to restore
- 7.3.5 Selecting a target disk/partition
- 7.3.6 Changing the restored partition type
- 7.3.7 Changing the restored partition file system
- 7.3.8 Changing the restored partition size and location
- 7.3.9 Assigning a letter to the restored partition
- 7.3.10 Restoring several disks or partitions at once
- 7.3.11 Using Acronis Universal Restore
- 7.3.12 Setting restore options
- 7.3.13 Restoration summary and executing restoration
- 7.4 Setting restore options
- Chapter 8. Scheduling tasks
- Chapter 9. Managing Acronis Secure Zone
- Chapter 10. Creating bootable media
- Chapter 11. Other operations
- Chapter 12. Mounting an image as a virtual drive
- Chapter 13. Transferring the system to a new disk
- 13.1 General information
- 13.2 Security
- 13.3 Executing transfers
- 13.3.1 Selecting Clone mode
- 13.3.2 Selecting source disk
- 13.3.3 Selecting destination disk
- 13.3.4 Partitioned destination disk
- 13.3.5 Old and new disk partition layout
- 13.3.6 Old disk data
- 13.3.7 Destroying the old disk data
- 13.3.8 Selecting partition transfer method
- 13.3.9 Partitioning the old disk
- 13.3.10 Old and new disk partition layouts
- 13.3.11 Cloning summary
- 13.4 Cloning with manual partitioning
- Chapter 14. Adding a new hard disk
- Chapter 15. Command-line mode and scripting

3.9 Backing up to tape drive
Acronis True Image Enterprise Server supports SCSI tape drives. It can store backups on the
tape and restore data from the tape, store large backups to multiple tapes, and append
incremental/differential changes to a tape with the existing archives.
If a SCSI tape drive is connected to the computer, controlling the backup process (i.e. where
you are running Acronis True Image Management Console or Acronis True Image Enterprise
Server local version) the list of devices available for backup storage will be extended with a
name corresponding to the drive type.
To place backup archives on a tape drive connected to another network computer, install
Acronis Backup Server on that computer. Then a new device type named “Acronis Backup
Server” will appear in the list of devices, and you will be able to access the tape under this
device.
Backup and restore on the tape proceed in the same way as with other devices, with the
following exceptions.
1. A full backup can be stored on an empty tape only. If you use tape that already contains
data, its contents will be overwritten.
2. In case you want to keep more than one archive on the tape, for example, back up two
disks separately, choose
incremental
backup mode instead of a
full
backup when you create
an initial backup for the second disk. In other situations, incremental backup is used for
appending changes to the previously created archive.
3. You do not have to provide filenames for backups.
You might experience short pauses that are required to rewind the tape.
Low-quality or old tape, as well as dirt on the magnetic head, might lead to pauses that can
last up to several minutes.
3.10 Viewing disk and partition information
You can change the way of data representation in all schemes you see in various wizards.
To the right are three icons: Arrange Icons by, Choose Details and i (Display the
properties of the selected item), the last duplicated in the context menu invoked by
right-clicking objects.
To sort messages by a particular column, click the header (another click will switch the
messages to the opposite order) or Arrange Icons by button and select the column.
To select columns to view, right-click the headers line or left-click the Choose Details
button. Then flag the columns you want to display.
If you click the i (Display the properties of the selected item) button, you will see the
selected partition or disk properties window.
This window contains two panels. The left panel contains the properties tree and the right
describes the selected property in detail. The disk information includes its physical
parameters (connection type, device type, size, etc.); partition information includes both
physical (sectors, location, etc.), and logical (file system, free space, assigned letter, etc.)
parameters.
You can change the width of a column by dragging its borders with the mouse.
Copyright © Acronis, Inc., 2000-2006 27