
Operation Manual

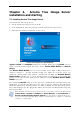
Table Of Contents
- Chapter 1. Introduction
- 1.1 Acronis® True Image Server – a complete solution for corporate users
- 1.2 New in Acronis True Image 9.1 Server for Windows
- 1.3 System requirements and supported media
- 1.4 Technical support
- Chapter 2. Acronis True Image Server installation and starting
- Chapter 3. General information and proprietary Acronis technologies
- 3.1 The difference between file archives and disk/partition images
- 3.2 Full, incremental and differential backups
- 3.3 Acronis Secure Zone
- 3.4 Acronis Startup Recovery Manager
- 3.5 Acronis Snap Restore
- 3.6 Acronis Universal Restore
- 3.7 Using dynamic disks and volumes
- 3.8 Backing up to tape drive
- 3.9 Viewing disk and partition information
- Chapter 4. Using Acronis True Image Server
- Chapter 5. Creating backup archives
- Chapter 6. Restoring the backup data
- 6.1 Restore under Windows or boot from CD?
- 6.2 Restoring files and folders from file archives
- 6.3 Restoring disks/partitions or files from images
- 6.3.1 Starting the Restore Data Wizard
- 6.3.2 Archive selection
- 6.3.3 Restoration type selection
- 6.3.4 Selecting a disk/partition to restore
- 6.3.5 Selecting a target disk/partition
- 6.3.6 Changing the restored partition type
- 6.3.7 Changing the restored partition file system
- 6.3.8 Changing the restored partition size and location
- 6.3.9 Assigning a letter to the restored partition
- 6.3.10 Restoring several disks or partitions at once
- 6.3.11 Using Acronis Universal Restore
- 6.3.12 Setting restore options
- 6.3.13 Restoration summary and executing restoration
- 6.4 Setting restore options
- Chapter 7. Scheduling tasks
- Chapter 8. Managing Acronis Secure Zone
- Chapter 9. Creating bootable media
- Chapter 10. Other operations
- Chapter 11. Mounting an image as a virtual drive
- Chapter 12. Transferring the system to a new disk
- 12.1 General information
- 12.2 Security
- 12.3 Executing transfers
- 12.3.1 Selecting Clone mode
- 12.3.2 Selecting source disk
- 12.3.3 Selecting destination disk
- 12.3.4 Partitioned destination disk
- 12.3.5 Old and new disk partition layout
- 12.3.6 Old disk data
- 12.3.7 Destroying the old disk data
- 12.3.8 Selecting partition transfer method
- 12.3.9 Partitioning the old disk
- 12.3.10 Old and new disk partition layouts
- 12.3.11 Cloning summary
- 12.4 Cloning with manual partitioning
- Chapter 13. Adding a new hard disk
- Chapter 14. Command-line mode and scripting

16 Copyright © Acronis, Inc., 2000-2007
3.4 Acronis Startup Recovery Manager
3.4.1 How it works
The Acronis Startup Recovery Manager enables starting Acronis True Image Server without
loading the operating system. With this feature, if the operating system won't load for some
reason, you can run Acronis True Image Server by itself to restore damaged partitions. As
opposed to booting from Acronis removable media or RIS server, you will not need a
separate media or network connection to start Acronis True Image Server.
3.4.2 How to use
To be able to use Acronis Startup Recovery Manager at boot time, prepare as follows:
1. Install Acronis True Image Server.
2. Create Acronis Secure Zone on the server hard disk (see
Chapter 8. Managing Acronis
Secure Zone
).
3. Activate Acronis Startup Recovery Manager. To do so, click Activate Acronis Startup
Recovery Manager and follow the Wizard’s instructions.
If you try to activate Acronis Startup Recovery Manager while Acronis Secure Zone is missing
from the system, you will be prompted to create the zone,
then Acronis Startup Recovery
Manager will be activated. Otherwise, Acronis Startup Recovery Manager will be activated
immediately.
When Acronis Startup Recovery Manager is activated, it overwrites the master boot record
(MBR) with its own boot code. If you have any third-party boot managers installed, you will
have to reactivate them after activating the Startup Recovery Manager. For Linux loaders
(e.g. LiLo and GRUB), you might consider installing them to a Linux root (or boot) partition
boot record instead of MBR before activating Acronis Startup Recovery Manager.
If failure occurs, turn on the computer and press F11 when you see the "Press F11 for
Acronis Startup Recovery Manager" message. This will run a standalone version of Acronis
True Image Server that only slightly differs from the complete version. For information on
restoring damaged partitions, see
Chapter 6. Restoring the backup data
.
Be careful! Disk letters in standalone Acronis True Image Server might sometimes differ
from the way Windows identifies drives. For example, the D: drive identified in the
standalone Acronis True Image might correspond to the E: drive in Windows.
3.5 Acronis Snap Restore
With this feature you can boot the OS on a crashed computer before the system is
completely restored from an image, and start work seconds after the restoration is launched.
The restoration will be continued in the background.
3.5.1 Limitations in using Acronis Snap Restore
1. Acronis Snap Restore is currently available for images located in the Acronis Secure Zone
only.
2. Acronis Snap Restore does not support images of Windows Vista. If any Vista edition is
detected in an image, the Snap Restore option will not appear.
3. Naturally, Acronis Snap Restore cannot be used if the image contains no operating system
(a logical partition or disk image) or when restoring file archives.