
Operation Manual
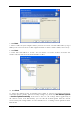
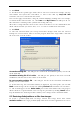
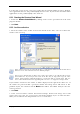
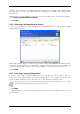
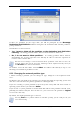
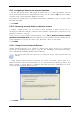
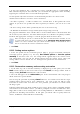
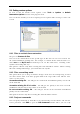
Table Of Contents
- Chapter 1. Introduction
- 1.1 Acronis® True Image Server – a complete solution for corporate users
- 1.2 New in Acronis True Image 9.1 Server for Windows
- 1.3 System requirements and supported media
- 1.4 Technical support
- Chapter 2. Acronis True Image Server installation and starting
- Chapter 3. General information and proprietary Acronis technologies
- 3.1 The difference between file archives and disk/partition images
- 3.2 Full, incremental and differential backups
- 3.3 Acronis Secure Zone
- 3.4 Acronis Startup Recovery Manager
- 3.5 Acronis Snap Restore
- 3.6 Acronis Universal Restore
- 3.7 Using dynamic disks and volumes
- 3.8 Backing up to tape drive
- 3.9 Viewing disk and partition information
- Chapter 4. Using Acronis True Image Server
- Chapter 5. Creating backup archives
- Chapter 6. Restoring the backup data
- 6.1 Restore under Windows or boot from CD?
- 6.2 Restoring files and folders from file archives
- 6.3 Restoring disks/partitions or files from images
- 6.3.1 Starting the Restore Data Wizard
- 6.3.2 Archive selection
- 6.3.3 Restoration type selection
- 6.3.4 Selecting a disk/partition to restore
- 6.3.5 Selecting a target disk/partition
- 6.3.6 Changing the restored partition type
- 6.3.7 Changing the restored partition file system
- 6.3.8 Changing the restored partition size and location
- 6.3.9 Assigning a letter to the restored partition
- 6.3.10 Restoring several disks or partitions at once
- 6.3.11 Using Acronis Universal Restore
- 6.3.12 Setting restore options
- 6.3.13 Restoration summary and executing restoration
- 6.4 Setting restore options
- Chapter 7. Scheduling tasks
- Chapter 8. Managing Acronis Secure Zone
- Chapter 9. Creating bootable media
- Chapter 10. Other operations
- Chapter 11. Mounting an image as a virtual drive
- Chapter 12. Transferring the system to a new disk
- 12.1 General information
- 12.2 Security
- 12.3 Executing transfers
- 12.3.1 Selecting Clone mode
- 12.3.2 Selecting source disk
- 12.3.3 Selecting destination disk
- 12.3.4 Partitioned destination disk
- 12.3.5 Old and new disk partition layout
- 12.3.6 Old disk data
- 12.3.7 Destroying the old disk data
- 12.3.8 Selecting partition transfer method
- 12.3.9 Partitioning the old disk
- 12.3.10 Old and new disk partition layouts
- 12.3.11 Cloning summary
- 12.4 Cloning with manual partitioning
- Chapter 13. Adding a new hard disk
- Chapter 14. Command-line mode and scripting

Copyright © Acronis, Inc., 2000-2007 45
However, you can choose an ordinary way of restoration for that image. This will allow you
to make changes to the restored partition that would not be possible when using Acronis
Snap Restore.
Finally, if you are not going to recover the system, but only want to repair damaged files,
select Restore specified files or folders.
2. Click Next.
6.3.4 Selecting a disk/partition to restore
1. The selected backup can contain images of several partitions or even disks. Select which
disk/partition to restore.
Disks and partitions images contain a copy of track 0 along with MBR (Master Boot Record).
It appears in this window in a separate line. You can choose whether to restore MBR and
track 0 by checking the respective box. Restore MBR if it is critical to your system boot.
2. Click Next.
6.3.5 Selecting a target disk/partition
1. Select a target disk or partition where you want to deploy the selected image. You can
restore data to its initial location, to another disk/partition or to an unallocated space. The
target partition should be at least the same size as the uncompressed image data.
All the data stored on the restored partition will be replaced by the image data, so be careful
and watch for non-backed-up data that you might need.
2. Click Next.
3. When restoring an entire disk, the program will analyze the target disk structure to see if
the disk is free.