
Operation Manual
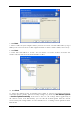
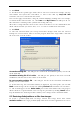
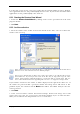
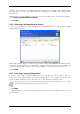
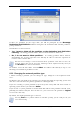
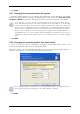
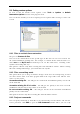
Table Of Contents
- Chapter 1. Introduction
- 1.1 Acronis® True Image Server – a complete solution for corporate users
- 1.2 New in Acronis True Image 9.1 Server for Windows
- 1.3 System requirements and supported media
- 1.4 Technical support
- Chapter 2. Acronis True Image Server installation and starting
- Chapter 3. General information and proprietary Acronis technologies
- 3.1 The difference between file archives and disk/partition images
- 3.2 Full, incremental and differential backups
- 3.3 Acronis Secure Zone
- 3.4 Acronis Startup Recovery Manager
- 3.5 Acronis Snap Restore
- 3.6 Acronis Universal Restore
- 3.7 Using dynamic disks and volumes
- 3.8 Backing up to tape drive
- 3.9 Viewing disk and partition information
- Chapter 4. Using Acronis True Image Server
- Chapter 5. Creating backup archives
- Chapter 6. Restoring the backup data
- 6.1 Restore under Windows or boot from CD?
- 6.2 Restoring files and folders from file archives
- 6.3 Restoring disks/partitions or files from images
- 6.3.1 Starting the Restore Data Wizard
- 6.3.2 Archive selection
- 6.3.3 Restoration type selection
- 6.3.4 Selecting a disk/partition to restore
- 6.3.5 Selecting a target disk/partition
- 6.3.6 Changing the restored partition type
- 6.3.7 Changing the restored partition file system
- 6.3.8 Changing the restored partition size and location
- 6.3.9 Assigning a letter to the restored partition
- 6.3.10 Restoring several disks or partitions at once
- 6.3.11 Using Acronis Universal Restore
- 6.3.12 Setting restore options
- 6.3.13 Restoration summary and executing restoration
- 6.4 Setting restore options
- Chapter 7. Scheduling tasks
- Chapter 8. Managing Acronis Secure Zone
- Chapter 9. Creating bootable media
- Chapter 10. Other operations
- Chapter 11. Mounting an image as a virtual drive
- Chapter 12. Transferring the system to a new disk
- 12.1 General information
- 12.2 Security
- 12.3 Executing transfers
- 12.3.1 Selecting Clone mode
- 12.3.2 Selecting source disk
- 12.3.3 Selecting destination disk
- 12.3.4 Partitioned destination disk
- 12.3.5 Old and new disk partition layout
- 12.3.6 Old disk data
- 12.3.7 Destroying the old disk data
- 12.3.8 Selecting partition transfer method
- 12.3.9 Partitioning the old disk
- 12.3.10 Old and new disk partition layouts
- 12.3.11 Cloning summary
- 12.4 Cloning with manual partitioning
- Chapter 13. Adding a new hard disk
- Chapter 14. Command-line mode and scripting

48 Copyright © Acronis, Inc., 2000-2007
6.3.9 Assigning a letter to the restored partition
1. Acronis True Image Server will assign an unused letter to a restored partition. You can
select the desired letter from a drop-down list. If you set the switch to No, no letters will be
assigned to the restored partition, hiding it from OS.
You should not assign letters to partitions inaccessible to Windows, such as to those other
than FAT and NTFS.
2. Click Next.
6.3.10 Restoring several disks or partitions at once
1. During a single session, you can restore several partitions or disks, one by one, by
selecting one disk and setting its parameters first and then repeating these actions for every
partition or disk to be restored.
If you want to restore another disk (partition), select Yes, I want to restore another
partition or hard disk drive. Then you will return to the partition selection window (6.3.4)
again and will have to repeat the above steps. Otherwise, don’t set this switch.
2. Click Next.
6.3.11 Using Acronis Universal Restore
Acronis Universal Restore is an add-on to Acronis True Image Server. It is purchased
separately and installed from a separate setup file. The following is for Acronis True Image
Server installations including Acronis Universal Restore.
The Acronis Universal Restore option does not work if the image contains dynamic disks and
volumes.
1. Using Acronis Universal Restore will help you create a bootable system clone on a
different hardware (for more information see
3.6 Acronis Universal Restore
). Choose this
when restoring a system disk to a computer with other processor, motherboard or mass
storage device than in the imaged system.
2. Click Next.