
Operation Manual
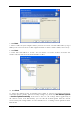
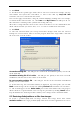
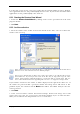
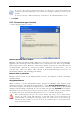
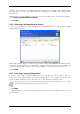
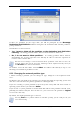
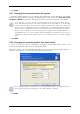
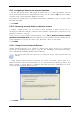
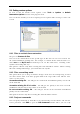
Table Of Contents
- Chapter 1. Introduction
- 1.1 Acronis® True Image Server – a complete solution for corporate users
- 1.2 New in Acronis True Image 9.1 Server for Windows
- 1.3 System requirements and supported media
- 1.4 Technical support
- Chapter 2. Acronis True Image Server installation and starting
- Chapter 3. General information and proprietary Acronis technologies
- 3.1 The difference between file archives and disk/partition images
- 3.2 Full, incremental and differential backups
- 3.3 Acronis Secure Zone
- 3.4 Acronis Startup Recovery Manager
- 3.5 Acronis Snap Restore
- 3.6 Acronis Universal Restore
- 3.7 Using dynamic disks and volumes
- 3.8 Backing up to tape drive
- 3.9 Viewing disk and partition information
- Chapter 4. Using Acronis True Image Server
- Chapter 5. Creating backup archives
- Chapter 6. Restoring the backup data
- 6.1 Restore under Windows or boot from CD?
- 6.2 Restoring files and folders from file archives
- 6.3 Restoring disks/partitions or files from images
- 6.3.1 Starting the Restore Data Wizard
- 6.3.2 Archive selection
- 6.3.3 Restoration type selection
- 6.3.4 Selecting a disk/partition to restore
- 6.3.5 Selecting a target disk/partition
- 6.3.6 Changing the restored partition type
- 6.3.7 Changing the restored partition file system
- 6.3.8 Changing the restored partition size and location
- 6.3.9 Assigning a letter to the restored partition
- 6.3.10 Restoring several disks or partitions at once
- 6.3.11 Using Acronis Universal Restore
- 6.3.12 Setting restore options
- 6.3.13 Restoration summary and executing restoration
- 6.4 Setting restore options
- Chapter 7. Scheduling tasks
- Chapter 8. Managing Acronis Secure Zone
- Chapter 9. Creating bootable media
- Chapter 10. Other operations
- Chapter 11. Mounting an image as a virtual drive
- Chapter 12. Transferring the system to a new disk
- 12.1 General information
- 12.2 Security
- 12.3 Executing transfers
- 12.3.1 Selecting Clone mode
- 12.3.2 Selecting source disk
- 12.3.3 Selecting destination disk
- 12.3.4 Partitioned destination disk
- 12.3.5 Old and new disk partition layout
- 12.3.6 Old disk data
- 12.3.7 Destroying the old disk data
- 12.3.8 Selecting partition transfer method
- 12.3.9 Partitioning the old disk
- 12.3.10 Old and new disk partition layouts
- 12.3.11 Cloning summary
- 12.4 Cloning with manual partitioning
- Chapter 13. Adding a new hard disk
- Chapter 14. Command-line mode and scripting

Copyright © Acronis, Inc., 2000-2007 49
3. If the target hardware has a specific mass storage controller (such as a SCSI, RAID, or
Fibre Channel adapter) for the hard disk, you can install the appropriate driver manually,
bypassing the automatic driver search-and-install procedure.
Use this option only if the automatic search-and-install procedure was unsuccessful.
Acronis Universal Restore uses three sources for drivers:
- the driver repository - a folder or folders on a network drive or CD specified in restore
options. If you have not specified the driver repository in advance, you can do it at next
step.
- the mass storage device driver specified by the user at the current step
- the Windows default driver storage folders (in the image being restored).
The program will find the most suitable drivers of all available drivers and install them into
the restored system. However, the driver defined by the user, will have the priority. It will be
installed, with appropriate warnings, even if the program finds the better driver.
When restoring the system to a virtual machine that uses SCSI hard drive controller, be sure
to specify SCSI drivers for virtual environment in the Specifying Mass Storage Drivers
window. Use drivers bundled with your virtual machine software or download the latest
drivers versions from the software manufacturer website.
4. Click Next.
6.3.12 Setting restore options
1. Select the options for the restoration process (that is, pre/post restoration commands,
restoration process priority etc.). You may Use default options or Set the options
manually. If the latter is the case, the settings will be applied only to the current restore
task. Alternatively, you can edit the default options from the current screen. Then your
settings will be saved as default. See
6.4 Setting restore options
for more information.
2. Click Next.
6.3.13 Restoration summary and executing restoration
1. At the final step, the restoration summary is displayed. Up to this point, you can click
Back to make changes in the created task. If you click Cancel, no changes will be made to
disk(s). Clicking Proceed will launch the task execution.
2. The task will appear on the Active tasks pane of the main window. The task progress
will be shown in a special window.
You can stop the procedure by clicking Cancel. However, it is critical to note that the target
partition will be deleted and its space unallocated – the same result you will get if the
restoration is unsuccessful. To recover the “lost” partition, you will have to restore it from
the image again.
If Acronis Universal Restore finds no HAL or mass storage device drivers compatible with the
new hardware in all available sources, you will be prompted to browse network share drive,
floppy disk or CD to select missing drivers. On starting Windows, it will initialize a common
procedure for installing new hardware. At this point, you will be able to specify drivers for
devices, if Windows cannot find them automatically.