
Operation Manual
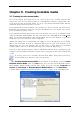
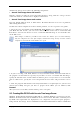
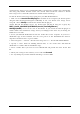
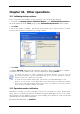
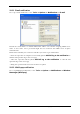
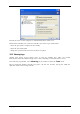

Table Of Contents
- Chapter 1. Introduction
- 1.1 Acronis® True Image Server – a complete solution for corporate users
- 1.2 New in Acronis True Image 9.1 Server for Windows
- 1.3 System requirements and supported media
- 1.4 Technical support
- Chapter 2. Acronis True Image Server installation and starting
- Chapter 3. General information and proprietary Acronis technologies
- 3.1 The difference between file archives and disk/partition images
- 3.2 Full, incremental and differential backups
- 3.3 Acronis Secure Zone
- 3.4 Acronis Startup Recovery Manager
- 3.5 Acronis Snap Restore
- 3.6 Acronis Universal Restore
- 3.7 Using dynamic disks and volumes
- 3.8 Backing up to tape drive
- 3.9 Viewing disk and partition information
- Chapter 4. Using Acronis True Image Server
- Chapter 5. Creating backup archives
- Chapter 6. Restoring the backup data
- 6.1 Restore under Windows or boot from CD?
- 6.2 Restoring files and folders from file archives
- 6.3 Restoring disks/partitions or files from images
- 6.3.1 Starting the Restore Data Wizard
- 6.3.2 Archive selection
- 6.3.3 Restoration type selection
- 6.3.4 Selecting a disk/partition to restore
- 6.3.5 Selecting a target disk/partition
- 6.3.6 Changing the restored partition type
- 6.3.7 Changing the restored partition file system
- 6.3.8 Changing the restored partition size and location
- 6.3.9 Assigning a letter to the restored partition
- 6.3.10 Restoring several disks or partitions at once
- 6.3.11 Using Acronis Universal Restore
- 6.3.12 Setting restore options
- 6.3.13 Restoration summary and executing restoration
- 6.4 Setting restore options
- Chapter 7. Scheduling tasks
- Chapter 8. Managing Acronis Secure Zone
- Chapter 9. Creating bootable media
- Chapter 10. Other operations
- Chapter 11. Mounting an image as a virtual drive
- Chapter 12. Transferring the system to a new disk
- 12.1 General information
- 12.2 Security
- 12.3 Executing transfers
- 12.3.1 Selecting Clone mode
- 12.3.2 Selecting source disk
- 12.3.3 Selecting destination disk
- 12.3.4 Partitioned destination disk
- 12.3.5 Old and new disk partition layout
- 12.3.6 Old disk data
- 12.3.7 Destroying the old disk data
- 12.3.8 Selecting partition transfer method
- 12.3.9 Partitioning the old disk
- 12.3.10 Old and new disk partition layouts
- 12.3.11 Cloning summary
- 12.4 Cloning with manual partitioning
- Chapter 13. Adding a new hard disk
- Chapter 14. Command-line mode and scripting

Copyright © Acronis, Inc., 2000-2007 65
Chapter 10. Other operations
10.1 Validating backup archives
To be certain that your archives are not damaged, you can check their integrity.
1. To invoke the Backup Archive Validation Wizard, select Validate Backup Archive in
the main window or in the Tools group or click Validate Backup Archive on the toolbar.
2. Click Next.
3. Select the archive to validate. The Acronis Secure Zone can be selected only as a whole
because all its contents is considered as a single archive.
4. Click Next.
5. Clicking Proceed will launch the validation procedure. After the validation is complete,
you will see the results window. You can cancel checking by clicking Cancel.
To check data from an archive containing incremental backups, you must have all
incremental backup files and the initial full backup. If any successive backups are missing
from the archive, the validation is not possible.
To check data from a differential backup, you must have the initial full backup as well.
However, if you created several differential or both incremental and differential backups
based on the same full backup (and therefore, in the same folder), you will need ALL of
these successive backups to validate the archive.
10.2 Operation results notification
Sometimes a backup or restore procedure can last for 30 minutes or more. Acronis True
Image Server can notify you when it is finished using the WinPopup service or via e-mail.
The program can also duplicate messages issued during the operation or send you the full
operation log after operation completion.
By default all notifications are disabled.