
Operation Manual
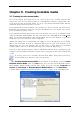
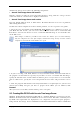
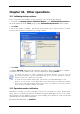
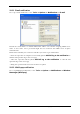
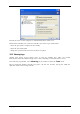

Table Of Contents
- Chapter 1. Introduction
- 1.1 Acronis® True Image Server – a complete solution for corporate users
- 1.2 New in Acronis True Image 9.1 Server for Windows
- 1.3 System requirements and supported media
- 1.4 Technical support
- Chapter 2. Acronis True Image Server installation and starting
- Chapter 3. General information and proprietary Acronis technologies
- 3.1 The difference between file archives and disk/partition images
- 3.2 Full, incremental and differential backups
- 3.3 Acronis Secure Zone
- 3.4 Acronis Startup Recovery Manager
- 3.5 Acronis Snap Restore
- 3.6 Acronis Universal Restore
- 3.7 Using dynamic disks and volumes
- 3.8 Backing up to tape drive
- 3.9 Viewing disk and partition information
- Chapter 4. Using Acronis True Image Server
- Chapter 5. Creating backup archives
- Chapter 6. Restoring the backup data
- 6.1 Restore under Windows or boot from CD?
- 6.2 Restoring files and folders from file archives
- 6.3 Restoring disks/partitions or files from images
- 6.3.1 Starting the Restore Data Wizard
- 6.3.2 Archive selection
- 6.3.3 Restoration type selection
- 6.3.4 Selecting a disk/partition to restore
- 6.3.5 Selecting a target disk/partition
- 6.3.6 Changing the restored partition type
- 6.3.7 Changing the restored partition file system
- 6.3.8 Changing the restored partition size and location
- 6.3.9 Assigning a letter to the restored partition
- 6.3.10 Restoring several disks or partitions at once
- 6.3.11 Using Acronis Universal Restore
- 6.3.12 Setting restore options
- 6.3.13 Restoration summary and executing restoration
- 6.4 Setting restore options
- Chapter 7. Scheduling tasks
- Chapter 8. Managing Acronis Secure Zone
- Chapter 9. Creating bootable media
- Chapter 10. Other operations
- Chapter 11. Mounting an image as a virtual drive
- Chapter 12. Transferring the system to a new disk
- 12.1 General information
- 12.2 Security
- 12.3 Executing transfers
- 12.3.1 Selecting Clone mode
- 12.3.2 Selecting source disk
- 12.3.3 Selecting destination disk
- 12.3.4 Partitioned destination disk
- 12.3.5 Old and new disk partition layout
- 12.3.6 Old disk data
- 12.3.7 Destroying the old disk data
- 12.3.8 Selecting partition transfer method
- 12.3.9 Partitioning the old disk
- 12.3.10 Old and new disk partition layouts
- 12.3.11 Cloning summary
- 12.4 Cloning with manual partitioning
- Chapter 13. Adding a new hard disk
- Chapter 14. Command-line mode and scripting

Copyright © Acronis, Inc., 2000-2007 69
10.4.2 SNMP notifications
You can choose whether to send event log messages issued by Acronis True Image Server to
computers, running SNMP (Simple Network Management Protocol) management
applications.
The default setting – Do not send messages to SNMP clients
Having chosen Send messages to SNMP clients, specify a name or IP address of the
client computer. Otherwise messages will be sent to all SNMP clients found in the local
network.
An additional choice is available between sending All events, Warnings and Errors, or
Errors only messages.
Acronis True Image Server provides the following SNMP objects to SNMP management
applications:
1.3.6.1.4.1.24769.100.200.1.0 - string identifying a type of occurred event (Information,
Warning, Error)
1.3.6.1.4.1.24769.100.200.2.0 - string containing text description of occurred event (it looks
identically to messages published by Acronis True Image Server in its log).
10.5 Managing System Restore
Microsoft Windows System Restore tool, available in Windows XP and Windows 2003 Server
operating systems, is used to undo harmful changes to the system without losing recently
changed or created user data. To run the System Restore tool or find out more about it,
select Start -> Programs -> Accessories -> System Tools -> System Restore.
(Please be aware that the older Windows Server versions do not feature System Restore,
therefore, under these operating systems Manage System Restore tool is unavailable.)
If you run Acronis True Image Server regularly, this feature in your operating system is
redundant. You can turn it off, freeing up to 12% of your hard disk space, directly from
Acronis True Image Server.
1. To invoke the System Restore Management Wizard, click the Manage System
Restore icon in the main program window.
2. Click Next.
3. Now you can turn on/off System Restore on all your hard disk(s) partitions at once or do it
individually for each partition.
Note that you cannot turn off System Restore on the system disk (partition), yet keep it on
other disks (partitions).
4. Click Next.
5. The program lists the configured changes. You can click Back to choose different
settings. If you click Cancel, all new settings will be lost. Click Proceed to apply the
changes.
If you turn off System Restore on any disk or partition, all previously created restore points
for that disk (partition) will be deleted. Please make sure you do not need those restore
points before proceeding.