
User Guide Owner manual
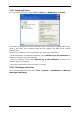

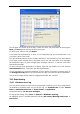
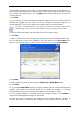
Table Of Contents
- Chapter 1. Introduction
- Chapter 2. Acronis True Image Server for Windows installati
- Chapter 3. General information and proprietary Acronis tech
- 3.1 The difference between file archives and disk/partition
- 3.2 Full, incremental and differential backups
- 3.3 Acronis Secure Zone
- 3.4 Acronis Startup Recovery Manager
- 3.5 Acronis Snap Restore
- 3.6 Acronis Universal Restore
- 3.7 Using dynamic disks and volumes
- 3.8 Backing up to tape drive
- 3.9 Viewing disk and partition information
- Chapter 4. Using Acronis True Image Server for Windows
- Chapter 5. Creating backup archives
- Chapter 6. Restoring the backup data
- 6.1 Restore under Windows or boot from CD?
- 6.2 Restoring files and folders from file archives
- 6.3 Restoring disks/partitions or files from images
- 6.3.1 Starting the Restore Data Wizard
- 6.3.2 Archive selection
- 6.3.3 Restoration type selection
- 6.3.4 Selecting a disk/partition to restore
- 6.3.5 Selecting a target disk/partition
- 6.3.6 Changing the restored partition type
- 6.3.7 Changing the restored partition file system
- 6.3.8 Changing the restored partition size and location
- 6.3.9 Assigning a letter to the restored partition
- 6.3.10 Restoring several disks or partitions at once
- 6.3.11 Using Acronis Universal Restore
- 6.3.12 Setting restore options
- 6.3.13 Restoration summary and executing restoration
- 6.4 Setting restore options
- Chapter 7. Scheduling tasks
- Chapter 8. Managing Acronis Secure Zone
- Chapter 9. Creating bootable media
- Chapter 10. Other operations
- Chapter 11. Mounting an image as a virtual drive
- Chapter 12. Transferring the system to a new disk
- 12.1 General information
- 12.2 Security
- 12.3 Executing transfers
- 12.3.1 Selecting Clone mode
- 12.3.2 Selecting source disk
- 12.3.3 Selecting destination disk
- 12.3.4 Partitioned destination disk
- 12.3.5 Old and new disk partition layout
- 12.3.6 Old disk data
- 12.3.7 Destroying the old disk data
- 12.3.8 Selecting partition transfer method
- 12.3.9 Partitioning the old disk
- 12.3.10 Old and new disk partition layouts
- 12.3.11 Cloning summary
- 12.4 Cloning with manual partitioning
- Chapter 13. Adding a new hard disk
- Chapter 14. Command-line mode and scripting

combination of Acronis True Image Server for Windows and Win PE facilities and therefore
provides more functionality than using only-Acronis bootable media. The Acronis Universal
Restore add-on to Acronis True Image Server for Windows, if installed, will also be included
in the ISO image.
To add the Acronis True Image Server for Windows plug-in to your Win PE distribution:
1. Make sure that Acronis Bart PE plug-in is installed on the computer (the default path is
\Program Files\Acronis\TrueImageServer\BartPE). If not, run Acronis True Image Server for
Windows setup file, choose Modify and install the Acronis Bart PE plug-in.
Acronis Win PE ISO Builder locates the Acronis Bart PE plug-in using the registry key
HKEY_LOCAL_MACHINE\SOFTWARE\Acronis\TrueImageServer\
Settings\BartPE, created at the time of installation. If you moved the Bart PE plug-in to
another folder after installation, change the key accordingly. If the above key is missing, the
builder does not work.
2. Insert your Win PE distribution CD into the media drive of the computer. If you have a
distribution copy on the hard disk, trace the exact path to it. The distribution files must be
unpacked and allocated in a separate folder.
3. Select Programs -> Acronis ->Acronis True Image Server for Windows -> Acronis Win PE
ISO Builder.
4. Specify a source folder for building Win PE ISO, i.e. the media drive with Win PE
distribution or a folder with the distribution copy.
5. Locate a folder where you want to create Win PE ISO and provide the name for the ISO
file.
6. Check your settings in the summary screen and click Proceed.
7. Use any third-party tool that will burn ISO images to CD or DVD.
Copyright © Acronis, Inc., 2000-2006 63