
User Guide Owner manual

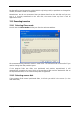
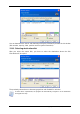
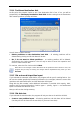


Table Of Contents
- Chapter 1. Introduction
- Chapter 2. Acronis True Image Server for Windows installati
- Chapter 3. General information and proprietary Acronis tech
- 3.1 The difference between file archives and disk/partition
- 3.2 Full, incremental and differential backups
- 3.3 Acronis Secure Zone
- 3.4 Acronis Startup Recovery Manager
- 3.5 Acronis Snap Restore
- 3.6 Acronis Universal Restore
- 3.7 Using dynamic disks and volumes
- 3.8 Backing up to tape drive
- 3.9 Viewing disk and partition information
- Chapter 4. Using Acronis True Image Server for Windows
- Chapter 5. Creating backup archives
- Chapter 6. Restoring the backup data
- 6.1 Restore under Windows or boot from CD?
- 6.2 Restoring files and folders from file archives
- 6.3 Restoring disks/partitions or files from images
- 6.3.1 Starting the Restore Data Wizard
- 6.3.2 Archive selection
- 6.3.3 Restoration type selection
- 6.3.4 Selecting a disk/partition to restore
- 6.3.5 Selecting a target disk/partition
- 6.3.6 Changing the restored partition type
- 6.3.7 Changing the restored partition file system
- 6.3.8 Changing the restored partition size and location
- 6.3.9 Assigning a letter to the restored partition
- 6.3.10 Restoring several disks or partitions at once
- 6.3.11 Using Acronis Universal Restore
- 6.3.12 Setting restore options
- 6.3.13 Restoration summary and executing restoration
- 6.4 Setting restore options
- Chapter 7. Scheduling tasks
- Chapter 8. Managing Acronis Secure Zone
- Chapter 9. Creating bootable media
- Chapter 10. Other operations
- Chapter 11. Mounting an image as a virtual drive
- Chapter 12. Transferring the system to a new disk
- 12.1 General information
- 12.2 Security
- 12.3 Executing transfers
- 12.3.1 Selecting Clone mode
- 12.3.2 Selecting source disk
- 12.3.3 Selecting destination disk
- 12.3.4 Partitioned destination disk
- 12.3.5 Old and new disk partition layout
- 12.3.6 Old disk data
- 12.3.7 Destroying the old disk data
- 12.3.8 Selecting partition transfer method
- 12.3.9 Partitioning the old disk
- 12.3.10 Old and new disk partition layouts
- 12.3.11 Cloning summary
- 12.4 Cloning with manual partitioning
- Chapter 13. Adding a new hard disk
- Chapter 14. Command-line mode and scripting
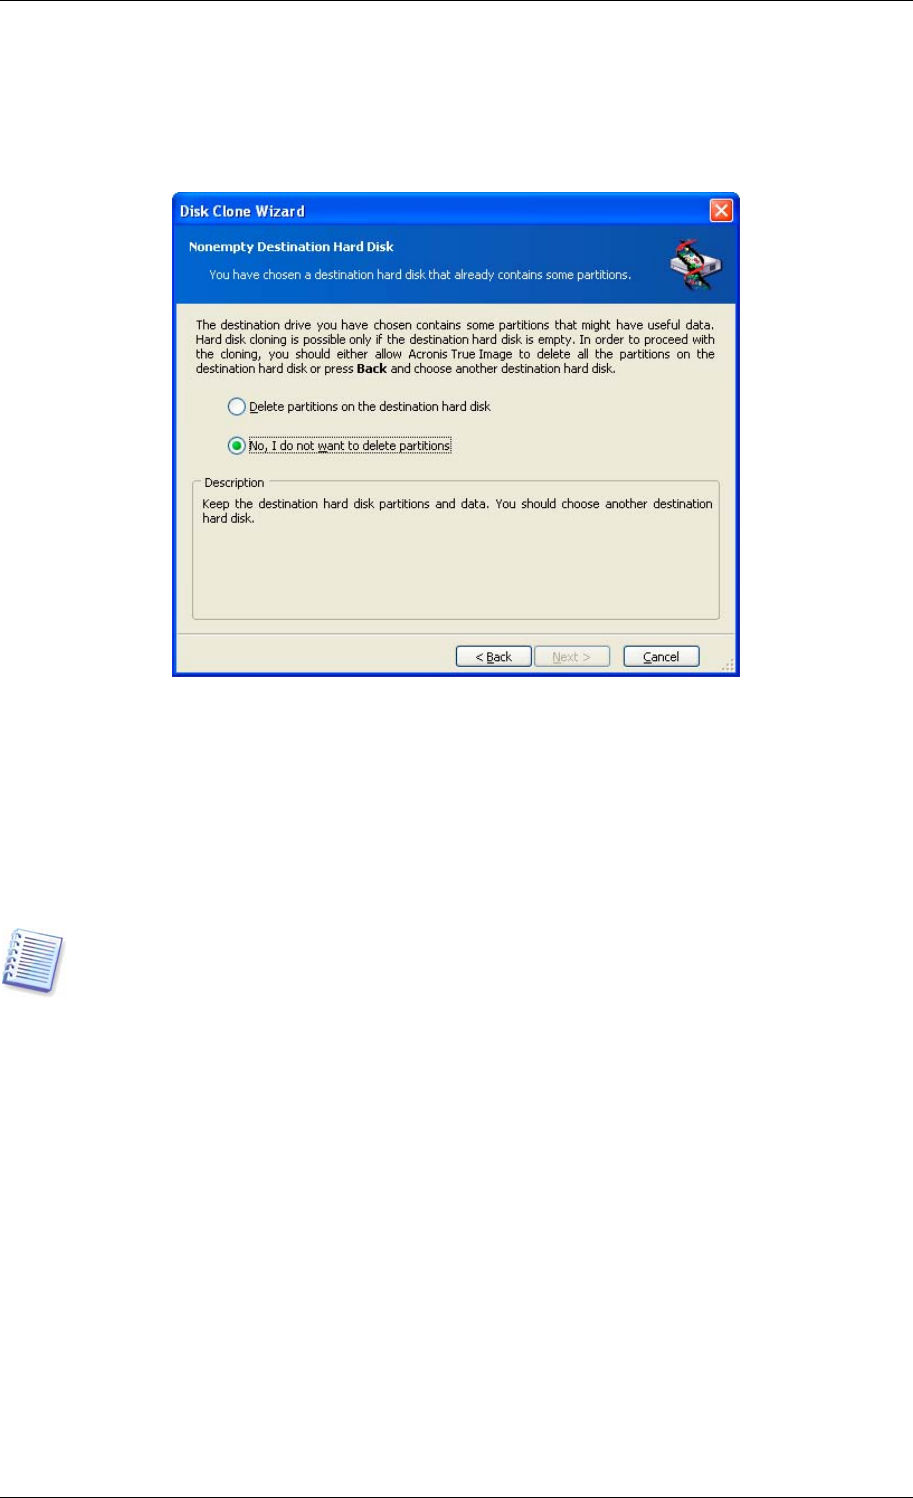
12.3.4 Partitioned destination disk
At this point, the program checks to see if the destination disk is free. If not, you will be
prompted by the Nonempty Destination Hard Disk window stating that the destination
disk contains partitions, perhaps with data.
You will have to select between:
• Delete partitions on the destination hard disk – all existing partitions will be
deleted during cloning and all their data will be lost.
• No, I do not want to delete partitions – no existing partition will be deleted,
discontinuing the cloning operation. You will only be able to cancel this operation and
return to select another disk.
To continue, select the first choice and click Next.
Note that no real changes or data destruction will be performed at this time! For now, the
program will just map out cloning. All changes will be implemented only when you click
Proceed.
12.3.5 Old and new disk partition layout
If you selected the automatic mode before, the program will ask you for nothing further. You
will see the window graphically illustrating information (as rectangles) about the source disk
(partitions and unallocated space) and the destination disk layout.
Along with the disk number, some additional information is provided: disk capacity, label,
partition and file system information. Partition types — primary, logical — and unallocated
space are marked with different colors.
Next you will see the cloning summary.
12.3.6 Old disk data
If you selected the manual mode, the program will ask you what to do with the old disk:
• Create a new partition layout – All existing partitions and their data will be deleted
(but they will also be cloned to the new disk, so you won’t lose them)
Copyright © Acronis, Inc., 2000-2006 75