
User`s guide


Having completed the required steps, you will add a new partition. To create another one,
simply repeat those steps.
If you make a mistake, click Back to redo.
After you create the necessary partitions, uncheck the Create new partition in
unallocated space box and click Next.
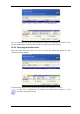
13.3.10 Old and new disk partition layouts
In the next window, you will see rectangles indicating the source hard disk, including its
partitions and unallocated space, as well as the new disk layout.
Along with the hard disk number, you will also see disk capacity, label, partition and file
system information. Different partition types, including primary, logical and unallocated
space are marked with different colors.
If you selected manual partition creation earlier, the partition layout will look different.
This partitioning method is described below.
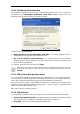
13.3.11 Cloning summary
In the next window, you will see a list of briefly described operations to be performed on
the disks.
After you click Proceed, Acronis True Image Echo Server will start cloning the old disk to
the new disk, indicating the progress in a special window. You can stop this procedure by
clicking Cancel. In that case, you will have to repartition and format the new disk or
repeat the cloning procedure.
After the operation is complete, you will see the results message.
13.4 Cloning with manual partitioning
13.4.1 Old and new disk partition layouts
The manual transfer method enables you to resize partitions on the new disk. By default,
the program resizes them proportionally.
In the next window, you will see rectangles indicating the source hard disk, including its
partitions and unallocated space, as well as the new disk layout.
Along with the hard disk number, you will see disk capacity, label, partition and file
system information. Different partition types, including primary, logical and unallocated
space are marked with different colors.
To resize either partition, check the Proceed relayout box. If you are satisfied with the
partition layout shown, uncheck this box (if checked). Clicking Next, you will proceed to
the cloning summary window.
Be careful! Clicking Back in this window will reset all size and location changes that
you've selected, so you will have to specify them again.
First, select a partition to resize. It will be underlined in red.
Resize and relocate it on the next step.
You can do this by entering values to Unallocated space before, Partition size,
Unallocated space after fields, by dragging partition borders or the partition itself.
84 Copyright © Acronis, Inc., 2000-2007