User's Guide TrueImage 6.0 Compute with confidence www.acronis.
Copyright © SWsoft, 2000-2002. All rights reserved. Linux is a registered trademark of Linus Torvalds. OS/2 is a registered trademarks of IBM Corporation. Windows and MS-DOS are registered trademarks of Microsoft Corporation. All other trademarks and copyrights referred to are the property of their respective owners. Distribution of substantively modified versions of this document is prohibited without the explicit permission of the copyright holder.
Table of Contents INTRODUCTION ................................................................................................... 4 CHAPTER 1. INSTALLING ACRONIS TRUEIMAGE AND GETTING STARTED . 6 1.1 ACRONIS TRUEIMAGE SYSTEM PACKAGE ...................................... 6 1.2 SYSTEM REQUIREMENTS ................................................................. 6 1.3 INSTALLATION ................................................................................. 6 1.4 REPAIRING/UPGRADING ACRONIS TRUEIMAGE ..
Introduction What is Acronis TrueImage Acronis TrueImage is your ultimate data insurance policy! It takes an exact image of your hard disk drive or separate partitions for complete backup, and allows you to restore all of their contents, including operating systems, programs, personal data and settings. In the event of fatal software or hardware failure Acronis TrueImage protects your data, even when ordinary file backup software does not work.
How to Find the Necessary Information in this Guide Acronis TrueImage user’s guide contains the following main chapters: • Chapter 1. «Installing Acronis TrueImage and Getting Started» and Getting Started» - this describes how to install, run, and remove the software; • Chapter 2. «Creating Disk/Partition Images» - this describes how to create an exact disk/partition image; • Chapter 3.
Chapter 1. Installing Acronis TrueImage and Getting Started 1.1 Acronis TrueImage System Package Acronis TrueImage system package includes: • an installation disc, • this guide, • license agreement, • registration card, • advertising materials. 1.2 System Requirements To take full advantage of Acronis TrueImage one should have: • a PC-compatible computer with a Pentium CPU or similar, • 32 MB RAM, • a floppy or a CD-RW drive, • VGA monitor, • a mouse (recommended), • free disk space for archive files.
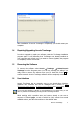
After installation of Acronis TrueImage is completed, you should restart your computer. 1.4 Repairing/Upgrading Acronis TrueImage In order to upgrade or repair your software, start the TrueImage installation program again. It will determine that TrueImage was already installed on your computer and will ask you if you want to restore (update) the program or completely remove it from disk. 1.
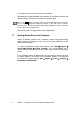
The switches can be set with the mouse or keyboard. Each dialog box contains detailed text comments for the dialog’s purpose and switches (control elements) as well as for each switch state. There is no Help button on Wizard pages. It is unnecessary because on each page there is detailed information about the purpose of the page and its controls. Moreover, there is detailed information about what possibilities you get if you select any of controls in any possible state.
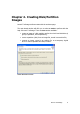
Chapter 2. Creating Disk/Partition Images Acronis TrueImage software starts with the welcome page. The next wizard window will offer you to select an action to perform with the help of Acronis TrueImage.
2.1 Selecting Partitions to Image In the next Selecting Partitions to Image window you will see the structure of the disks connected to your PC. Click a rectangle representing a partition to select it. As a result this rectangle will become underlined red. You’ll be able to consequently select several hard disk partitions and/or different disks. Click a rectangle representing the whole hard disk (with an icon, disk number and capacity) to select it for image creation.
2.2 Image Archive Location In the next Image Archive Location window you’ll need to select a type of a device to create a disk/partition image. Acronis TrueImage supports three device types: • hard disks, • network disks, • removable media – CD-R/RW, DVD+RW, Iomega Zip, Iomega Jaz, magneto-optical, and other drives. Selecting Image Archive location In the next Image Archive Creation window you’ll need to provide an archive filename to store images of chosen partitions (disks) to as well as its full path.
You can also use a connected disks tree in the left part of the window to find archive files (if previously created) and their locations. Selecting a folder and an archive file name If an archive file with the entered filename already exists in the chosen folder, you’ll be prompted about it by Acronis TrueImage with a question if you want to create a new file with the same name, that is to delete an old archive file and create a new one instead.
2.3 Compression Level In the next Compression level window you’ll need to select a data compression level of a partition image. A compression level can be selected by moving the slider. If you select zero compression, files will be obviously moved to an archive file without any compression, which is inefficient. On the other hand the work speed might drop and image creation time might increase, if you select the maximal compression.
2.4 Image Archive Splitting In the next Image Archive Splitting window you’ll be able to select if the software should create a single archive file or split it into a number of volumes. If you set the switch to Automatic, Acronis TrueImage will try to determine settings for certain situations itself. If there’s enough space on a hard disk that you’ve chosen for locating an image on, the software will create a single archive file.
Splitting an archive file into separate fixed size volumes makes sense when storing it on a hard disk as well, as you’ll be able to move archive volumes to CD-R/RW, DVD+RW disks in the future. Creating an archive file directly on a to CD-R/RW, DVD+RW disk would have taken much longer time then in case of a hard disk. 2.5 Protecting an Archive File with a Password An archive file with a partition (disk) image can be protected with a password.
2.6 Image Archive Comments In the next window you’ll be able to provide an archive file with any comment that may include any information on the PC and its user, the hard disk, partition data, image creation time, and any peculiarities and conditions.
2.7 An Archive File Creation Script In the next window you’ll see a partition (disk) image creation script (several images, perhaps). It will contain a list of operations to be performed on partitions (disks) along with their main features. An archive file creation script All operations of a partition (disk) image creation in an archive file are delayed in Acronis TrueImage. A partition (disk) image creation script is created first, and then it’s executed.
Chapter 3. Restoring a Disk/Partition from an Image Partition or disk restoration from an image is a more complex procedure than storing. When you store a partition, you can do it directly under Windows or from a bootable CD. But your system is assumed inoperable in general. If you need to restore individual files only, you’ll be able to work directly under Windows. However, if your system or a system partition (usually the primary one) is damaged, it gets more complex.
3.1 Selecting an Archive File To restore a disk/partition from an archive file you must set the switch to Restore a partition or the whole hard disk drive or deploy a new PC in the Action Selection window. Selecting an action: restore a partition In the next window Acronis TrueImage will show you the complete list of storage devices connected to your PC, including hard disks as well as any other storage drives.
If you commented the archive file when creating it, the description will help you understand if you selected the right archive file or the partition image is located in some other file. Your comment will be shown in the right part of the Image Archive Selection window. Notice that a comment is available without entering a password that protects an archive file. However, you won’t be able to either restore, or browse archive file contents without a password.
3.2 Selecting a Partition to Be Restored One archive file may contain images of several disk partitions or the whole disks. Therefore the next window will offer you the contents of the selected archive file. Select a partition for restoration by clicking the appropriate rectangle. It will become underlined red (by default).
3.3 Selecting a Destination Partition As it has been said above, you can restore a partition image, stored in an archive file, to a new hard disk. In the same way you can restore contents of a stored partition to another partition. For example, you could have stored logical drive D: data in an archive file. You would like this data to be restored to the logical drive E: on a new hard disk. Acronis TrueImage software allows to do this as well.
3.4 Selecting the Restored Partition Type and File System You can imagine the following example situation to understand what you might have to change partition type for. Both system, and data files were stored on a single damaged primary partition. Now you need to restore a partition from a back-up copy to another hard disk with several partitions and an operating system installed. You need only the data of a stored partition, and need not another system partition.
You should also remember that not all operating systems can boot from a FAT32 partition. MS-DOS, Windows 95 Original, Windows NT 3.x, 4.x does not support FAT32 and won’t work after restoration with a file system change, i.e. they can be restored to a FAT16 partition only. But you can freely convert a FAT16 partition with newer operating systems to FAT32. You can find file system comparatives in the A.2 «File Systems».
3.5 Resizing a Partition The information on a stored partition is kept in its image. The window shows exactly this information. You can resize a partition to make it larger or smaller (not smaller than the space occupied with its data.) Resizing a partition Having changed partition size and location if needed, click Next to continue. Having restored a partition, Acronis TrueImage will «map» its contents, stored in an archive file, to a logical drive.
3.6 Selecting a Partition Letter Windows operating system uses Roman alphabet letters for disk and partition identification. Letters are automatically assigned during OS boot process. Acronis TrueImage software lets you assign any unoccupied letter to a partition (logical drive) to be restored under Windows NT/2000/XP. To do this, set the switch to Yes, I want to assign a logical drive letter to the restored partition on the following page and select a letter from the drop-down list.
3.7 Selecting the Next Partition to Be Restored You can restore several partitions at one session in the same way as you can store several images. To do this, set the switch to Yes, I want to restore another partition or hard disk drive in the Next Selection window. Selecting the next partition to be restored Having clicked Next , you’ll see the Source Partition Selection window again.
3.8 Partition Restoration Script Window So, you’ll finally get a script again, but this time for restoring a partition from an image instead of creating an image in an archive file. Partition restoration script window Now Acronis TrueImage software is ready for partition restoration. If you click Back , you’ll be able to select other partitions and/or disks for restoration, rethink partition size changes, its type and file system selection, in other words to change any restoration parameters.
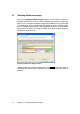
3.9 Partition Restoration Peculiarities While restore hard disk or partition you might receive this warning: Warning of unavailability of exclusive access to a logical drive at partition restoration This means the following. Operating system blocks logical drives for some low-level operations that Acronis TrueImage tries to perform to restore a partition. In particular, some application might work with this partition data. Therefore, it is necessary to close all applications before restoring a partition.
3.10 Peculiarities of Restoration from Removable Media Restoring a partition (disk) from removable media is as easy as restoring it from a hard disk. However please pay close attention to the procedure outlined below. If your partition (hard disk) image has been split into several volumes written on CD-R/RW, DVD+RW or other removable discs, you should first insert the last disc you created (this is called the Master volume). Further restoration steps are the same as outlined above.
Chapter 4. Restoring Individual Files As it has been said before, Acronis TrueImage software works with both hard disk partitions, and the whole disks. In particular, you can store images of several partitions or even disks in an archive file. However, if you have only one or several files damaged (or accidentally deleted!) on the partition, it would be inefficient to entirely restore it.
So, you’ll need to connect a temporary logical drive to restore a separate file (a group of files, folders) from an image. To do this, set the switch to Explore an image archive in the Action Selection window of Acronis TrueImage.
If this archive file isn’t protected with a password, selecting it you’ll see the previously created comment along with the list of stored partitions. If the file is protected with a password, you’ll see the comment only. In the next window you’ll be able to select one of the partition (disk) images to connect as a temporary logical drive. Selecting a partition and letter for a drive to be connected A partition is selected by clicking the appropriate rectangle representing it.
In the next window you’ll see the temporary logical drive connection script. The drive connection script window If you do not have any doubts regarding the selected partitions (and its letter), click Proceed to continue.
Select Unplug in the context menu of a connected drive, invoked by rightclicking the disk icon in the Windows window. As a result this disk will disappear. Additionally, having run Acronis TrueImage, you’ll find out another button in the operation selection window – Unplug temporary logical drives. A new operation in the Action Selection window After selecting this operation and clicking Next , you’ll see the list of connected temporary logical drives. Use it to select a drive to unplug.
Appendix A. A.1 Partitions and File Systems Hard Disk Partitions It would be quite inconvenient if you could only access the entire hard disk, so a mechanism was created that allows you to divide the hard disk into several parts for storing different types of data or operating systems. This is done by partitioning hard disks into partitions. Partitioning hard disk is done by special applications. In MS-DOS and Windows the widely known FDISK and Disk Administrator programs are used for this purpose.
Different operating systems use different file systems. Some operating systems are able to work with only one file system while other can use several of them. Let us describe some of widely used file systems in detail. A.2.1 FAT16 FAT16 file system is widely used by DOS (DR-DOS, MS-DOS, PC-DOS, PTS-DOS and other), Windows 95/98/ME, Windows NT/2000/XP operating systems and is supported by most other systems. Main features of FAT16 are the file allocation table (FAT) and clusters.
A.2.3 NTFS NTFS file system is the main file system for Windows NT/2000/XP. Its structure is closed, so no other operating system fully supports. Main structure of NTFS is the MFT (Master File Table). NTFS stores a copy of the critical part of the MFT to reduce the possibility of data damage and loss. All other NTFS data structures are special files. Like FAT, NTFS uses clusters to store files, but cluster size does not depend on partition size.