
User's Manual


5. Choose a target archive for the backup being configured – you can either add a new backup to an
existing archive or create a new one. Choose the backup location and assign a name to the
backup to be created. It is better to use meaningful names, e.g. Disk1_full.tib.
6. Carefully read the Summary of actions to be performed during backup and click Proceed if you
are satisfied with the backup task settings, otherwise click Options on the Summary screen to
change the settings.
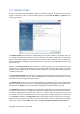
7. Select a backup method. For a more detailed explanation of the methods see Full, incremental
and differential backups (p. 17). When performing backups in the recovery environment many
users prefer full backups, though you may choose another method depending on your needs.
8. Set the backup options. When backing up in the recovery environment you must set the options
manually for each backup task. You can encrypt the backup for data protection and select a
compression level (the program shows estimated backup sizes for each level). You can also
choose to validate the backup immediately after its creation (under "Additional settings"), though
it can be done later. In any case validation of a system disk backup is best performed in the
recovery environment, as you will use the recovery environment when recovering the system
partition or disk.
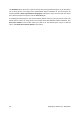
9. If you wish, provide comments to the backup. You will also be able to add comments later.
10. Click Proceed to start the backup.
It is extremely important to validate the system disk backup before trying to recover, because Acronis
True Image Home 2010 Netbook Edition deletes the original partition(s) on the disk before starting
recovery and if it finds a problem with the backup file during recovery, you are left with nothing. It is
even better to try system disk recovery to a spare hard drive, if you have one.
6.3.3. Backing up a data partition or disk
Your personal data (MS Office documents, financial documents, pictures, music, videos, etc.) require
protection in no less degree than your operating system. Such data is better kept separately from
your operating system and applications on a dedicated partition or disk. This speeds up data partition
or disk image backup, as well as recovery. It is recommended to perform data disk backup in
Windows, because in most cases Windows drivers for storage devices operate better and faster than
the respective Linux drivers used in the recovery environment. In addition, recovery of data disks and
partitions usually occurs in Windows. Let's create a data disk backup task in Windows.
Attach the external drive if it is to be used as the backup destination and make sure that the drive is powered on.
This must be done before starting Acronis True Image Home 2010 Netbook Edition.
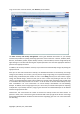
1. Click the My Disks link under Back Up on the Welcome screen.
2. Select the box of your data partition or disk on the What to back up screen.
3. Choose a target archive for the backup task being configured – you can either add a new backup
to an existing archive or create a new one. Choose the backup location and assign a name to the
backup to be created. It is better to use meaningful names, e.g. Data_disk.tib. When you store
different backup archives in the same location, e.g. on an external drive, you may want to create
a new folder when creating a new backup archive. To do this, click Create new folder in the
toolbar, then assign a meaningful name to the folder.
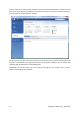
4. Carefully read the Summary of actions to be performed during backup and click Proceed if you
are satisfied with the backup task settings, otherwise click Options on the Summary screen to
change the settings.
Copyright © Acronis, Inc., 2000-2009 39