
User's Manual


If you have not assigned names to the disks and have any doubts when selecting the destination
disk, you may abort the recovery by clicking Cancel and try to identify the target disk by its model
number, interface, etc. To see this information, select Tools & Utilities → Add New Disk in the
main menu and the Disk selection screen will show the information. Use it for identifying the
destination disk number, then click Cancel, start the Recovery Wizard again, repeat the above
steps, and select the destination disk.
7. Clicking Accept will return you to the "Settings of partition ..." screen. Check the partition type
and change it, if necessary. You should remember that the system partition must be primary and
marked as active.
8. Proceed to specifying the partition size by clicking Change default in the Partition size area. By
default the partition will occupy the entire new disk. You can resize and relocate the partition by
dragging it or its borders with a mouse on the horizontal bar on the screen or by entering
corresponding values into the appropriate fields (Partition size, Free space before, Free space
after). While specifying the partition size remember that you need to leave as much unallocated
(free) space after the newly resized partition as will be needed for the second partition. Usually
the free space before partitions is equal to zero. Click Accept when the partition has the size you
have planned for it, then click Next.
9. Begin specifying the settings for the second partition. Click New location, then select unallocated
space on the destination disk that will receive the second partition. Click Accept, check the
partition type (change, if necessary) and then proceed to specifying the partition size which by
default is equal to the original size. Usually there is no free space after the last partition, so
allocate all the unallocated space to the second partition, click Accept and then click Next.
10. Carefully read the summary of operations to be performed. If you do not want to validate the
backup, click Proceed, otherwise click Options and select the "Validate backup archive before
recovery" box before clicking Proceed.
11. When the operation finishes, exit the standalone version of Acronis True Image Home 2010
Netbook Edition.
Windows should not "see" both the new and old drive during the first boot after recovery. If you upgrade the old
drive to a larger capacity new one, disconnect the old drive before the first boot otherwise there may be
problems booting Windows.
Switch off the computer, if you need to disconnect the old drive, otherwise just reboot the computer
after removing the rescue media.
Boot the computer to Windows. It may report that new hardware (hard drive) is found and Windows
needs to reboot. After making sure that the system operates normally, restore the original boot
sequence.
9.2.2. Recovering a disk with a hidden partition
Recovering a backup of the system disk with a hidden partition (e.g. created by the PC manufacturer
for diagnostics or system recovery) to a different capacity hard drive, requires to take into account
some additional factors. First of all, for the best chance of success, it is necessary to keep on the new
drive the physical order of the partitions that exist on the old drive and place the hidden partition to
the same location - usually at the start or the end of the disk space. In addition, it is better to recover
the hidden partition without resizing to minimize the risk of possible problems.
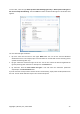
So before proceeding with recovery, you need to know about all partitions existing on the system
disk, their sizes, and physical order. To see this information, start Acronis True Image Home 2010
Netbook Edition and choose Recovery → Recovery Wizard in the main menu. Select a backup of your
Copyright © Acronis, Inc., 2000-2009 77