
User's Manual


5. Select the Daily scheduling option. If you think that your work results will be safer being backed
up more often, select Run the task every x hour(s) until the end of the day box and specify the
interval in hours. Your files can be open when backups are running, though it might be advisable
to close them when working with a database.
6. Choose a backup method. If you would like to save several versions of your project files, select
the Incremental method. Thus Acronis True Image Home 2010 Netbook Edition will at first create
a full backup, then will supplement it with incremental backups till the project is finished. After
finishing the project you will be able to either delete the task or disable it until you need to run
the task again.
7. The next step allows you to exclude from the backup temporary files created, e.g. by Microsoft
Word by providing appropriate criteria.
8. When the project files contain sensitive information, the backup options allow protecting your
backups with a password and encryption. In addition, you can set validation of backups
immediately after creation – this makes sense in case of frequent backups as it relieves you of
remembering to validate them later.
9. The next step allows setting automatic consolidation of the backup archive, for example, when
the "age" of backups exceeds the desired time period (30 days by default).
10. If you wish, provide comments to the backup. You will also be able to add comments later.
11. Click Proceed when you are satisfied with the backup task settings.
6.3.5. Backing up to a network share
With Acronis True Image Home 2010 Netbook Edition you can back up your data to a network share.
This may be desirable, for example, when you have a file server and want to use it for backing up data
from PCs in your home network. Depending on your backup strategy, you may want to back up just
files and folders or entire disks. One more consideration is the data transfer rate provided by your
network. For example, a Gigabit Ethernet network has a bandwidth sufficient for all amounts of data
to be backed up. However backing up over Wi-Fi connection may be time-consuming when you need
to back up a hundred gigabytes.
Files and folders or data partitions can be backed up and recovered in Windows. If you plan to back
up your system disk or partition, please, make sure that the standalone version of Acronis True Image
Home 2010 Netbook Edition can "see" the network share to be used for backups as system recovery
will be done in the recovery environment. After booting from the rescue media make sure that you
can browse to the share in the Backup wizard or Recovery wizard.
It may be advisable to first back up and recover some files to ensure that you can perform those
operations over the network. In addition, it is not recommended to map the drive containing the
network share. Specifying the UNC path makes it easier to establish network connection in most
cases.
Let's suppose you want to back up your system partition.
1. Start Acronis True Image Home 2010 Netbook Edition and click the My Disks link under Back Up
on the Welcome screen.
2. Select the check box of your system partition on the Source selection screen.
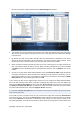
3. When you are connecting to a networked computer, in most cases you will need to provide the
network credentials (user name and password) to access a network share. To do this, select the
Use NT authentication box and enter the user name and password into the appropriate fields.
Copyright © Acronis, Inc., 2000-2009 41