
User's Manual

1. Arrange the boot sequence in BIOS so as to make your rescue media device (CD, DVD or USB
stick) the first boot device. See Arranging boot sequence in BIOS (p. 146).
2. Boot from the rescue media and select Acronis True Image Home 2010 Netbook Edition (Full
version).
3. Select Recovery → Recovery Wizard in the main menu and then choose the image backup of
your system partition (or entire system disk) that you want to use for recovery.
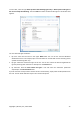
If the disks have different disk letters in Windows and the recovery environment, the program
will display the following error message: "Acronis True Image Home 2010 Netbook Edition cannot
detect volume N of "Name" archive", where Name is the name of the required image backup
archive and volume number (N) may be different depending on the number of backups in the
archive. Click Browse and show the path to the archive.
4. Select Recover whole disks and partitions at the Recovery method step.
5. Select the system partition (usually C) on the What to recover screen. If the system partition has
a different letter, select the partition using the Flags column. It must have the Pri, Act flags. As
you are recovering the system partition to the original hard drive, there is no need to select the
"MBR and track 0" box.
6. At the "Settings of partition C" (or the letter of the system partition, if it is different) step check
the default settings and click Next if they are correct. Otherwise change the settings so as to suit
you before clicking Next.
7. Carefully read the summary of operations at the Finish step. If you have not resized the partition,
the sizes in the Deleting partition and Recovering partition items must match. If you do not want
to validate the backup, click Proceed, otherwise click Options and select the "Validate backup
archive before recovery" box before clicking Proceed.
8. When the operation finishes, exit the standalone version of Acronis True Image Home 2010
Netbook Edition, remove the rescue media and boot from the recovered system partition. After
making sure that you recovered Windows to the state you need, restore the original boot
sequence.
9.2. Recovering a disk backup to a different capacity hard
disk
Recovery of a disk backup containing several partitions to a hard disk that has a different capacity
using manual resizing of the partitions can be considered as one of the most complicated operations
in Acronis True Image Home 2010 Netbook Edition. This is especially true when you have backed up
the original hard disk containing a hidden diagnostic or recovery partition.
Recovering a dual/multiboot system disk e.g. with Windows and some flavor of LINUX may be even
more fraught with difficulties. Quite often it requires some research on the appropriate forums
before attempting to perform a recovery so this section does not cover such case.
Make the preparations described at the beginning of the previous section Recovering your system
partition (p. 74). In case of upgrading the healthy system disk to a larger capacity new one, if you
have not assigned unique names to the partitions on the system disk before making a system disk
backup, it might make sense to assign such names and create a new backup of the entire disk. This
will allow identifying the partitions by their names and not by the letters which may differ when
booting from the rescue media. If you are recovering from a system disk drive failure, assign names
now anyway. The names will help you find the drive containing your backups, as well as the target
(new) drive.
Copyright © Acronis, Inc., 2000-2009 75