
User's Manual


(Partition size, Free space before, Free space after). Click Accept when the partition has the
required size and location and then click Next.
Specify the settings for the second partition which in this case is your system partition. Click New
location, then select unallocated space on the destination disk that will receive the partition. Click
Accept, check the partition type (change, if necessary). You should remember that the system
partition must be primary and marked as active. Specify the partition size which by default equals
the original size. Usually there is no free space after the partition, so allocate all the unallocated
space on the new disk to the second partition, click Accept and then click Next.
9. Carefully read the summary of operations to be performed. If you do not want to validate the
backup, click Proceed, otherwise click Options and select the "Validate backup archive before
recovery" box before clicking Proceed.
10. When the operation finishes, proceed to MBR recovery. In this case you need to recover the MBR
as the PC manufacturer could change the generic Windows MBR or a sector on the track 0 to
provide access to the hidden partition.
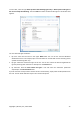
11. Select the same backup once more, right-click and select Recover in the shortcut menu, choose
Recover whole disks and partitions at the Recovery method step and then select the MBR and
Track 0 box.
12. At the next step select the destination disk as the target for MBR recovery, click Next and then
Proceed. After MBR recovery is complete, exit the standalone version of Acronis True Image
Home 2010 Netbook Edition.
Windows should not "see" both the new and old drive during the first boot after recovery. If you upgrade the old
drive to a larger capacity new one, disconnect the old drive before the first boot otherwise there may be
problems booting Windows.
Switch off the computer, if you need to disconnect the old drive, otherwise just reboot the computer
after removing the rescue media.
Boot the computer to Windows. It may report that new hardware (hard drive) is found and Windows
needs to reboot. After making sure that the system operates normally, restore the original boot
sequence.
9.3. Recovering a data partition or disk
As we already said, data partitions and disks are usually recovered in Windows because this allows
you to avoid such issues as the program not detecting your hard drives, changing disk letters, etc. To
reduce the risk of problems during recovery even more, validate the backup archive to be recovered
and check the destination disk for errors using chkdsk.
Attach the external drive if it contains the backup archive to be used for recovery and make sure that the drive is
powered on. This must be done before starting Acronis True Image Home 2010 Netbook Edition.
1. Start Acronis True Image Home 2010 Netbook Edition.
2. Select Recovery → Recovery Wizard in the main menu, then choose the image backup containing
the data partition you want to recover.
3. Select Recover whole disks and partitions at the Recovery method step.
4. As you are going to recover a data partition, there is no need to select the "Recover MBR and
track 0" box at the What to recover step. Select just the data partition you want to recover.
5. The next step allows you to select settings for the partition to be recovered. When recovering the
partition to the original location, you only need to check the settings. If you want to recover the
Copyright © Acronis, Inc., 2000-2009 79