
User's Manual


partition to another location, select the new location and set the partition type you need (or
leave the default setting). When the new location is an existing partition, usually you may leave
its disk letter and size unchanged. When the new location is unallocated space e.g. after installing
a new hard drive you intend to use for your data, specify the size of the new partition and assign
a logical disk letter.
6. Carefully read the Summary. After making sure that you have made the correct settings, click
Proceed, if you do not need to change the default recovery options, otherwise click Options.
7. The Options step allows setting the recovery options, for example, to check the file system after
recovery. For more information about the recovery options see Setting default recovery options
(p. 90). After setting the recovery options click Proceed.
Recovering the entire data disk backup requires similar steps with few minor differences, for
example, there is no "Check file system after recovery" option. When recovering to the original hard
drive the steps of the Recovery Wizard are straightforward - just make sure that you select the disk
with the same number as the backed up disk, as the destination.
Recovering your data disk backup to a hard drive with a different capacity has some nuances
depending on its capacity and geometry (the number of heads and sectors per track). When
recovering to a smaller capacity hard drive, the partition(s) size will be proportionally reduced. When
recovering to a larger capacity hard drive, there are two cases: 1) if the hard drive has the same
geometry, the backed up disk will be recovered "as is" thus leaving unallocated space; and 2) if the
hard drive has different geometry, the partition(s) size will be proportionally enlarged.
9.4. Recovering files and folders
Depending on the backup types you have used, there may be several methods of recovering files and
folders. In most cases you recover files and folders in Windows. You can recover files and folders from
a file backup archive and from a disk/partition image as well. To recover files/folders from an image,
you can mount the image (see Mounting an image (p. 109)) and copy files/folders to a desired
location using Windows Explorer.
If you need to recover just a single file/folder or a few files, double-click on the required image
backup archive. Then drill-down to the folder containing the file(s) you need to recover, select the
file(s), right-click and choose Copy in the shortcut menu, open a folder for saving the files to be
recovered, right-click in the folder and choose Paste in the shortcut menu. You can also drag the files
from the backup archive into the destination folder. This method can also be used in case of My Data
type backup archives.
One more method of recovering files/folders from an image is described below. See Recovering files
and folders from image archives (p. 82).
9.4.1. Recovering files and folders from file archives
This section describes how to recover files and folders from a file backup archive.
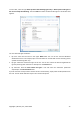
1. Start the Recovery Wizard by selecting Recovery → Recovery Wizard in the main program menu.
2. Select the archive.
Data recovery directly from an FTP server requires the archive to consist of files of no more than 2GB. If you
suspect that some of the files are larger, first copy the entire archive (along with the initial full backup) to a
80 Copyright © Acronis, Inc., 2000-2009