
User's Manual


9. The task progress will be shown in a special window. You can stop the procedure by clicking
Cancel. Please keep in mind that the aborted procedure may still cause changes in the destination
folder.
9.4.2. Recovering files and folders from image archives
Image archives provide recovery of not only entire disks/partitions, but files/folders too.
1. Start the Recovery Wizard by selecting Recovery → Recovery Wizard in the main program menu.
2. Select the archive.
Data recovery directly from an FTP server requires the archive to consist of files of no more than 2GB. If you
suspect that some of the files are larger, first copy the entire archive (along with the initial full backup) to a
local hard disk or a network share disk. See notes and recommendations for supporting FTP servers in
Supported storage media.
3. If you are going to recover files from an archive containing incremental backups, Acronis True
Image Home 2010 Netbook Edition will enable selecting one of the successive incremental
backups by its creation date/time. Thus, you can roll back the file/folder state to a certain date.
To recover data from an incremental backup, you must have all the previous backup files and the initial full
backup. If any of the successive backups are missing, recovery is not possible.
To recover data from a differential backup, you must have the initial full backup as well.
4. At the Recovery method step select Recover chosen files and folders.
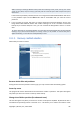
5. Select where you want to recover the chosen files/folders. You can recover data to its original
location or choose a new one, if necessary. Choosing a new location results in appearance of one
more required step, namely, Destination.
When you choose a new location, by default the selected items will be recovered without
recovering the original, absolute path. You may also wish to recover the items with their entire
folder hierarchy. If this is the case, select Recover absolute path.
At the Destination step select a new location on the directory tree. You can create a new folder
for the files to be recovered by clicking Create new folder.
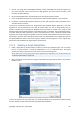
6. Select the files and folders to recover. Make sure that you unselect all unnecessary folders.
Otherwise you will recover a lot of excess files.
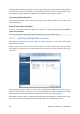
7. The first optional step allows you to keep useful data changes made since the selected backup
was created. Choose what to do if the program finds a file in the destination folder with the same
name as in the archive. By default, the program will overwrite existing files and folders, though
more recent files and folders are protected from being overwritten. If necessary, you can protect
the system, hidden files and folders from being overwritten by selecting the appropriate check
boxes.
In addition, you can protect the files that meet the criteria you specify in this window from being
overwritten.
Unselecting the Overwrite existing files checkbox will give the files on the hard disk
unconditional priority over the archived files.
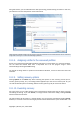
8. Select the options for the recovery process (that is, recovery process priority, file-level security
settings, etc.). The options you set on this page will be applied only to the current recovery task.
9. Up to this point, you can make changes in the created task by choosing the step you want to
change and editing its settings. Clicking Proceed will launch the task execution.
82 Copyright © Acronis, Inc., 2000-2009