OPERATION MANUAL Operation Manual Nimbie Automated Disc Duplicator Model #: NB12 Series (Standalone) Serial Number: ______________________________ (The serial number is labeled on the rear panel of the device.
Operation Manual, Nimbie NB12 Version 1.3 PREFACE Important Safety Instructions For your safety, basic precautions should always be followed to reduce risk of damage, electric shock, fire, and personal injury. This includes the following: Read this manual carefully and follow all warnings and instructions. Operate the unit with only the proper electrical specifications as labeled on the device.
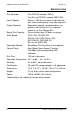
Version 1.3 Operation Manual, Nimbie NB12 brands, and trademarks are the property of their respective owners. FCC Compliance: This equipment has been tested and found to comply with the limits for a Class B digital device, pursuant to Part 15 of the FCC Rules. These limits are designed to provide reasonable protection against harmful interference in a residential installation.
Operation Manual, Nimbie NB12 Version 1.3 tampering, negligence, faulty installation, accidents, lack of reasonable care, unauthorized repairs or service, or if installed to any device not provided with the product, or if the serial number label provided with this product has been broken or removed. This warranty does not cover damages that occur in shipment, due to acts of God. All repairs and replacement services shall only be handled by Acronova Technology Inc, and by authorized service centers.
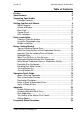
Version 1.3 Operation Manual, Nimbie NB12 Table of Contents Preface 2 Specifications 6 Unpacking Your Nimbie 7 Package Contents......................................................................... 7 Getting Familiar with Nimbie 9 Block Diagram............................................................................... 9 A Look at Nimbie........................................................................... 9 Rear View..............................................................................
Operation Manual, Nimbie NB12 Version 1.
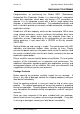
Version 1.3 Operation Manual, Nimbie NB12 UNPACKING YOUR NIMBIE Congratulations on purchasing the Nimbie NB12 (Standalone) Automated Disc Duplicator. Nimbie is a state-of-the-art, automated, optical disc duplicator, which does not require a PC connection to operate. It is an integrated system with a built-in single optical disc recorder, a hard disk and autoloaders. The embedded controller and built-in hard disk provide an extremely reliable automated, standalone, duplication solution.
Operation Manual, Nimbie NB12 Version 1.3 The items listed below should be included in the package: 8 One Nimbie NB12 Automated Disc Duplicator One power cord One power adapter One spindle box (serves as the Finish Disc Bin) Three Extension Rods (attached to the underside of Nimbie's lid) One Alignment Pad Four Legs One operation manual © 2011, Acronova Technology, Inc.
Version 1.3 Operation Manual, Nimbie NB12 GETTING FAMILIAR WITH NIMBIE Block Diagram Nimbie NB12 is an integrated system with a single optical disc drive, hard disk and autoloader. See the illustration below.
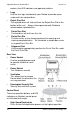
Operation Manual, Nimbie NB12 Version 1.3 contains the LED indicators and operation buttons. Legs Use the four legs included with your Nimbie to provide space underneath for rejected discs. Reject Disc Slot The rejected discs will slide out from the Reject Disc Slot at the bottom of the unit. Always allow space beneath Nimbie to accommodate rejected discs. Finish Disc Slot Finished discs will exit from this slot.
Version 1.3 Operation Manual, Nimbie NB12 write speed to produce discs at the maximum production rate. Norm-Speed Duplication Press to start normal speed duplication. This increases quality but decreases output rate. Recommended for audio and video discs. Function Key Press this button to activate or deactivate disc verification during the duplication process. Test/Abort Press to abort the current duplication process or to start a duplication simulation.
Operation Manual, Nimbie NB12 Version 1.3 (This page is intentionally left blank.) 12 © 2011, Acronova Technology, Inc.
Version 1.3 Operation Manual, Nimbie NB12 DEVICE INSTALLATION Finding a Place for Nimbie Nimbie should be placed on a fairly level surface, firm enough to support the unit and discs. Always allow ample workspace for your operation, with easy access to the blank and finished discs. Do not expose the unit to direct sunlight or high humidity, as it may cause the unit to malfunction. If you desire, Nimbie can be placed on a raised block so there is ample room to receive discs from the Finish Disc Slot.
Operation Manual, Nimbie NB12 Version 1.3 under the Finish Disc Slot. Use the power cord that came with the unit to connect Nimbie to a wall outlet with a reliable power supply. You have now successfully completed the installation of Nimbie device. 3) 14 © 2011, Acronova Technology, Inc.
Version 1.3 Operation Manual, Nimbie NB12 BEFORE GETTING STARTED Tips for Handling Optical Discs Never touch the printable or data surface of the disc, as it may decrease quality and disc lifespan. Refer to the arrows on the illustration to the right, Always handle discs from the outer edge or the center hole. What You Need to Start a Disc Duplication Session The Nimbie NB12 is a standalone duplicator, which does not require a computer connection.
Operation Manual, Nimbie NB12 Version 1.3 or raise Nimbie using the provided legs to increase space underneath for more discs. Important: Nimbie will stop operation if a rejected disc cannot clear the Reject Disc Slot. More Than 30 Discs in One Session Using the extension rods, Nimbie can process 100 or more discs without refilling. To increase Nimbie’s capacity to 100 discs, please follow the instructions below: 1) Open the Blank Disc Storage Lid. 2) Remove the extension rods from the lid’s underside.
Version 1.3 Operation Manual, Nimbie NB12 Nimbie not only performs one-to-multiple, but also multiple-to-multiple disc duplication. Whenever Nimbie detects a non-blank disc in a recorder, a disc image will be written to the built-in hard disk. The disc image is then used to duplicate all the following blank discs, until another master disc is detected or the loader becomes empty. When another non-blank disc is detected, a new disc image will be written to the built-in hard disk.
Operation Manual, Nimbie NB12 Version 1.3 Handling Disc Write Failures Some discs may be defective and fail during a write session. A failed disc will be sent to the Reject Disc Slot. To avoid excessive disc failure, Nimbie is designed with the following rules when disc failure is encountered: In a normal duplication session if the recorder continuously fails to write to ten discs in sequence, this recorder will be deactivated.
Version 1.3 Operation Manual, Nimbie NB12 OPERATION QUICK GUIDE Abort a Running Operation To abort a duplication session, press and hold the Test/Abort button for two seconds. If the recorder is currently writing to disc, Nimbie is designed to abort the duplication session after the recorder has completed writing to disc. Important: Turning the power switch to the Off position will immediately terminate the active duplication session, damaging any disc in the process of being written to.
Operation Manual, Nimbie NB12 Version 1.3 Important: The Nimbie will save the latest master disc image, for future duplication, on the hard disk until a new master disc has been read. This is the case even if the Nimbie has been turned off or restarted after a previous session has completed. If using multiple master discs to produce different quantities of duplicate discs, repeat steps 1 and 2 to load additional sets of masters and blank discs.
Version 1.3 Operation Manual, Nimbie NB12 Erase a Stack of Rewritable Discs This operation erases a stack of rewritable discs for future use: 1) 2) Load the rewritable discs you would like to erase into the disc loader. Press the Test/Abort button to start. Nimbie will erase discs until the disc loader is empty. Verify a Stack of Discs This operation verifies a stack of duplicate discs against a master disc.
Operation Manual, Nimbie NB12 Version 1.3 (This page is intentionally left blank.) 22 © 2011, Acronova Technology, Inc.
Version 1.3 Operation Manual, Nimbie NB12 APPENDIX Nimbie Maintenance Periodically cleaning the device will ensure proper performance. Follow the steps below to maintain Nimbie: 1) 2) 3) 4) 5) Turn the power switch to the Off position. Remove the master and blank discs. Unplug the power cord from the wall outlet. Clean the Nimbie unit using a lint-free cloth moistened with warm water. Dry the unit immediately with a dry lint-free cloth.
Operation Manual, Nimbie NB12 Version 1.3 The Quality of the Master Disc Counts As with blank discs, the quality and the data format of the master disc play a critical role in the duplication process. If you encounter difficulties try Norm-Speed Duplication to increase quality and lower failure rate. Writing Speed The recorder will automatically adjust the writing speed according to the disc quality.
Version 1.3 Operation Manual, Nimbie NB12 FREQUENTLY ASKED QUESTIONS Why is my duplication failure rate so high? Try a lower writing speed using Norm-Speed Duplication. Use a different brand of blank discs. Check the power source. Why do my discs get stuck in the disc loader during the duplication process? Check to see if the disc is the standard size (120mm). Make sure discs are level in the loader. Reduce the quantity of discs per load.
Operation Manual, Nimbie NB12 Version 1.3 If Nimbie is showing an LED error please remove all the discs in the loader. Be sure to check for any discs that may be stuck inside the unit. Press the NORM button and hold for five seconds to restart Nimbie. You can also turn the power switch to the Off position and back to the On position after waiting 30 seconds. Nimbie may continue to show an LED error.
Version 1.3 Operation Manual, Nimbie NB12 (This page is intentionally left blank.) © 2011, Acronova Technology, Inc.
Operation Manual, Nimbie NB12 Version 1.3 Acronova Technology, Inc. http://www.acronova.com Manual Ver.: 1.3, July 2011 Part #: 711-NT12-9AC6-3 28 © 2011, Acronova Technology, Inc.