Time & Attendance System ( TAS2000 ) Softools Middle East http://www.softoolsme.com PO Box 14959 Dubai, U.A.E. Tel: 2680533, Fax: 2680535, info@softoolsme.com Manual Version C.
INDEX Part 1…………………….…… Introduction Part 2……………………….… Getting Started ……………………………….. Installing TAS2000 software ……………………………….. Joining Secured Workgroup ……………………………….. Log On To TAS2000 ……………………………….. System Initialization ……………………………….. Adding A New Employee ……………………………….. Adding A New Cost center ……………………………….. Marking Attendance on Manual Screen ……………………………….. IN/OUT/Absentee/Incomplete Explained ……………………………….. Exit From TAS2000 Part 3……………………….… Advance Features ………………………………..
Part 6……………………….… DOs and DON’Ts for Time Keeper Part 7……………………….… Configuring Readers …………………………………… iGuard from Lucky Technology …………………………………… TR510 (from GIGA-TMS) …………………………………… TR550 (from GIGA-TMS) …………………………………… TR40XX (from GIGA-TMS) Part 8……………………….… Frequently Asked Questions Part 9……………………….
Part 1 Introduction TAS2000 (Time & Attendance System) provides following facilities and benefits. 1. Employees mark their attendance electronically, using a method like fingerprint, magnetic card, proximity card, barcode reader, or even computer screen itself. This speeds up attendance related activity (typically 2-8 seconds per employee depending on terminal type). 2. Recurring effort on maintaining punch cards and associated cost is eliminated. 3. An employee’s presence / absence can be known instantly.
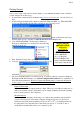
Part 2 Getting Started Once you are ready, it may take less than 5 minutes to start marking attendance in the evaluation system. Simply follow these steps: 1. Download the evaluation file from Internet (http://www.softoolsme.com) or use the CD if you have. 2. Double click the installation file (which is named like TFijCxyN.EXE, e.g. TF93C91N.EXE for version TF9.3D9.0C9.1D9.0). This will bring up the following screen.
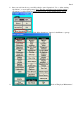
Part 2 8. Once you exit from above, you will be asked to start “Operations”. Do so. After starting “Operations”, a screen will open up. Note: The first screen that opens up after starting “Operations” is called “Time and Attendance Screen” in this manual and the system. Click “More Operations” button for the Menu to open up. 9. Click on “Employee Maintenance”.
Part 2 10. Now add an employee record by clicking on “Add Record”: • • • • • • Enter Employee ID – it must have as many characters (1 to 7) as stated during initialization. Enter Name of the person Select Cost Centre to which this person belongs (create a new cost-centre by double clicking). Creation of new cost center codes is normally done by clicking on the “Cost Centre Maintenance” button in More Operations menu switchboard.
Part 2 • Exit “Employee Maintenance”. • Exit Operations 11. Now start “Interface To Post Data” again and enter your Employee ID to record attendance. Incorrect entry will display “Sorry”. Correct entry will display “Thanks”. 12. Start Operations and in “Time and Attendance Screen” click on “IN”. Two screens will open up on Right Hand Side. In the RHS, top screen you will see this new employee - as expected, since you have just now marked his attendance. 13. Now click on “Out” button.
Part 3 Advance Features: It is best that you come to this place after using system and seeing various reports. Department Maintenance This is available if system parameters have been setup to use it. • Enter 2 character code • Enter 15 character description Department is useful to see department wise daily OT. In smaller companies you may not use it or allow all employees to be part of default department “*”. Shift Maintenance Do you have following issues? • Five days a week or Half days (5.
Part 3 Similar to above, you can also enter data for Break 1 and Break 2 – if they are used. For example Break 1 could be for lunch, and you may like to monitor who is going early and coming back late. Break 2 could be a second break like tea break. RAMADAN/Special Days Just as for STANDARD days, you can configure the shift for those days in the year when working hours are different. In gulf and many Islamic countries it is common that during the month of Ramadan, working hours are shorter than standard.
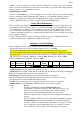
Part 3 processes by TAS2000. In such a case enter 300 in ‘Additional Info’. Action will take place after 8:15. 2 3 4 5 6 7 8 9 A B C Similar to ‘1’ above, however, the report is sent to Manager’s email address, defined in System Configuration and it cost-centre separation is NOT done. Similar to ‘1’ above, however instead of using Grace Time, this action uses Start Time of shifts. Similar to ‘2’ above, however instead of using Grace Time, this action uses Start Time of shifts.
Part 3 Define User's Role User is linked to a Role here. Privilege Maintenance Privileges of each Role are maintained here. Select a ‘Role’ and then for each Form/Report specify exactly what privileges are allowed. For Reports only ‘Read’ permission is meaningful. Define User's Data Scope This is a powerful feature that allows you to limit the scope of a user only to those employees which he needs to process.
Part 4 Reason/Jobbing/Job Costing TAS2000 has extended features for ‘Non-Attendance’ scans too. What is non-attendance scans? These are scans that should not affect the attendance of an employee. For example, you want the employee to scan even when he is going out for and coming back from official work. Obviously we don’t want to use these scans for attendance purpose and deduct the time he was out of the office for official work from his daily attendance! Such scans are called ‘Non-Attendance Scans’.
Part 4 Using Job Costing Job Costing Requires additional license: Ensure ‘Job Costing’ is checked.
Part 5 System Operations This section gives an overall summary of how TAS2000 works. TAS2000 can be divided into following sections: 1. Master Maintenance a) Cost Centre: Upto 9 characters. At least one CC should exist. It is a good idea to use 9 character code (CC basis + CostCentre) that matches with PPR2000 – if also purchased.
Part 5 • To help in easy maintenance of daily attendance, 15 powerful filters are provided in Daily Attendance Form. When this form is opened, a warning message appears if attendance data is not complete (i.e. as per the system, one or more employee has yet not left company at the end of the day’s work). If all the employees have actually left, then it means that either they have wrongly punched IN/OUT or forgotten to swipe their card.
Part 5 • Click on ADD button. A new record is automatically presented with all fields filled-in (values taken from the Shift Table), ready to be created. If you agree with the data, simply click the Mouse outside the Record area for it to be created. Otherwise edit the field that you wish to change and then Create it as described above. (Note: you CAN modify scan date and time if required for records you created, later) Close A Day Once you are satisfied all attendance data is correct, close the day.
Part 6 The DOs and DON’Ts for Time Keeper The DOs ======= Daily: ====== 1. Ensure all employees are "Out" for yesterday. This can only be done if attendance is "complete", i.e. there are no "IN" or "IN-OUT-IN" records for yesterday. 2. Ensure that information in following columns in "Daily Attendance" is correct for yesterday: -Normal (normal attendance), usually it should be same as PH (planned hours).
Part 6 2. Print Time Card and if any attendance is not correct (normal, OT, sick, Flat), correct it, so that payroll system gets correct data. 3. . Do the E.O.M. The DON'Ts ========== 1. If using PPR2000 and interface is being used, then do not create a new employee in TAS2000. New employee is created when a new employee is created in PPR2000 automatically. 2. If using PPR2000 and interface is being used, then do not create a Cost Centre in TAS2000, it is created automatically through PPR2000 4.
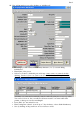
Part 7 Configuring Readers IGuard from Lucky Technology While configuring the reader, let the machine numbers be 4 digits like 0001. Use ISVRSetup2512.exe or later file to install iServer. During installation of iServer, ensure that you select MS Access version 2.0 and also Text Status for IN/OUT status as shown below. On the next screen (shown below), just click on OK button Next, to “Do you want to configure the program now?” select Yes.
Part 7 On the following screen, select date format as dd-mm-yyyy”: Click Apply and OK. On the main screen click on ‘Add’ button. The Add Terminal screen will pop-up. Enter TCP/IP address, Admin User Name and Admin Password of the iGuard terminal and click ‘Add’ button. You may connect to database now. For more details read iServer manual. Special Notes: 1. The User Id used in iGuard reader is to be used as Proxy ID in TAS2000 Employee Master. Ensure Proxy ID length in TAS2000 is configured 2.
Part 7 TR510 (from GIGA-TMS) Install TR510 communication software as described in TR510 manual. Create C:\TR4000 folder. Make sure that the IP address of the reader is properly associated with the reader (000-Default or 001-Machine-1 etc) in Settings. Test with Ping to check proper communication. In the ‘Time Scheduler’ page make sure settings in the fields circled with red colour are as shown below.
Part 7 TR4020/TR4030 (from GIGA-TMS) Install as per the user manual. Create C:\TR4000 folder Download settings should be as shown above. Saved Data Format (in Miscellaneous) should be ‘Default’ Schedule can be as per requirement. In Interface to Post Data configuration, select TR4000 from Giga-Tms/Promag in the Attendance Reader Interface. While configuring the reader with master card, you can change the SHIFT KEY length. Make sure that this is same as configured in “Interface To Post Data” configuration.
Part 7 Using Different Type Of Terminals Simultaneously You can use different type of readers at the same time. Selecting “Readers.INI Based” in Attendance Reader Interface under configuration does this. The readers.ini file should exist in same folder where TASQLDAT.MDB is placed. In the “Readers.INI” file, you select the reader being used by having a line Interface=N (no space before or after the “=”). Till version FA.3D9.2C9.9D9.
Part 8 Frequently Asked Questions Q How to close a day? A Suppose you want to close 15-Aug-2006: 1) Change the date in Time & Attendance Form: 2) Click on ‘Out’ and all employees should be listed there. 3) Click on Incomplete and you should get “No such employee” message 4) If there were any ‘Incomplete’ attendance records, use ‘Scan Maintenance’ to rectify, such that no employee has ‘Incomplete Attendance’. 5) Click ‘More Operations’ button. 6) Click ‘Close A Day’ button.
Part 8 automatic deduction (in hours) that is made by system. TKA is time keeper adjustment (+/-), done manually (how, is explained elsewhere). Tot is the total time worked depending on S1…S6, Ded and TKA. Calculation is done as follows (The terms Scan and Swipe are used interchangeably): 1. First, Tot is calculated as per steps shown below: Step 1: Depending on configuration parameter, S1, S2…S6 are or are not re-adjusted. The configuration parameter in question is: .
Part 8 3. Out of ‘Tot’ we allocate, Normal Hours (Nml), OT1 and OT2 4. For Weekly off and holidays, ‘Holiday Hours’ (Hol) are automatically given by system to staff employees (hourly workers don’t get it). From payroll calculation point of view, accountants will note that ‘Normal’ and ‘Holiday’ hours are same. However it is useful to see attendance given through actual presence and without presence. 5.
Part 8 1. Create a text file in C:\PROGRAM FILES\TAS2KSQL folder with name “EMPLOYEE.TXT”. One of the methods is to have the list in Excel and then use ‘save as’ in CSV format. 2. First line of EMPLOYEE.TXT is the header of field names, separated by comma. Second and subsequent lines contain actual data. 3. File must contain following data at the minimum: a. Employee ID (header Emp_Id) b. Employee Name (header Emp_Name) c.
Part 8 day. Default is –1 which means value is taken from Shift SNHDBWO Number Same as SNH but for "Day Before Weekly Off" EntitledForOT Yes/No Rate Currency RateIsMDH Text HourlyJobRate Number ProxyID Text 14 EmailD Text 30 3/2 1 (M)onthly, (D)aily or (H)ourly Generally it is good idea to create “Employee.Txt” file with Employee id, Employee name, cost center, Shift and Proxy id fields.
Part 8 Take backup before you start, just in case you make a mistake. Also, stop down-loader program of the attendance reader (re-start, once you have tested and are satisfied with new configuration). On First (Main) PC 1. Move TASQLCOM.MDB, TASQLDAT.MDB and SOFTOOL6.MDW files to another folder like C:\PROGRAM FILES\TAS2KSQL\TASDATA (cut/paste so that these three files do not exist in default folder anymore). Join Workgroup SOFTOOL6 again. 2.
Part 8 database is installed (First/Main PC). Ensure no TAS2000 program is running during repair from any computer. The system seems to be running slow. What to do? Run Compact and Repair from TAS2000 program group. Select TASQLDAT.MDB file and click Compact button. If in multi-user environment, contact your administrator to do this on the computer where full TAS2000 database is installed. Ensure no TAS2000 program is running during Compact. You can also select other MDB files and compact them.
Part 8 2. Deletes attendance data that is older than required in history (depends on configuration parameter “Keep History For (Months)”. Note: Leave and Job Costing records are exceptions. Leave records are removed only when employee is removed from system. Job Records are removed if Job is inactive as well as old. 3. Deletes “Ex-Employees” from Employee Master, for whom there no data in the system any more. What to do when an employee goes on leave? Mark the employee ‘On Leave’ as described below: 1.
Part 8 I’m getting “illegal function call’ error. Why? Change date format in regional settings to dd-mmm-yy and time hh:mm:ss tt or h:mm:ss tt. We have A1 (morning) and A2 (general) shift timings. How to take only A1 shift absentees list? Enter A1 in the ‘shift’ field in “Time & Attendance window” and click on ‘Absent’ button. The reader is showing wrong time (or date). How to set accurate time? Ensure your computer time is correct.
Part 8 10. Ignore this step if your current version is F7 or later. Version is seen on the top edge of "Time and Attendance Screen" (check FAQ above for what is Time and Attendance Screen, if you don't know). If your current version is F6 or older, click on "Show Duplicate..." (step 1) to take care of duplicates. Edit time by 1 second to convert duplicate into non-duplicate. 11. Click on "Upgrade" button (step 2). It will first confirm with you that old and new TASQLCOM.MDB and TASQLDAT.
hand held terminal for taking attendance and bring the HHT to office. This is a common “remote Part 8 sites’ related Time & Attendance problem; TAS2000 has powerful features to handle such issues. How can we get attendance time, overtime etc of workers in different sites (projects) separately? Let each project be defined as a cost-centre and ensure that workers have correct cost centre.
Part 9 System Configuration Parameters System parameters are applied system-wide. System parameter is set by logging into “Interface To Post Data” as user siteadmin. Each parameter is explained below in alphabetic order: Adjust Previous/Current Month Days: This is applicable only when first day of period is not 1st of month.
Part 9 C.C. Wise Effective Hours Logic: If used, under-time/overtime is truncated or rounded off as per settings in cost-centre master, otherwise as per Effective Hours Logic (see below). Company Name: Appears on report title and is linked to license.
Part 9 Length of Reason/Job Code Field In Record: Mainly for TR4xxx readers, can be 0 to 8 Length of Task Code Field In Record: Mainly for TR4xxx and ADCT readers, can be 0 to 7. In TR4xxx readers, data punched after Job code is taken as Task code, if used (hence combined length of job code and task code can’t be greater than 8 for TR4xxx readers). Manager's Email Address: Used in automatic emails. Automatic emails work only if system is compatible with TAS2000.
Part 9 Special 1 Reason Code: If reader has 5 function keys, this can be used for special reason like ‘going out for personal work’ in just the same manner “Official In Reason Code”. Special 2 Reason Code: Same as above, if 6 function keys exist. Special Days/Ramadan Used: Whether show related fields in Shift Maintenance or not Swipe is ProxyID: Whether the identification number in the attendance record is proxy id or the employee id itself.
Manual Revision Log Version 9.6 Rev 2 April 30, 2007: Installation on Citrix method modified because TASQLFRM.MDB now looks for TAS2KTMP.MDB file in current directory on every startup. Version 9.6 Rev 3 Word Doc margins are Top=0.5, Bottom=0.5, Left=1, Right=0.7 inches Revised Repair & Compact wordings in FAQ Revised Multi-user FAQ Version 9.6 Rev 4 FAQ added for on leave, for correcting leave mistake and for deleting leave record Version 9.
Version A.9 Rev 0 Jul 12, 2009 Multiple employees can now be inserted in Employee Schedule based on certain criteria. Jul 12, Added a feature, which allows Shifts to be decided based on reader number (port). Jul 12, 2009 Added feature to schedule change of job, cost centre and shift that are linked to a reader. Jul 12, 2009 Added Yes/No field to employee master so that even if cost centre and shift is based on reader, an employee can over-ride it and have fixed values.