Time and Attendance System The Time Clock terminal is designed to record employee’s arrival and departure times. For ease and efficiency in using the Time C lock terminal, it is recommended that the system be used with the PC interface software (included with 50' interface cable) which requires an IBM® compatible PC. (See Minimum system requirements, 1.2). The system may also be used as a stand-alone terminal and may be connected directly to an IBM® compatible printer to print reports.
Table of contents 1. Introduction ................................................................................ 5 1.1 1.2 1.3 1.4 1.5 1.6 Product overview .................................................................................. 5 Minimum system requirements ............................................................. 6 Employee punch capacity ..................................................................... 6 Site requirements ..............................................................
5.5 5.6 5.7 5.8 5.9 5.10 5.11 5.12 5.13 5.14 5.15 Shift grace start ................................................................................... 19 Shift dock start .................................................................................... 20 Shift stop time ..................................................................................... 20 Shift round stop .................................................................................. 20 Shift grace stop ..........................
1. Introduction 1.1 Product overview The “Time and Attendance System of tomorrow” The Time and Attendance system is designed for small businesses to make payroll processing easy and accurate. This microprocessor based clock uses magnetically encoded badges to record employee times. The system can handle up to 120 employees. (See 1.3 Employee punch capacity.) The terminal may be connected directly to an IBM® compatible printer to print reports or used with the PC Interface supplied with the system.
PC Software offers On-line Help for quick assistance and answers to your questions. IMPORTANT 1.2 • • • • • Minimum system requirements IBM PC compatible computer, Pentium or higher processor with a minimum of 4 MB of RAM Microsoft Windows 95, Windows 98, Windows 2000 or Windows NT Workstations 1 MB available hard disk space 3.5" floppy disk drive Available serial port 1.3 Employee punch capacity The system can handle up to 120 employees.
1.4 Site requirements • • • • • 1.5 IMPORTANT The Time Clock terminal can be installed in any typical office environment. The terminal does require 120VAC 60 Hz. and should be located near a standard electrical outlet. Power cord is approximately 6' in length. The PC Interface is supplied with 50' of cable. The distance from the terminal to the PC must also be taken into consideration. No special wiring or cooling is required.
1.6 Unpacking and inspection Open the shipping carton and carefully remove the contents. Inspect the Time Clock terminal and accessories for damage. Report any damage or shortages to the company from which the unit was purchased. IMPORTANT: Complete the registration card and return it to Acroprint to ensure warranty registration.
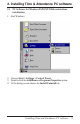
2. Installing Time & Attendance PC software 2.1 PC Software for Windows 95/98/NT/2000 workstations installations 1. Start Windows. 2. Choose Start > Settings > Control Panel. 3. Double-click the Add/Remove Programs Properties option. 4. At the dialog screen choose the Install/Uninstall tab.
5. Click Install. At the dialog screen titled “Install Program from Floppy Disk or CD-ROM” insert the 3½" Time and Attendance PC Software floppy disk into the drive and click Next. Follow the onscreen instructions. 6. Command line: A:\Setup.exe, Click “Finish” 7. Default directory: C:\TSIF, click “OK” if you don’t want to change. 8. When setup has installed the software, click on “OK.” 9. The “Read me” file may be printed, read at the monitor, or closed.
3. Terminal installation 3.1 Electrical connections Wiring connections for power, PC interface or printer (stand-alone mode) and mounting bracket can be located by removing the terminal's access door. Access Door 3.2 Terminal mounting The Time Clock terminal is supplied with a reversible bracket on back of the unit for desk or wall mounting. The unit is shipped with the bracket in the desk mounting position. With the access door removed, you are able to remove the bracket.
supplied with the system. If your computer has a 25-pin serial port you will need a 9-pin to 25-pin adaptor available at most computer stores. 4. Connect the adaptor to the RS-232 serial port located on the rear of your computer. 5. Replace the access door on the terminal. 3.4 Printer connections (Stand-alone Operation or with Additional Printer) The Time Clock terminal may be connected directly to an IBM® PC compatible printer. Reports can be printed without a PC. 3.4.
3.5 Connecting the power cord and securing the access door Plug in the power cord coming from the wall mount transformer into the Time Clock terminal. To reattach the access door and secure the unit to the reversible bracket, screw on the lower front panel of the unit to tighten the access door. Power Cord Access Door 3.6 Establishing communications between terminal and PC In most cases the software will automatically locate the PC serial port.
3.7 Time and date Select the Time and Date icon from the main menu. To set time you may scroll up/down or you may enter the time in the AM/PM format. Set month, date, and year, and click on “OK.” With correct communications established the time and date will be sent to the Time Clock terminal.
4. Setup Setup is the set of instructions telling the Time and Attendance system how to calculate employee’s hours. These “Clock Rules” along with the “Shift Rules” will be used to calculate employee’s time worked. The Time and Attendance Software for Windows® provides on-line reference to assist you in setting up your Time and Attendance systems to correctly calculate your employee hours worked.
HINT: PRINT THIS REPORT FOR FILE COPY 4.1 The Clock Rules report initially contains the default factory settings on the Time Clock terminal. It is recommended that you print this report. To Print: select the report icon; under reports select Clock Rules and under report output, print manager. Click on print. Review settings and pencil in settings that fit your work schedule(s).
4.2.4 Daily overtime after The amount of time worked in a day, after which, overtime will begin to accumulate. Note: Leave at the default setting, 24 hours if you pay overtime based on a weekly setting only (i.e. 40 hours). Daily overtime may be set to 2 levels (i.e. 8:00 and 12:00). Click on time window to change time. 4.2.5 Weekly overtime after The amount of time worked in a week, after which, overtime will begin to accumulate. Note: Weekly overtime does not apply to semimonthly or monthly pay periods.
4.2.9 Daylight savings time If enabled, the system will automatically assign the first Sunday in April and the last Sunday in October as beginning and ending dates of daylight savings. This will occur each year without resetting. Time change will occur at 2:00 AM on these dates. Dates may be changed in countries where dates may be different. If not enabled, automatic daylight change will not occur. 4.2.
5. Shift rules Shift Rules defines shift start time, stop time, lunch periods, round, grace and dock times. Employees worked time will be calculated based on the “Clock Rules” and the rules of the “Shift” the employee is assigned. The Time and Attendance system allows for 12 shifts or different schedules. Note: When using “Round,” “Grace,” and “Dock” features actual punched time will always be shown on time card. Features are used for hours worked calculations. 5.
5.6 Shift dock start The minutes the employee will lose from time work totals if punched in after the “Start Time” plus Grace, if used. (i.e. 8:00 AM start, 3 minute grace, 15 minute dock, employee punch at 8:04 AM would be treated as a 8:15 punch.) 5.7 Shift stop time The time of day the employee would normally stop work. To select time, scroll up/down or enter in either the AM/PM format (5:00 PM) or military format (17:00). 5.
5.11 Lunch rules enable Click on button to set lunch rules. 5.12 Lunch start time The earliest time of day an employee can punch out for lunch. 5.13 Lunch end The latest time of day at which an employee should punch back in from lunch. 5.14 Lunch duration The number of minutes for lunch which will be subtracted from time worked totals. If the Lunch Duration is 60 minutes and employee punches out at 12:01 PM and punches back in at 12:55 PM (54 minutes) one hour will be deducted for lunch. 5.
6. Entering employees into system From the main menu select “Employee Profiles” icon. To enter an employee, click on “Insert.” 6.1 Name At the “Insert Employee” screen enter employee’s name. Employee name field has 21 characters including spaces. Note: Enter employee’s last name first if reports are to be sorted by last name. 6.2 Badge Enter 4 digit badge number (see Badge) assigned to employee. 6.3 Number You may enter up to a 9 digit employee number (not required). 6.
7. Supervisor’s badges Supervisor’s badges are used to access setup information and reports at the Time Clock terminal. The system includes two Supervisor’s badges. Supervisor’s badges will not allow access to the “Punch Editing,” the “Bell” program or “Data Export” features. These can only be accessed through the PC Interface software. Up to 10 employee badges may be designated “Supervisor Badge.” Employee badge(s) assigned as a supervisor badge may not be used as an employee badge.
8. Editing punches The Time and Attendance system allows you to edit employee punches in the current or the previous pay periods. Punches may be added or deleted. Employees who missed “punching” times can be added so that the system will calculate total hours worked. Punches outside of the shift parameter will be noted with an exclamation mark (!). The “Punch Editor” screen also allows you to edit totals in “Regular” and “Overtime” categories.
9. Reports 9.1 Print, view, archive (save to disk) There are five (5) standard reports available from the Time and Attendance system. To print reports, select the “Report” icon from the main menu: 1. Select the report you wish to print or view at the PC monitor: Hours Summary Time Card Who’s In, Who’s Out Employee Profiles Clock Rules NOTE: The Time and Attendance system is designed to hold two pay periods of data.
4. Select Pay Period: Current or Previous 5. Sort By: Allows you to select reports sorted by Name, Badge Number, Employee Number or by Shift. 6.
9.2 Time card report The Time Card report is a listing by employee of all IN-OUT punches along with hours worked totals. This may be for the current or previous pay period. The report may be for one employee, employees on a specific shift, or for all employees. When a Time Card report has punch times with an “!” exclamation mark beside them, this indicates that the punch is either too early or too late to conform to shift or lunch rules that were enabled.
IMPORTANT: PRINTING A PREVIOUS HOURS REPORT FOR ALL EMPLOYEES AFTER PAY PERIOD ENDS AND BEFORE EMPLOYEE PUNCH “IN” NEW PAY PERIOD WILL PREVENT “LOCKOUT.” 9.3 Hours summary report The Hours Summary report list hours worked totals by regular and overtime hours. This may be for an individual employee, a specific shift, or all employees; for the current or previous pay period. If an employee has a missed punch, the HOURS SUMMARY TOTAL will be noted with an * .
9.4 Employee profile report The Employee Profile report lists All employees who have been programmed into the system with their assigned employee number, badge number and shift number.
9.5 Clock rules report The Clock Rules report lists ALL of the programmed setup, shift, and lunch rules.
9.6 Who's in, who's out report The Who’s In, Who’s Out report lists all employees or a specific shift of names by who is punched IN or punched OUT.
10. Save to disk, archiving, & exporting The Time and Attendance system allows you to save pay period data to disk eliminating the need to keep hard copies. A generic ASCII export file can be created to export to other programs. (Check with your computer support consultant.) Export files for selected national payroll processors have been included. Check with one of these companies in your area for pricing and information about their services. READ THIS! 10.
11. Bell schedule The Time and Attendance system includes a signal schedule allowing for 24 program signal times, with individual durations from .1 to 25.5 seconds, and individual day of the week selection. An optional external signal buzzer is available for office environments. See Appendix D. Optional bells/horns may require relay box. Call Acroprint for details.
12. Programming terminal without software 12.1 Introduction The Time Clock terminal is primarily self-prompting to supervisors. The Main Menu is activated by swiping a Supervisor Badge. The headings for each group on the next four pages are the choices which appear in the Main Menu. The menu key (either up or down) is used to reach the menu subject desired. Pressing ENTER opens the specific task menu. The following Supervisor's Menu Map shows menus and choices available.
12.
ADD/EDIT EMPLOYEE SELECT A TASK ENTER BADGE NUMBER ADD AN EMPLOYEE EMPLOYEE NAME SELECT AN EMPLOYEE EDIT AN EMPLOYEE {EMPLOYEE NAME} EMPLOYEE NUMBER SHIFT NUMBER DELETE AN EMPLOYEE SELECT AN EMPLOYEE {EMPLOYEE NAME} EDIT TIME TOTALS SELECT AN EMPLOYEE CURRENT REGULAR HRS CURRENT OVERTIME 1 CURRENT OVERTIME 2 PREVIOUS REGULAR HRS PREVIOUS OVERTIME 1 PREVIOUS OVERTIME 2 SUPERVISOR CARDS SELECT A TASK ADD SUPERVISOR BADGE DELETE A SUPERVISOR } ENTER BADGE NUMBER 36 Programming the Time C lock termi
EDIT SHIFT RULES SELECT A SHIFT SHIFT RULES = DISABLED SHIFT RULES = ENABLED SHIFT START TIME SHIFT START ROUND SHIFT START GRACE SHIFT START DOCK SHIFT STOP TIME SHIFT STOP ROUND SHIFT STOP GRACE SHIFT STOP DOCK SHIFT LUNCH RULES = DISABLED SHIFT LUNCH RULES = ENABLED LUNCH WINDOW BEGIN LUNCH WINDOW END LUNCH DURATION AUTO LUNCH AFTER TIME AND DATE SELECT A TASK SET THE TIME ENTER TIME OF DAY SET THE DATE TIME FORMAT 12 HOUR 24 HOUR DATE FORMAT DAY MONTH YEAR DAY YEAR MONTH MONTH DAY YEAR MONTH YEAR
SETUP MAX TIME ON CLOCK ENTER ELAPSED TIME PAY INTERVAL ROUND SELECT PAY INTERVAL 1 MINUTE(S) 5 MINUTE(S) 6 MINUTE(S) 10 MINUTE(S) 15 MINUTE(S) PAY PERIOD LENGTH SELECT PAY PERIOD WEEK PAY PERIOD TWO WEEK PAY PERIOD SEMIMONTHLY PERIOD MONTHLY PAY PERIOD PAY PERIOD START DAY CHANGE OFFSET ENTER TIME OFFSET OVERTIME RULES 1ST DAILY OT AFTER 1ST WEEKLY OT AFTER 2ND DAILY OT AFTER 2ND WEEKLY OT AFTER 7TH DAY OVERTIME DISABLED DAYLIGHT SAVINGS ENABLED DAYLIGHT SAVE START DAYLIGHT SAVINGS END DISABLED
12.3 Terminal diagnostics The Time Clock terminal has a self-testing feature. The badge reader, display, keyboard audio, printer and bell program can be tested using a Supervisor’s badge. At the terminal: 1) 2) 3) 4) 5) Swipe the Supervisor badge. Scroll up/down to “Test Features.” Press ENTER. Scroll menu to select test Press ENTER and proceed as instructed.
Appendix A — Error messages at PC monitor Error: A change has occurred in the Primary database..... Reason: Database changed since PC last communicated with the terminal. Punches may have occurred or supervisor changes may have been made at the terminal. New data must be reloaded at the PC. Unsaved changes made at PC will be discarded. Error: A Field Validation Error Has Occurred on Field: Reason: Invalid value entered in the field indicated.
Error: Error Messages regarding: Reason: Error occurred in communication between the PC and terminal: 1) Try again. 2) Check connections between PC and terminal. 3) Insure communications cable does not exceed recommended length, in specifications, located away from other wiring and is not coiled. 4) Try lowering baud rate. (This must be done at both the PC and the terminal.
Error: Unable to open COM port . Reason: PC interface unable to open a COM port. Check hardware settings and connections. Error: Unable to start a timer. Reason: Windows unable to initiate a timer. Close some programs and try again. Error: Clock Terminal not responding. Reason: Terminal did not respond to a communication packet sent by the PC. 1) Check all connections between terminal and PC. Make sure terminal is powered up. Check baud rate is the same at PC and terminal.
To check if an IRQ conflict on the COM port supporting the Time C lock terminal exists on your computer you can run a Resource Summary Report: Windows 95: a) Under “My Computer” icon click on “Control Panel” b) Click on the “System” icon. c) Click on tab “Device Manager.” d) Click on “Print,” “OK.” e) Click on “OK” again to exit. The Resource Summary Report contains an IRQ Usage Summary. If the port attached to the Time Clock terminal uses the same IRQ as another device this could cause a problem.
Appendix B — Error messages at terminal These are error messages you may encounter while using the clock. BADGE OUT OF RANGE The badge number is not 1-9999 or one of the three special supervisor badges. BADGE READER TEST INVALID DATA Errant badge read during badge reader test. CAN’T COMPLETE TASK 1. Response when database failed to remove all punches. 2. Record verification prior to deleting an employee failed. Simply try again. 3. Database access problem. 4.
CAN’T COMPLETE TASK INVALID BADGE Attempting to add/delete a supervisor or employee badge that is outside of the acceptable badge number range (1-9999). CAN’T COMPLETE TASK INVALID DATE 1. An invalid date was entered by the users. An example of an invalid date is Feb. 30, 1997. 2. When manually entering daylight savings time thresholds, the dates must be beyond the current date and time and it must be within 400 days of the current date and time.
CAN’T COMPLETE TASK INVALID NUMBER Attempting to add an employee number to the clock that is outside of the acceptable range (0-999999999). CAN’T COMPLETE TASK INVALID SHIFT Attempting to set a shift number that is outside of the acceptable range (1-12). CAN’T COMPLETE TASK INVALID TIME An invalid time of day was entered by the users. An example of an invalid time is 25:00:00. CAN’T COMPLETE TASK MEMORY FULL Employee cannot clock in/out. The memory is full.
CAN’T COMPLETE TASK SELECT_PRINTER_TYPE Generating a report when printer type is none. CAN’T COMPLETE TASK SUPERVISOR FOUND Attempting to add a supervisor or employee badge to the clock that is already programmed as a supervisor’s badge. CAN’T COMPLETE TASK TOO MANY WAITING Attempted to submit a report when the report queue is full. Wait for some of the reports to finish printing, then try again. CAN’T COMPLETE TASK TRY AGAIN PLEASE Database access errors while attempting a transaction.
MEMORY FULL REPORT OLD DATA 1ST Employee cannot clock in/out. Reporting previous pay period will allow the clock to dump that data and free up memory. PC COMM ERROR DEVICE=SERIAL An error occurred when passing information between the PC and the Time Clock terminal. RAM MEMORY TEST FAIL:DATA A data error occurred during the RAM test. ROM MEMORY TEST FAIL:DATA A data error occurred during the EPROM test. REPORT OUTPUT ERROR DEVICE= PARALLEL An error was detected while printing to the parallel port.
UNRECOVERABLE ERROR PRESS A KEY Catastrophic database error notification. The system will perform a system initialization.
Appendix C — FA Q ’S FAQ’S — Frequently Asked Questions GENERAL INFORMATION 1. Q. What happens if one of my employees forgets to punch out? A. The word “Missed” will appear in place of the out punch on the time card. When time is determined it may then be added to the employee time card under editing in the PC software. The word “Inserted” will now appear on the time card and the totals will automatically update. Asterisks (*) will also appear on the Hours Summary report denoting a missed punch. 2. Q.
6. Q. What is the total number of Supervisors I can assign? A. You may have a total of 10 Supervisors. The System includes two Supervisor’s badges. However, you can use employees badges and assign them as Supervisor badges. These badges cannot be used as employee badges while assigned as Supervisor. BADGES 1. Q. Can I use my present employee badge? A. Time Clock terminal badges are magnetic encoded on ABA, track 2, with four significant digits.
2. Q. Can I use other payroll packages and export data for payroll? A. Yes. Using the generic ASCII output, data may be exported to other software accepting ASCII files. (The Time and Attendance PC software is required.) See procedure above. 3. Q. The Time and Attendance software allows for export to national payroll processors (Time Plus, ADP, Paychex’s Paylink). How do these services work? A. The end user must contact these companies in their local area for pricing and information about the service.
3. Q. The Time Clock terminal comes with 50' of cable to connect to my computer. Can I get a longer cable? A. Acroprint offers an optional 100 feet low impedance cable. This cable is terminated at both ends and inspected to assure proper operation. User supplied cable may result in communication problems. User's cable is not supported by Acroprint's help desk. TROUBLESHOOTING 1. Q. My employees cannot punch in; the display reads “Locked out report old data 1st.” A.
Appendix D — Support agreement Acroprint offers a hassle-free support agreement for your peace of mind. You can call our support department for more details and pricing on this support plan.
Appendix E — Companion products Contact the Acroprint distributor from which you purchased this product to see if companion products are offered. You may purchase directly from Acroprint using your Visa or MasterCard. Sorry no COD’s.
40 Departure Drive • Raleigh, NC 27616 Phone: 919.872.5800 • IN USA 800.334.7190 Fax: 919.850.0720 www.acroprint.com Microsoft® Windows™, Windows®95, Windows 98, Windows 2000 or Windows NT are registered trademarks of Microsoft Corp., IBM® is a registered trademark of International Business Machines.Time+Plus® is a registered trademark of Time+Plus® Inc., ADP® is a registered trademark of Automatic Data Processing, Inc., Paylink is a registered trademark of PayChex.