TQ600F Face Recognition Terminal User Manual
Important Claim Thank you for purchasing the TQ600F Face Recognition Terminal. Before installing your terminal please read this manual carefully to avoid damage to the unit! This manual provides information on the proper use of your terminal. You may not distribute or change any content of this manual in part or in full without written consent from Acroprint Time Recorder Co.
Table of Contents 1. Instructions for Use ...................................................................................................................... 1 1.1 Standing Position, Posture and Face Expressions .................................................................... 1 1.2 Enrolling Face Expressions ....................................................................................................... 1 1.3 Use of the Touch Screen .............................................................
6. System Settings .......................................................................................................................... 21 6.1 General Parameters ................................................................................................................ 21 6.2 Interface Parameters ............................................................................................................... 21 6.3 Face Parameters ....................................................................
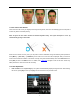
1. Instructions for Use 1.1 Standing Position, Posture and Face Expressions 1. Recommended standing-distance from device: It is recommended that users 5-6 feet tall (1.55m-1.85m) stand about 2 feet (0.5m) from the wall. When viewing your image on the device display window, step away if your image appears too bright. Step closer if your image appears too dark. 2. Recommended face Expressions vs. Poor Expressions: 3. Recommended Posture (pose) vs.
1.3 Use of the Touch Screen Touch the screen with one of your fingertips or the edge of a fingernail, as shown in the following figure. A broad point of contact may lead to inaccurate pointing. Note: A stylus has also been included to facilitate keyboard entry. The stylus telescopes to 3-1/2” by simultaneously pulling on both ends.
• Enter Text: Press the [Name] key. The system will automatically display the keyboard. After entering the user name, press [X] to save and return to the previous screen. • Modify parameters: Press the default value of a parameter and the system will automatically switch to another value of this parameter.
1.
1.6 Main Interface Date Screen Shortcut Time 1:1 Switch Key Menu • Date: The current date is displayed. • Screen Shortcut Key: Press the shortcut key to display the WorkCode button. For details, see 6.5 Shortcut Definitions. • Time: The current time is displayed. Both 12-hour and 24-hour display formats are available. • 1:1 Switch Key: Switch to the 1:1 verification and display the keypad for user ID input. • Menu: Display the Main Menu.
1.7 Verification Modes 1.7.1 Face Verification 1: N Face Verification The terminal compares the current face template (image) with all face templates on the terminal. • Scan your face using the proper technique. For details, see 1.1 Standing Position, Posture and Face Expressions. Your image will appear on the display as shown by the figure on the left below. • If your face template is matched to a template in the terminal, your face template will be displayed as shown by the figure on the right below.
1.7.2 Password Verification In the password verification mode, the device compares the password entered with the password assigned to the user ID. • Press [1:1] on the Main Interface to enter the 1:1 recognition mode. • Enter the user ID and then press the "Key” icon to enter the password verification mode. If the prompt “Not Registered!” is displayed, the user ID does not exist. • Enter the password and press the “OK” icon to start the password comparison.
Badge + Facial Verification • Swipe your badge over the swipe area to enter the 1:1 facial verification mode. • Scan your face using the proper technique. For details, see 1.1 Standing Position, Posture and Face Expressions. • If the verification is successful, an interface as shown in Figure 3 on the right will be displayed. The system will return to the Main Interface if the verification is not passed within 20 seconds. Badge + Password Verification • Swipe your badge over the swipe area.
FACE & PW verification: Users can punch in/out by scanning their face. Once their face has been verified they are prompted to enter their password. Enter password and press “OK”. If the verification is successful, the display will show a punch in or out. FACE & RF verification: Users can punch in/out by scanning their face. Once their face has been verified they are prompted to scan their proximity badge. Scan badge. If the verification is successful, the display will show a punch in or out.
PW & RF verification: Users can punch in/out using their Pin#/Password and proximity badge. Press “1:1” on the Main Interface. Users can punch using two different sequences: Sequence #1: Scan proximity badge. Enter your password when prompted and press “OK”. If the verification is successful, the display will show a punch in or out. Sequence #2: Press “1:1” on the Main Interface. Enter User ID (Pin#) and press the password button (Key icon). Enter password and press “OK”.
2. Main Menu There are two types of users: Ordinary users and Administrators. Ordinary users are only granted the rights of face, password or card verification, while administrators are granted access to the main menu in addition to the privileges granted to ordinary users. Press [Menu] on the main screen to access the main menu, as shown in the figures below. Note: If a lock icon appears after pressing [Menu], then one or more administrators exist on the device.
Auto Test: Test operational status of various hardware components including the display, voice prompts, camera, keyboard screen, clock (time) tests and touch screen calibration. Dn/Upload: Download user information and attendance data stored in the device through a USB flash drive to the timeQplus software. Sys Info: Browse records and device information. Note: Any user can access the main menu by pressing the [Menu] key if the system does not have an administrator.
3. Add User Press [Add] on the User Mgt. screen to display the Add User screen as shown to the right. • User ID: Enter a user ID. 1 to 9 digit user IDs are supported by default. • Name: Enter a user name. 12 characters user names are supported by default. • Password: Enroll a user’s password. The device supports 1 to 8 digit passwords by default. • Card: Enroll a Badge. • Face: Enroll a user’s face. • Role: Set the rights of a user.
3.2 Entering a Name • Press [Name] on the Add User screen to display the name input screen with keyboard. • On the displayed keyboard, enter a user name and press [X]. For details on using the keyboard screen, see 12.1 Entering Text Using the Keyboard . • After the user name is entered, press [Save] to save the current information and return to the previous screen. Press [Exit] to return to the previous screen without saving the current information.
• After the password is entered, a screen is displayed as shown to the right. Press [Save] to save the current information and return to the previous screen. Press [Exit] to return to the previous screen without saving the current information. 3.4 Enrolling Proximity Badges • Press [Card] on the Add User screen to display the Enroll Card screen. • The Punch Card! Screen displays as shown below. Swipe your badge over the swipe area. For details on locating the swipe area, see 1.5 Appearance of Device.
• If your face image is enrolled successfully, the system will display a prompt message and automatically return to the Add User screen. • Press [Save] to save the current information and return to the previous screen. Press [Exit] to return to the previous screen without saving the current information. 3.6 Modifying User Rights There are two types of rights respectively granted to two types of users: the ordinary users and administrators.
3.7 Enroll Photo If you enrolled your photo in the system, the system will display your enrolled photo in addition to your ID and name after you pass the verification. 1. Press [Photo] on the Add User screen to display the photo enrollment screen. 2. On the photo enrollment screen, stand naturally in front of the screen. For details, see 1.1 Standing Position, Posture and Face Expressions. Press [Capture] to capture the photo. 3. After taking the photo, press [Done] to return to the previous screen. 4.
4. User Management Press [User Mgt] on the main menu screen to display the user management screen. Users are listed in alphabetical order by last name. The lock icon next to a user’s name indicates that this user is an administrator. 4.1 Edit a User Press a user name from the list to enter the User Info screen. The User ID cannot be modified, and the other operations are similar to those performed in Add User. You can re-enroll your face, change your password, and modify the management rights.
4.2 Delete a User On the User Info screen, you can delete all or partial user information. • Press [Delete] to delete a user. • On the displayed screen, press [YES] to delete the current user or [NO] to return to the previous screen. • On the User Info screen, press [Name], [Password], [Card] or [Face] to delete the related user information and to re-enroll new information by following the device prompt. 4.
5. Communication Settings You can set related parameters for the communication between the device and PC, including the IP address, Subnet Mask, Gateway, DNS Server, Device ID, and Comm Key. • IP Address: The IP address is 192.168.1.201 by default and can be changed as required. • Subnet Mask: The subnet mask is 255.255.255.0 by default and can be changed as required. • Gateway: The gateway is 0.0.0.0 by default and can be changed as required. • DNS Server: The DNS server is 0.0.0.
6. System Settings Through the System menu, you can set system-related parameters, including General Settings, Display Settings, Face, Log settings, Shortcut Def. and Firmware Update. 6.1 General Parameters • Keyboard Clicks: Used to set whether to generate a beep sound in response to every keyboard touch. Select “ON” to enable the beep sound, and select “OFF” to mute. • Voice Prompts: Used to set whether to play voice prompts during the operation of the device.
6.3 Face Parameters • 1: 1 Threshold: Used to set the threshold of matching between the current face and the face template enrolled in the device in the 1:1 verification mode. If the similarity between the current face and the face template enrolled in the device is larger than this threshold, the matching is successful; otherwise, the matching is not successful. The valid value scope is 70-120.
6.4 Log Settings • Log Alert: When the available space is insufficient to store the specified number of attendance records, the device will automatically generate an alarm (Valid values: 1-99). • Dup. Punch Period (m): If a user’s attendance record already exists and the user punches in again within the specified period (unit: minute), the second attendance record will not be stored (Valid values: 1-60 minutes). • Card Only: If this parameter is set to “YES”, users can punch by only using a badge.
• To configure the Status function, press Status on the Function screen. The Edit screen will appear, allowing the user to configure individual settings for the Status shortcut. Press the Label box to enter the Label screen. Press the row of the label (six options for Status) to select it. • The Code cannot be modified; it is changed accordingly with the selected label for the status key. Select Auto Switch, and select “On”, as shown in the figures below.
6.6 Update You can upgrade the device firmware by using an upgrade file stored on a USB Flash Drive. Note: If you need a firmware upgrade file, please contact Acroprint Technical Support. Firmware upgrades are not normally needed.
7. Data Management Through the [Data Mgt.] menu, you can perform management of data stored on the device, for example, delete attendance records, delete all data, clear administrators, restore the device to factory settings, and query user records. • Delete Transactions: Delete all attendance records. • Delete All Data: Delete all enrolled personnel and any stored data such as face templates, badge numbers and attendance records. • Clear Administrator: Change all Administrators to Ordinary Users.
7.2 SMS Administrators can write a short message to be displayed on the terminal screen during a designated period. Short messages are classified into Public and Personal short messages. If a short message is configured as public, it will be automatically displayed every minute, on the minute, for 4 seconds. The message will remain active for the duration of the designated period; alternatively, users can use the shortcut keys to view the message.
• Press Start or Valid to start the configuration screen shown in the following figures: • Press the number key to input values to be set, and press OK to save the settings and return to the previous screen. • Press Type to select the type for the short message, which include personal, public, and reserved. The following figure shows the personal type: • Press Assign to start the Hand out SMS screen.
• Press Done to save the settings and return to the previous screen. Press Save to store the short message and go back to the previous screen. The new short message is displayed on the screen. Edit a short message • Press the message to be edited in the SMS screen.The procedure of editing a short message is the same as that of adding a short message. Delete a short message By pressing Delete on the Edit screen, the short message is removed.
7.2.2 View a Short Message View a public short message On the initial screen, public short messages are automatically displayed on the minutes. Alternatively, the public short messages can be viewed by pressing the shortcut keys on the screen, as shown in the following figures. For details on creating shortcut keys, see 6.6 Shortcut Definitions. After viewing, press [Exit] to return to the main screen.
7.3 Work Code Note: If using timeQplus software, work codes with labels are defined in the software and are then uploaded to the terminal. DO NOT enter work codes directly into the terminal. The Work Code function is designed to capture and assign labor hours worked by employees. Work Codes can be departments, projects, activities, or any other segmentation associated with labor hours. 7.3.1 Add a Work Code • Press [WorkCode] on the Data Mgt.
8. Date/Time Setting 8.1 Set Date/Time The date and time of the device must be set accurately to ensure the accuracy of attendance time. • Press [Menu] on the initial screen to display the main menu screen. • Press [Date/Time] to display the Date/Time setting screen. • Select the desired date and time by pressing the parameter. For the time format, there are 10 formats available. Both 12-hour and 24-hour time systems are supported.
• Press [Bell] on the Date/Time screen. The displayed bell setting screen lists all the predefined bells. • Press a bell in the list on the bell setting screen to display the [Edit] screen. • The following parameters can be configured: Bell Time: Used to set time when the device automatically plays a bell ring tone every day. Bell Date: Used to set which day the device automatically plays a bell ring tone. Ring Tone: Used to set the bell ring tone. Repeat: Used to set the alarm times.
• Press [None] to display the DLST mode selection screen. The available options are Mode 1, Mode 2 and None. • Select the DLST mode; you will automatically return to the Date/Time screen: • Press [DLST Settings] to enter the DLST settings edit screen. After setting, press [Save] to complete and return.
9. Auto Test The auto test enables the system to automatically test whether functions of various modules are normal, including the screen, sensor, voice, face, keyboard and clock tests. 1. Test Screen: The device automatically tests the display effect of the color TFT display by displaying full color, pure white and pure black and checks whether the screen displays properly. You can continue the test by touching the screen or quit by pressing [Exit]. 2.
10. USB Disk Management Through the [Dn/Upload] menu, you can download user information and attendance data stored to a USB disk to be uploaded to related software. • Download Transactions: Download all the attendance data from the device to a USB disk. • Download User: Download all the user information, fingerprints and face images from the device to a USB disk. • Download user photos: Download the employees’ photos from the device to a USB disk.
11. System Information You can check the storage status as well as version information of the device through the [Sys Info] option. • Records: The number of enrolled users, administrators and passwords are displayed on the Records screen; the total face storage capacity and used capacity as well as the total attendance storage capacity and used capacity are graphically displayed respectively.
12. Appendix 12.1 Entering Text Using the Keyboard The device has a full QWERTY keyboard that supports upper and lower case Alpha characters, numbers and symbols. Press a button that requires text input to display the keyboard. For example, press [Name] and the keyboard will appear: Keyboard Area Text Display Area Text List Area Exit Backspace Enter Space Character/English Shift Key To enter a name, proceed as follows: • Press [Name] on the Add screen, as shown in figure below.
• After finishing the entry of name, press [X] to exit the Keyboard Interface and return to the previous screen. 12.2 Photo ID Function The Photo ID function is used to display on screen the photo enrolled by a user or stored on a USB disk in addition to such information as the user ID and name. When the photo taken by the device is used, the photo can be displayed upon successful verification.
12.3 Multi-combination Authentication Mode Four elements can be combined to authenticate a user: User Number (PIN#), Face (FACE), Password (PW) and Proximity Badge (RF). Meaning of symbols used in table below: ● "/" is or ●"+" follow next operation ● "&" is and ● FACE (Face) ● PWD (Password) ● RF (RF card) ● PIN (user ID) If Face, Password and Proximity Badge have been enrolled for the user, the verification procedure is as described in the table below.
06-0405-000 Rev.