
User Manual


6
CONNECTING TO A COMPUTER:
1.
Turn on your computer.
2.
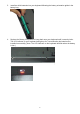
Make sure batteries for your keyboard and mouse have been properly installed, refer to
the Installing the batteries section in this manual if necessary. Switch on your mouse, the
red LED indicator inside the mouse will light on for 3 seconds. (Note: The red LED
indicator of your mouse will blink when batteries in your mouse is low.)
3.
Insert the enclosed receiver into an available USB port on your computer. The green LED
indicator on the receiver will light on for 5 seconds to show it’s powered on. (Note: The
green LED indicator on the receiver will blink when your mouse is working.)
4.
Your computer will detect and install the necessary drivers automatically
5.
Your wireless keyboard and mouse are now ready to be used.
Note: There is a “Connect” button located at the bottom of the mouse and keyboard. In case
of high interference or when multiple set of desktops are in use within close proximity, please
press the “Connect” button on the keyboard or mouse to re-establish a new connection with
the receiver to ensure smooth operation of the keyboard and mouse. The device will re-
connect with the receiver in approximately 10 seconds.
Switch
LED Indicator
LED Indicator