
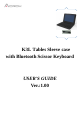
User's Manual


Functional Introduction
Installing Hardware
Step1: Turn the Tables power to ON, then place keyboard power switch to ON
Step2: Start your device’s Bluetooth set up function to search for this Bluetooth keyboard.
Step3:Select SETTINGS > WIRELESS & NETWORKS > BLUETOOTH >ON
Step4: Press the Fn and Pair button on your keyboard. A blue LED light will flash until your device and the
keyboard are paired.
Step5: Your device should find the “HP Bluetooth Keyboard T1000” and then list it as an available device.
If it doesn’t, simply touch Search for devices and it will scan again.
Step6: When the “HP Bluetooth Keyboard T1000” shows in your list of available devices, touch it to
complete pairing.
Charge
The LED keep flashing in your working, the keyboard is short of power. It is time to charge the keyboard.
Step1: Use the USB charging cable plug into outlet, put one end of the plug into keyboard USB charging
cable.
Step2: A Blue light will illuminate to indicate the keyboard is charging. Wait until this light turns off,
indicating a full charge. It usually takes 2-4 hours to completely charge your keyboard.
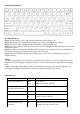
LED Indicator:
Definition
Indicator
Description
Charge with USB cable
Blue
No
LED solid on
When full charged, LED off
Turn on power
(no USB cable attached)
Blue
LED on after 3 seconds LED off
Bluetooth pairing
Blue
LED blinking (1 time/per sec for 2 mins)
Low power(=3.4v)
Blue
No
When key in, LED blink
When no action, LED off
No power
No
LED off
By accident protect for
Keyboard
No
When the key press and hold after 15sec, the
keyboard will stop send scan code.