
User Guide


Chapter 3: Installation
3-1 Positioning Your Dryer
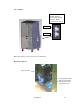
The dehumidifying dryer system was designed to be wheeled into place. The entire assembly is
mounted on a rugged, compact frame and is equipped with sturdy, 4” (10 cm) heavy-duty casters.
It is important to leave room to access the dryer from the front, rear, and at least one side, for
repair and regular maintenance.
Use caution and observe safety rules when placing your dryer!
3-2 Making Electrical Connections
Fulfill all national, state, and local safety and electrical code requirements.
Connections should be made by a qualified electrician.
Make sure all electrical connections are tight.
Connect main power to the dryer at the disconnect or terminals in the upper right corner
of the control enclosure.
Install a fused disconnect with a lockout feature in the power main leading to the dryer.
The power drop must include a ground wire.
Proper grounding of the main power line is critical!
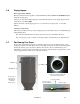
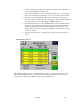
3-3 Checking for Proper Blower Rotation
Three-Phase Models
The blower rotates properly when air flows from the delivery outlet and a vacuum is felt on the
blower inlet.
In three-phase models, incorrect phasing of power leads can cause backward
rotation of blower motors and CONTAMINATION OF THE DESICCANT!
Always check blower rotation before putting material in the drying hopper!
If the three-phase blower rotates improperly, reverse any two wires at the fused disconnect
outside the dryer or at the disconnect/terminal in the control enclosure. This assures that the
blower rotates in the proper direction.
Installation 22