
User Guide


6-5 Replacing Worn Desiccant
Make sure desiccant beds are sufficiently cool before replacing worn
desiccant.
1. Disconnect the electrical supply.
2. Remove the rear panels to expose the desiccant beds.
3. Access the desiccant cans in one of the following ways:
• Remove the entire bed from the frame.
• Remove the hoses located at the top of the beds.
• Remove the thermocouple and fittings. Make a note of the correct location for each.
• loosen the 4 knurled nuts below the desiccant can.
• Loosen the couplers below the desiccant can by turning the “T” handle.
• twist the desiccant can clockwise and lift to remove.
• Remove only the top cover then remove the screen inside by removing the single nut
at the center of the can.
4. Replace the desiccant in one of the following ways:
• Replace the entire desiccant can with a pre-packed desiccant can assembly available
from parts and service.(see “Contact Information”, Can Assembly Part # 892.04505.00)
Drop in the new cans, tighten the knurled nuts, and replace the thermocouple and
fittings.
• Vacuum out the desiccant from the can and proceed to step 5.
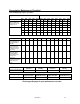
The desiccant levels for each unit are etched inside the cans for reference.
Make sure the bed interiors are clean.
You should properly dispose of any discarded desiccant.
Consult local disposal regulations for more information.
Operation 53