
User's Manual


2 –Pump 18-Station Controllers Chapter 3: Installation 18 of 44
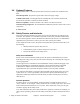
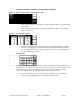
3. On the “Station Operator” screen (Figure 5), touch the SETUP button. The “Station
Setup” screen opens.
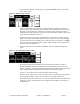
Figure 6: “Station Setup” Screen
On the “Station Setup” screen (Figure 6), adjust settings as required. Touching any
white box in the lower half of the screen provides you with a keypad to set new values
(See page 15 for keypad entry instructions). From this screen, the operator can also
configure the convey settings for each station by pressing NEXT or PREV (The screen
above shows the settings for Station 1).
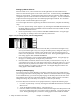
Keypad entry works as with many ATM machinesthe first digit you enter initially
appears to the right of the decimal point and moves to the left as you enter more digits.
You do not need to use the decimal point. Use CLR to erase any mistakes. Use ENT to
enter the value. The keypad disappears, and the “Station Setup” screen shows the new
value in the selected white box.
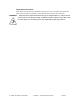
4. Once the values have been entered, press MORE. The second Station Setup screen
opens.
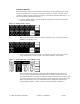
Figure 7: “Second Station Setup” Screen
By pressing each button individually, this screen allows the operator to enable or
disable the PURGE, DRY AIR and SPECIAL CONVEY features of the conveying
system. In addition, by touching the RESET TO DEFAULTS button in the right of this
screen changes all the settings for this station back to their factory defaults.
See pp. 34–37 for details on the options and their default settings.
From this screen, the operator can also configure the convey settings for each station by
pressing NEXT or PREV (The screen above shows the settings for Station 1).
Once these features have been turned on or off, press BACK to return to the last Station
Setup screen. After all stations have been configured, press MENU to return back to
the Main Menu.