
User's Manual


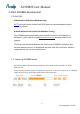
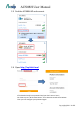

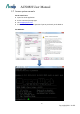
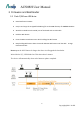
Table Of Contents
- UPuTTYU provides Secure Socket Shell (SSH) access to the development board operating system.
- # Install Bonjour Print Service (For Windows 7 only)
- Steps:
- Check if the setup takes effect:
- In AP mode
- In Station mode
- Step1: Type UCI commands to assign SSID, key, and encryption information for running Station mode
- Step 2: Restart the Wi-Fi driver for activating the configuration
- Step 3: Check for Internet connection
- Step1: type UCI command to disable Station mode
- Step 2: restart the Wi-Fi driver
- Step 1: Create lks7688.cfg file
- Step 2: Attach the USB Drive to the board
- Step 3: Reset and press WiFi button
- # Using SCP
- Using Samba
- AWS IoT SDK for JavaScript
- AWS IoT Embedded-C SDK
- Basic Concepts :
- GPIO and Interupts
- PWM
- I2C
- SPI
- Installing MRAA
- Controlling LED with MRAA in Node.js
- Step-by-step
- Create and configure C project
- Supported cameras
- AI7688H has installed Linux UVC (USB Video Class) drivers to provide USB webcam suppport. Webcams follow the UVC standard can be supported on AI7688H. The real capabilities and supported resolution depend on the current UVC driver implementation.
- Step-by-step
- we use mjpg-streamer as the streaming application and it's already installed in the system firmware by default. For the webcam, Logitech C310 is used in this example.

AI7688H User Manual
-10-
Copyright@2016 AcSiP
3.2 Update bootloader
USB drive must be in FAT file system or the file cannot be recognized by the AI7688H
development platform.
# Save the bootloader file (lks7688.ldr) in the root directory of a USB drive and name it
lks7688.ldr.
# Plug the USB drive to AI7688H.
# Press the WiFi and MPU (Reset) button at the same time, then release the MPU Reset
button but hold the WiFi button for at least 20 seconds.
# After 20 seconds Wi-Fi LED will turn on. Release WiFi button.
The board will start to read the bootloader (WiFi LED blinks fast) and perform the
bootloader upgrade process (Wi-Fi LED blinks slowly). It takes about 2 seconds to finish
the bootloader upgrade process
3.3 Build F/W from Source
The following operations are performed under a Ubuntu LTS 14.04.3 environment. For a
Windows or a Mac OS X host computer, you can install a VM for having the same
environment:
Install prerequisite packages for building the firmware:
$ sudo apt-get install git g++ libncurses5-dev subversion libssl-dev gawk
libxml-parser-perl unzip
Download OpenWrt CC source codes:
$ git clone git://git.openwrt.org/15.05/openwrt.git
Prepare the default configuration file for feeds:
$ cd openwrt
$ cp feeds.conf.default feeds.conf