Quick Installation Guide ENR-320P 16-Channel 4-Bay Tower Standalone NVR with 16-port PoE connectors ENR-321P 32-Channel 4-Bay Tower Standalone NVR with 16-port PoE connectors
BEFORE YOU START Thank you for purchasing ACTi ENR Standalone Network Video Recorder. This guide contains all the information you need to quickly set up the device via local display interface. For detailed instructions on installation and operation, please search for the product manuals on http://www.acti.com/downloadcenter. The items below are required for installation: • Network cameras • Monitor (with HDMI input and the cable) • Network cables • Network switch • At least one ACTI-certified 3.
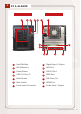
2 AT A GLANCE FRONT PANEL 1 2 3 BACK PANEL 6 4 5 7 8 9 14 10 11 12 13 1 Hard Disk Bay 8 Digital Input / Output 2 LED Indicators 9 LAN Port 3 Power Button 10 USB 3.0 Port 4 USB 2.
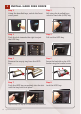
3 INSTALL HARD DISK DRIVE Step 1 Using the bundled keys, unlock the front cover panel. Step 2 Still using the bundled keys, unlock a hard disk (HDD) bay. Step 3 Push the lock towards the right to eject the HDD bay. Step 4 Pull out the HDD bay. Step 5 Remove the empty tray from the HDD bay. Step 6 Secure the hard disk on the HDD bracket using the bundled screws. Step 7 Push the HDD bay completely into the slot until the bay locks into place. Step 8 Lock the HDD bay.
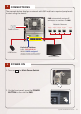
4 CONNECTIONS The example below displays a network with ENR and basic required peripherals to start using the device. ENR automatically assigns IP addresses to cameras via LAN. Network Cameras 192.168.0.101 192.168.0.102 192.168.0.103 192.168.0.104 ... 192.168.0.116 Power Source USB Device 5 Default IP Address LAN : 192.168.0.10 WAN: DHCP assigned (Optional) Connect to another network via WAN for remote client connection. HDMI Monitor POWER ON 1. Turn on the Main Power Switch. 2.
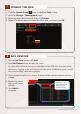
5 LOGIN On the Login screen, using the on-screen keyboard, type the Account and Password. Account: admin Password: 123456 “123456” is the default password of the administrator’s user account. For security reasons, please remember to change it.
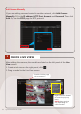
1. 2. 3. 4. 8 FORMAT THE HDD Click the System Setup icon on the Live View screen. Click the Storage > Management page. Select the hard disk to format, then click Format. Repeat the above steps to format the other disk, and then click OK. ADD DEVICES 1. On the Live View screen, click Add. 2. Click Add Camera from the pop-up menu. Or, click other network devices to add them in the ENR. You may also group devices by creating a group.
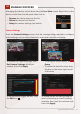
Add Camera Manually If you are adding cameras located in another network, click Add Camera Manually. Fill in the IP address, HTTP Port, Account and Password. Then click Add. Or, use the RTSP page for RTP protocol. 9 CHECK LIVE VIEW After adding the cameras, the models are listed on the left panel of the Live View screen. 1. Create a tab view on the right panel, click 2. Drag a model to the Live View screen. . Double-click the page tab to rename it. Right-click on a channel to access the pop-up menu.
10 MANAGE DEVICES Managing the devices can be done from the Live View screen. Right-click on the device model from the left panel, then click to: • Rename the device name on the list • Delete the device from the list • Setup the camera settings (see below) Camera Settings From the Camera Settings screen, click the corresponding page tab to configure video settings, set up motion detection, event and schedule recordings. To modify the camera settings, click Get Camera Settings.
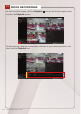
11 CHECK RECORDINGS On the Live View screen, click the Playback to enter the Playback screen. icon on the bottom right corner On the time bar, drag the current-time indicator to your desired position, and then click the Playback icon.
12 SYSTEM SETUP Administrators can configure the ENR system setup. 1. On the Live View screen, click the Setup icon on the bottom left corner. 2. On the Setup screen, click a menu page tab to access the settings: • • • • • • • System: Includes system information, date and time, email settings, etc. Network: Includes network related configurations. Storage: Manages the storage settings of the ENR. Maintenance: Includes firmware upgrade and station management system.