Camera Installation Kit Product Manual PMON-2000 2015/10/08
Product Manual Table of Contents Precautions ............................................................. 6 Safety Instructions .................................................................................... 8 Introduction ............................................................. 9 Package Contents...................................................................................... 9 Physical Description ...............................................................................
Product Manual IP Camera Live View ............................................. 26 Automatically Change Device IP Address ............................................. 26 Connect IP Camera (Direct Connection) ................................................ 26 Access the Camera ............................................................................... 27 Digital PT Control (For Fixed Camera) .................................................. 27 PTZ Control (For IP Speed Dome Camera) .................
Product Manual Snapshot ............................................................... 40 Take Snapshot ......................................................................................... 40 Snapshot File Setup .............................................................................. 40 Files in USB / SD .................................................................................. 40 Video Recording ................................................... 41 Record Video.......................
Product Manual All Files Copy ........................................................................................... 51 Single File Deletion.................................................................................. 51 All Files Deletion ...................................................................................... 51 Video Setup ........................................................... 52 Video Recording Setup (Video- Rec Setup) ...........................................
Product Manual Precautions Read these instructions Read all the safety and operating instructions before using this product. Heed all warnings Adhere to all the warnings on the product and in the instruction manual. Failure to follow the safety instructions given may directly endanger people, cause damage to the system or to other equipment. Servicing Do not attempt to service this product yourself as opening or removing covers may expose you to dangerous voltage or other hazards.
Product Manual Federal Communications Commission Statement This equipment has been tested and found to comply with the limits for a class B digital device, pursuant to Part 15 of the FCC Rules. These limits are designed to provide reasonable protection against harmful interference in a residential installation. This equipment generates, uses, and can radiate radio frequency energy and, if not installed and used in accordance with the instructions, may cause harmful interference to radio communications.
Product Manual Safety Instructions Cleaning Disconnect this product from the power supply before cleaning. Accessories and Repair Parts Use only the accessories and repair parts recommended by the manufacturer. Using other attachments not recommended by the manufacturer may cause hazards. Water and Moisture Keep this product in a dry place protected from moisture. Servicing Do not attempt to service this product yourself. Refer all servicing to qualified service personnel.
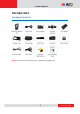
Product Manual Introduction Package Contents NOTE: The pictures are for reference only, actual items may slightly vary. 9 www.acti.
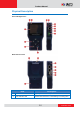
Product Manual Physical Description Front and Right Views Back and Left Views Item Description 1 Power Indicator LED Lights up when the device power is on. 2 Data Indicator LED Flashes when the device is transmitting or receiving data. 10 www.acti.
Product Manual Item 3 LCD Screen Description Displays the video and on-screen display (OSD) menu options. 4 Navigation Keys Press the corresponding arrow to move through the menu items on screen or perform PTZ functions when viewing a PTZ camera. 5 ESC Key Press to exit the current page without saving or return to the previous page. 6 Power / Snapshot / Enter Power Function Key Press and hold this key for at least 3 seconds to turn on the device. Make sure the main power switch is switched on.
Product Manual Item 17 USB Port Description Connects to a USB device for data storage or to update the device firmware. 18 Memory Card Slot Insert a memory card into this slot for data storage. 19 LAN Port / PSE Input Connects to a Power Supply Equipment (PSE) input, which can be used to provide DC 48V power to the IP camera connected to the PoE Output port. To enable this function, the Power Bank Switch must be “ON”. 20 LAN Port / PoE Output Connects to an IP Camera.
Product Manual Preparing the Device Charging the Battery Charge the bundled Li-ion battery approximately for two (2) hours before use. The battery supports up to three (3) hours of operating time and varies depending on the connected camera. To charge the battery, do the following: 1. Slightly press and slide to open the battery compartment cover. 2. Insert the battery towards the direction indicated by the battery arrow. 3. Close the battery compartment cover. 4.
Product Manual Powering On the Device 1. Slide the Power Switch to ON. 2. Press and hold the Power Key for at least 3 seconds. The Power Indicator LED lights up. NOTE: The boot up process may take a while to complete. Touch Panel Calibration For first-time use, the Touch Calibration screen appears. Using the stylus, follow the on-screen instructions to complete the calibration. 14 www.acti.
Product Manual Using the Carrying Bag For protection and convenience of use, you may use the rubber case for easy-grip or carrying bag to protect and carry the device wherever you go. To place the device in the carrying bag, do the following: 1. Insert the outer edge velcro through the bottom slot of the device. 2. Insert the inner edge velcro through the top slot of the device. 3. Attach the sunshield. 15 www.acti.
Product Manual 4. Close the bag and attach the neck strap. 16 www.acti.
Product Manual Connecting a Camera to the Device After installing the IP camera, use the device to power up the camera via Power-over-Ethernet (PoE). 1. Slide the Power Switch to “ON”. 2. Press and hold the Power Key for at least 3 seconds. NOTE: The Power Indicator LED lights up. The boot up process may take a while to complete. 3. Connect one end of the network cable to the camera and the other end to the LAN / POE OUT port of the device.
Product Manual Screen Layout Main Menu The Main Menu of the Camera Installation Kit is shown as follows: Status Icons Item Battery Status Description Indicates the battery level and charging status. When the Tester is connected to an IP Camera that is PoE enabled with the Tester’s PoE function on, the PSE button PSE will be lightened up, and the Camera will consume power from the Device’s internal battery. Buttons Item Description Main Menu Return to the Main Menu.
Product Manual Item Description Directly connect to the IP Camera with Connect one touch. Ideal for testing multiple IP Cameras. Tap this icon to find all the IP Cameras in the network. Then select a specific IP Camera Device by IP or MAC from the address list.Users Search have to access “Setup> Setup- IP> IP Camera Setup- IP connection” for choosing Camera Type. And relative IP Cameras will be filtered out. Tap this icon to find all the IP Cameras with UPnP names in the network.
Product Manual Setup Menu Press the button in the Main Menu, and you will be automatically directed to the Setup Menu as shown below. Item AV Video Setup - AV AV Dome Description Adjust analog video’s brightness, contrast and sharpness. Configure the Speed Dome Camera’s protocol, baud rate and ID address.
Product Manual Item Description Preview and manage the snapshot files. Setup - Snapshot Setup - Video Record Setup the recording video file name, description, Setup and saving path. Playback Preview, playback and manage the video files. The Camera Installation Kit’s system settings include volume, LCD brightness, firmware upgrade, factory default reset and auto shutdown Setup - System setup. The MAC address of the Device is also displayed on this page for users’ reference. 21 www.acti.
Product Manual AV In (Analog Video Live View) Users can view analog video through the BNC IN connector on top of the Device as shown below. Connect the BNC cable from the video output connector of the Camera to the BNC IN port on the Device. Tap the button on the Main Menu, and users can view live video on the LCD screen. To view live video from an IP Camera which supports BNC via AV In function, please make sure the IP Camera streaming is set as “BNC Out”. 22 www.acti.
Product Manual Speed Dome Camera Live View Users can implement a Speed Dome Camera’s PTZ control in the live view mode. NOTE: Make sure the Speed Dome Camera’s RS-485 lines are correctly connected to the Device’s RS-485 terminal block, or PTZ control cannot be manipulated here. Please refer to the PTZ control documentation for more RS-485 information.
Product Manual Enable PTZ Control Function Step 1: Tap the button on the Main Menu and then tap to enter it. Step 2: Tap and enter its setting page as shown below. Step 3: Select from the drop-down list. Step 4: Tap to save the setting, and system will automatically direct to the previous screen. Step 5: Tap to return to the Setup Menu. 24 www.acti.
Product Manual Implementing PTZ Control Step 1: Tap button in the Main Menu to enter the live view mode. Meanwhile, there will be four arrow buttons displayed on the screen as shown below. Step 2: Tap the arrows on the screen to pan and tilt the camera. And press the Up/Down Keys ( ) on the Device’s button pad for zooming in/out.
Product Manual IP Camera Live View The Camera Installation Kit can automatically detect and recognize the IP Camera that is connected to it. Please connect the IP Camera to the Device’s LAN port; plug in the IP Camera if not using PoE. For further information about PoE, please refer to Power over Ethernet (PoE) on page 36. Automatically Change Device IP Address After the IP Camera is powered on, the Camera Installation Kit’s IP address will be automatically detected and displayed on the screen.
Product Manual Check the IP Camera Profile in the field under the icon as shown below. The IP Camera’s profile details including IP address, camera type, username, password, etc. If there is any setting required to be altered, please go to to change the related IP Camera settings. For more setup information, please refer to Setup- IP Connection (Alter Camera Settings) on page 47.
Product Manual Press the Left/Right Keys ( ), and the image can be horizontally shifted to the left/right with four steps respectively; Press the Up/Down Keys ( ), and the image can be shifted upward/downward with four steps respectively. To leave the Digital PT Control mode, simply tap “ZOOM.” PTZ Control (For IP Speed Dome Camera) In the IP Camera’s live view mode, the text “ZOOM” will be displayed on the right bottom of the screen.
Product Manual Device Search If there are multiple IP Cameras in the network, utilize to find all of the cameras. can be accessed in IP Camera Submenu. Implement Device Search Tap icon, and wait for searching to finish. Then you will enter the Device Search page as shown below. Tap to switch the detected IP Camera displaying form between IP address and MAC. Select the target IP Camera from the device finding list on the left top of the screen.
Product Manual Digital PT Control (For Fixed Camera) In the IP Camera’s live view mode, the text “ZOOM” will be displayed on the right bottom of the screen. Tap the text “ZOOM”, and the video will switch to the digital zoom mode (at maximum digital zoom ratio). Meanwhile, the text “P & T” will be displayed on the left bottom of the screen as shown below.
Product Manual Exit the Viewing Mode Press the ESC Key on the Device’s button pad to exit the live view mode, and return to the IP Camera Submenu. 31 www.acti.
Product Manual UPnP Users can search all of the IP Cameras with UPnP names in the network via access setup page, please tap . To on the Main Menu and enter the IP Camera Submenu. Implement UPnP Tap icon, and wait for searching to finish. Then you will enter the UPnP page as shown below. Select the target IP Camera from the device finding list on the left top of the screen. Then setup the duration to wait until connecting to devises.
Product Manual Digital PT Control (For Fixed Camera) In the IP Camera’s live view mode, the text “ZOOM” will be displayed on the right bottom of the screen. Tap the text “ZOOM”, and the video will switch to the digital zoom mode (at maximum digital zoom ratio). Meanwhile, the text “P & T” will be displayed on the left bottom of the screen as shown below.
Product Manual Exit the Viewing Mode Press the ESC Key on the Device’s button pad to exit the live view mode, and return to the IP Camera Submenu. 34 www.acti.
Product Manual Cable Test (CAT5) Users can check the RJ-45 cable wiring with the supplied UTP Terminal Block Setup for Testing Connect one end of the RJ-45 connector to the UTP Terminal Block and the other end to the CAT5 port at the side of the Device. Cable Testing Step 1: Tap the icon on the Main Menu. Step 2: Tap the Step 3: Then the cable’s wire map will be displayed on the screen. Users can check the icon and wait for wiring detection.
Product Manual Power over Ethernet (PoE) The Camera Installation Kit can function as the power sourcing equipment (PSE) and provide power to IP Cameras that are PoE / PoE Plus enabled. Enable PoE Step 1: Connect the Ethernet cable from the IP Camera to the LAN / PoE OUT Port on the side of the Device. Step 2: Tap the indicator light icon on the Main Menu to enable the PSE, then the PSE will be on, which means the Device is now providing power to the IP Camera.
Product Manual PoE Setup Tap the icon on the Main Menu to setup including Power Level, Power over Ethernet (PoE) measurement, PoE measurement display, Enable PoE when booting, and PoE auto-shutdown time, etc. Power Level The output Power Consumption Level range can be set according to different needs. The options include , , and . NOTE: Please make sure the PoE function is off before Power Level setting. 37 www.acti.
Product Manual PoE Measurement The information includes voltage (V), current (I) and power consumption (P) of the Power over Ethernet (PoE) can be measured according to different Ethernet circumstances. Select from the drop-down list of the to fit your Ethernet condition to show the PoE Measurement information on the screen while using PoE.
Product Manual Enable PoE after Device Bootup For users who wish to enable PoE in the meantime while the Device is booting up, please select from the drop-down list of , and the Device will provide electricity to the IP Camera right after system startup. PoE Auto-shutdown Select the PoE auto-shutdown interval between 20 seconds, 40 seconds and 60 seconds. The setup can aid conserving battery power when there is no IP Camera or other device using the Device as the PSE.
Product Manual Snapshot The advanced Snapshot function facilitates saving images in the assigned path when necessary. Take Snapshot In the IP Camera’s live view mode, press the key on the Device’s button pad. Then enter the Snapshot setup page as shown below. Snapshot File Setup Assign a storage location among the three options (Device / USB / SD) located on the very top of the snapshot setup page for the snapshot by tapping the round button on the left side of the option.
Product Manual Video Recording The Device supports Video Recording, Video Setup, Video File Managing and Video Playback function for IP Camera live views when necessary. Record Video In the IP Camera’s live view mode, tap the white text “REC” on the right top corner of the live view screen to start Video Recording. During the recording process, the text will be in red. Tap the text “REC” one more time to stop Video Recording, and the text will be back in white again. 41 www.acti.
Product Manual AV Video Setup The can be accessed by the following path: Setup> Setup- AV> Setup- AV Video. In the menu, users can adjust analog video’s brightness, contrast or sharpness for favorable video display on the Device’s LCD screen under different operating circumstances. Access Step 1: Tap Step 2: Tap tap on the Main Menu and enter the Second Screen.
Product Manual Adjust Brightness / Sharpness / Contrast Value Move the slider bar by touching the screen or using the Device’s Left/Right Keys ( ). Switch to another Item icon next to the slider bar or press the Device’s Up/Down Keys to Tap the switch among Brightness, Sharpness and Contrast setting. Tap to save all the settings and you will then automatically directed to the previous page. Or tap to exit the setting page without saving settings.
Product Manual Set the Dome Type Select or from the drop-down list of the . means activating PTZ control on the Camera Installation Kit, while indicates disabling PTZ control on the Device. Set the Protocol Select the protocol for the Speed Dome Camera from the drop-down list. Set the Baud Rate Select the baud rate for the Speed Dome Camera from the drop-down list. Set the ID Address Enter the three-digit ID address.
Product Manual IP Camera Setup Users can change the IP Camera’s setting, e.g. IP address, camera type, user name, password, streaming format, network settings, in the Setup- IP Submenus: and . Access and Step 1: Tap the icon on the Main Menu to enter the Second Step 2: Tap on the Setup Menu, and then enter the IP Setup Submenu. 45 Screen. www.acti.
Product Manual The icon and icon are in the IP Setup Submenu. 46 www.acti.
Product Manual Setup- IP Connection (Alter Camera Settings) Tap the icon and enter its setup page as shown below. Specify Camera Settings Please specify the IP address, camera type, user name, password, HTTP Port, streaming settings (Streaming port / Format / Protocol), etc. of the connected IP Camera in each column by the stylus touch pen. 47 www.acti.
Product Manual Add a Camera to List To add a camera to the Camera Profile list, please enter its model name in the column and tap the icon on the right side of this column; while canceling a camera, select the camera to be deleted, and then tap the icon . Up to 128 IP Cameras can be assigned for testing. Tap to save all the settings and you will then automatically directed to the previous screen. Or tap to exit the setting page without saving settings.
Product Manual Tap to save all the settings and you will then automatically directed to the previous screen. Or tap to exit the setting page without saving settings. Setup- IP Script (IP Camera API Commands) Tap the icon and enter its setup page as shown below. This script tool can be used to set any of the API commands supported by the IP Camera.
Product Manual Snapshot Setup Users can preview, copy and delete the image on the setup page. Tap the icon on the Main Menu and tap on icon to enter the snapshot file managing page as shown below. Image Preview On the page, select the snapshot storage path (Device / USB / SD) where the saved files are located. Then all the files will be listed in the field.
Product Manual All Files Copy Tap the
Product Manual Video Setup Follow the steps below to setup for video recording. Video Recording Setup (Video- Rec Setup) Step 1: Tap the Step 2: icon on the Main Menu to enter the Second Screen. Enter by tapping the icon. Tap icon on the Video Setup Screen to access video recording setup page. 52 www.acti.
Product Manual Assign a storage location among the three options (Device / USB / SD) located on the very top of the setup page to save the videos by tapping the round button on left side of the option. And then enter the file name and description respectively for the snapshot. Tap to save all the settings and return to the live view mode, or tap to exit the setting page without saving settings. 53 www.acti.
Product Manual Video Playback Users can preview, copy and delete the video on the page. Tap the icon on the Main Menu and tap on Then tap on to enter the Video Setup Screen. icon to access video play back page. On the page, select the recording video storage path (Device / USB / SD). Then all the video files will be listed in the field.
Product Manual Single File Copy Tap the file name in the list to Copy, and then tap the < Copy> icon in section below . Select the location to copy the file to in the pop out window, and then tap . All Files Copy Tap the
Product Manual System Setup On the system setup page, users can adjust the volume or the brightness of the Camera Installation Kit’s LCD screen, implement firmware upgrade, restore all the system settings to factory default and auto shutdown time. Access Step 1: Tap the icon on the Main Menu. Step 2: Tap the icon on the Setup Menu to enter the Device’s system setup page. 56 www.acti.
Product Manual Adjust Device Volume Move the slider bar of . Greater volume represents louder sound. Adjust Device Screen Brightness (Backlight) Move the slider bar of . Greater value represents higher brightness. Tap the tick box below the slider bar to lock the level on the slider bar. Tap the tick box again to cancel the selection; then the slider bar above will become movable again.
Product Manual Step 2: Press the button, and the firmware in the USB drive shall be firmware details will be displayed in the blank field of the Step 3: file selection menu. Check the tick box by tapping, and tap button to start upgrade. Then the notice of firmware and the firmware upgrade found. The upgrade confirmation will pop up. Tap will proceed.
Product Manual Step 5: Then touch each flashing box coming out as instructed. The screen mode will switch to Main Menu after Touch Panel Calibration is completed. Auto Shutdown The system can be automatically shutdown after pre-determined time range when idle. Select the specific time interval from the drop-down list for system auto shutdown. To disable the function, please select . 59 www.acti.
Copyright © 2015, ACTi Corporation All Rights Reserved 7F, No. 1, Alley 20, Lane 407, Sec. 2, Ti-Ding Blvd., Neihu District, Taipei, Taiwan 114, R.O.C. TEL : +886-2-2656-2588 FAX : +886-2-2656-2599 Email: sales@acti.