
User's Guide
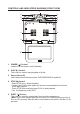
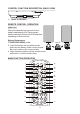


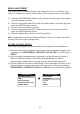
Table Of Contents

10
MENU ADJUSTMENT
The System Menu Contains features and options that let you customize your
system to change the screen mode display, OSD language and source default.
1) Press the SYSTEM MENU button on the remote, the main page of the system
menu will appear on screen.
2) Use the cursor buttons p or q to select the desired item in the main page and
press the ENTER button to select.
3) The sub menu will appear on screen.
4) Use the cursor buttons p or q to select an item in the sub menu and then
press the ENTER button to select.
5) Press the System Menu button to exit System Menu.
Note: System Menu can be controlled via Remote Control only. (Items selected in
the menu will have a green background)
PICTURE CONTROL SELECT
When watching program, the picture quality can be adjusted to suit satisfactory.
1) Each time this button is pressed, the on screen picture adjustment displays the
“adjustment” for BRIGHTNESS, CONTRAST, COLOR, TINT (for NTSC only) or
RESET.
2) Once the desired adjustment bar is displayed, use the Volume(+)/Volume(-)
Button to adjust the setting. The display will automatically turn off if no
adjustment are made within 6 seconds, or is any other button is pressed.
3) Press the qbutton four time to select RESET, then press either Volume(-)or the
Volume(+)button on the remote or ther main unit and all of the picture settings
(BRIGHTNESS, CONTRAST, COLOR and TINT)will return to the factory setting.
BRIGHTNESS
CONTRAST
COLOR
TINT
RESET
SYSTEM MENU
SCREEN MODE
OSD LANGUAGE
SOURCE DEFAULT DVD
PICTURE CONTROL
FMM
PICTURE CONTROL