Actiontec GT704-WG-B Wireless DSL Gateway User Manual
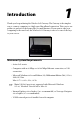
1 Introduction Thank you for purchasing the Wireless DSL Gateway. The Gateway is the simplest way to connect computers to a high-speed broadband connection. This easy-to-use product is perfect for the home office or small business. If you want to take your computing to the next level, the Wireless DSL Gateway is sure to be one of the keys to your success.
Wireless DSL Gateway User Manual Features s 0LUG AND 0LAY INSTALLATION SUPPORT FOR COMPUTERS RUNNING 7INDOWS OPERating systems (98SE, Me, 2000, XP, and Vista) s !$3, 7!. port (RJ-11) s &ULL RATE !.3) 4 Issue 2, ITU G.992.1(G.dmt) and G.992.2(G.lite) standard compliance s !UTO HANDSHAKE FOR DIFFERENT !$3, flavors s USB 1.
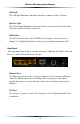
Chapter 1 Introduction Getting to Know the Gateway This section contains a quick description of the Gateway’s lights, ports, etc. The Gateway has several indicator lights (LEDs) and a button on its front panel, and a series of ports and switches on its rear panel. Front Panel The front panel of the Gateway features nine lights: Power, DSL, Internet, Ethernet (4), USB, and Wireless. Power Light The Power light displays the Gateway’s current status.
Wireless DSL Gateway User Manual USB Light The USB light illuminates when the Gateway is connected via its USB port. Wireless Light The Wireless light illuminates when the Gateway is connected wirelessly (if the Gateway’s Wireless feature is turned on). WPS Button The WPS button activates WPS 7I&I 0ROTECTED 3ETUP ON THE 'ATEWAY 3EE CHAPTER h#ONFIGURING 7IRELESS 3ETTINGS v FOR MORE INFORMATION ABOUT WPS.
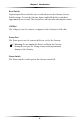
Chapter 1 Introduction Reset Switch Depressing the Reset switch for one second will restore the Gateway’s factory default settings. To reset the Gateway, depress and hold the Reset switch for approximately ten seconds. The reset process will start after releasing the switch. USB Port The USB port is used to connect a computer to the Gateway via USB cable. Power Port The Power port is used to connect the Power cord to the Gateway.
Wireless DSL Gateway User Manual This page left intentionally blank.
2 Performing a Quick Setup This chapter is a guide through a quick set up of the Gateway, including how to connect the Gateway to the ISP. To complete the quick setup, have the Welcome Letter or ISP Worksheet handy. If the document is not available, contact the ISP immediately. Accessing Quick Setup Screens To access the Quick Setup screens: 1. /PEN A 7EB BROWSER )N THE h!DDRESSv TEXT BOX TYPE http://192.168.1.1 then press Enter on the keyboard.
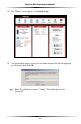
Wireless DSL Gateway User Manual 2. 4HE h(OMEv SCREEN APPEARS #LICK Quick Setup. 3. ! LOGIN WINDOW APPEARS %NTER THE USER NAME AND PASSWORD IN THE APPROPRIate text boxes, then click OK.
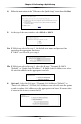
Chapter 2 Performing a Quick Setup 4. &OLLOW THE INSTRUCTIONS IN THEh7ELCOME TO THE 1UICK 3ETUPvSCREEN THEN CLICKNext. 5. !T THE TOP OF THE NEXT WINDOW SELECT PPPoE or DHCP. 5a. If PPPoE was selected in step 5, the default user name and password are entered in the appropriate text boxes. If “$(#0v WAS SELECTED GO TO STEP 5b.
Wireless DSL Gateway User Manual 7. #LICK Apply at the bottom of the screen. 8. Read the instructions on the next screen. The Gateway is successfully configured. The Power light flashes rapidly while the Gateway restarts, then glows steadily green when fully operational. The Internet light will also glow steadily green. The Gateway is now configured and users can start surfing the Internet.
Chapter 2 Performing a Quick Setup 3. 4HE h#HANGE !DMIN 5SERNAME 0ASSWORDv SCREEN APPEARS %NTER A NEW 5SERNAME IN THE h!DMIN 5SER .AMEv TEXT BOXT THEN ENTER A NEW PASSWORD IN THE h!DMIN 0ASSWORDv TEXT BOX -AKE SURE TO WRITE DOWN THE USER NAME AND password and keep it in a secure location. They will be needed to access the 'ATEWAY S 7EB #ONFIGURATION SCREENS IN THE FUTURE 4. #LICK Apply at the bottom of the screen. 5. Read the instructions on the next screen.
Wireless DSL Gateway User Manual This page left intentionally blank.
Viewing the Gateway’s Status 3 !FTER CONFIGURING THE 'ATEWAY THE 'ATEWAY S CONNECTION AND NETWORK STATUS CAN BE VIEWED 4HE )NTERNET CONNECTION STATUS IS VIEWED IN THE h"ROADBAND #ONNECTION 3TATUSv SCREEN WHILE THE NETWORK STATUS IS VIEWED IN THE h-Y .ETWORKv SCREEN Broadband Connection Status To view the Gateway’s connection statistics, select Status in the Home screen.
Wireless DSL Gateway User Manual PPP Status 4HE MIDDLE SECTION OF THE "ROADBAND #ONNECTION 3TATUS SCREEN DISPLAYS THE STATUS of the Gateway’s PPP connection, including user name, authentication failures, and packets sent and received.
Chapter 3 Viewing the Gateway’s Status )N THE MENU ON THE LEFT SIDE OF THE "ROADBAND #ONNECTION 3TATUS SCREEN THERE ARE two other options available to view: NAT Table and Routing Table #LICK TO GENerate the option of choice. NAT Table Selecting NAT Table GENERATES THE h.!4 4ABLEv SCREEN 4HIS SCREEN DISPLAYS AN OVERVIEW of the current list of open connections through .!4 .ETWORK !DDRESS 4RANSLATION THE Gateway supports between the networked computers and the Internet.
Wireless DSL Gateway User Manual Network Status To view the Gateway’s network status, select My Network IN THE h(OMEv SCREEN 4HE h-Y .
Configuring Wireless Settings # 4 This chapter explains how to set up the Gateway’s wireless network capabilities, including setting up wireless security and viewing the wireless connection status. Accessing Wireless Setup To access the Wireless Settings configuration screens, follow these instructions: 1. /PEN A 7EB BROWSER )N THE h!DDRESSv TEXT BOX TYPE http://192.168.1.1 then press Enter on the keyboard. 2. 4HE h(OMEv SCREEN APPEARS #LICK Wireless Setup.
Wireless DSL Gateway User Manual 3. ! LOGIN WINDOW APPEARS %NTER THE USER NAME AND PASSWORD IN THE APPROPRIate text boxes, then click OK.
Chapter 4 Configuring Wireless Settings 4. 4HE h7IRELESS "ASIC 3ETTINGSv SCREEN APPEARS 4O MODIFY A SPECIFIC CONFIGURAtion, click on its name in the menu bar on the left, or from the list in the middle of the screen.
Wireless DSL Gateway User Manual Basic Wireless Setup To perform a basic setup of a wireless network using the Gateway: 1. )N THE h7IRELESS "ASIC 3ETTINGSv SCREEN TURN THE 'ATEWAY S WIRELESS RADIO ON BY selecting On. 2. #REATE A NAME FOR THE WIRELESS NETWORK AND ENTER IT IN THE hESSIDv TEXT BOX 3. 3ELECT A CHANNEL FROM THE h#HANNELv DROP DOWN MENU )N THE United States, use channels 1-11. 4. !CTIVATE WEP (Wired Equivalent Privacy) to secure the wireless network by selecting WEP. 5.
Chapter 4 Configuring Wireless Settings 4HIS GENERATES THE h7IRELESS !DVANCED 3ETTINGSv SCREEN )N THIS SCREEN THE SECURITY OF the wireless network can be activated and fortified. Wireless Security 4HE FIRST SECTION OF THE 7IRELESS !DVANCED 3ETTINGS SCREEN INVOLVES WIRELESS SECURITY (securing wireless traffic as it transmits through the air).
Wireless DSL Gateway User Manual 128-bit WEP - 128-bit WEP requires one or more keys, each key comprising hexaDECIMAL PAIRS ! HEXADECIMAL DIGIT CONSISTS OF AN ALPHANUMERIC CHARACTER RANGING from 0-9 or ! & !N EXAMPLE OF A 128-bit WEP key is: D-44 &% 6# !1 %& 2ED #4-21-74-5D-B1.
Chapter 4 Configuring Wireless Settings When finished with this screen, click Apply to save all changes. To return to the 7IRELESS !DVANCED 3ETTINGS SCREEN CLICK Back. WPA, WPA2, AnyWPA !CTIVATING ANY OF THE THREE WPA 7I &I 0ROTECTED !CCESS OPTIONS in the Wireless !DVANCED 3ETTINGS SCREEN GENERATES A hWireless 70! Settingsv SCREEN 4HE THREE 70! options use identical procedures to activate, although 70! provides stronger security than standard 70!. !NY70! activates both 70! and 70! .
Wireless DSL Gateway User Manual To prevent a unwanted computers from joining the Gateway’s wireless network by using an ESSID OF h!NY v SELECT Disable in the ESSID Broadcast screen. To broadcast the wireless network’s ESSID, select Enable. When finished with this screen, click Apply to save all changes. To return to the 7IRELESS !DVANCED 3ETTINGS SCREEN CLICK Back.
Chapter 4 Configuring Wireless Settings 802.11b/g Mode Selecting 802.11b/g Mode IN THE 7IRELESS !DVANCED 3ETTINGS SCREEN GENERATES THE “802.11b/g Modev SCREEN !CCESS TO THE 'ATEWAY S NETWORK CAN BE RESTRICTED TO WIRELESS CLIENTS USING EITHER the 802.11b or 802.11G WIRELESS ADAPTERS #LICK ON THE DOWN ARROW NEXT TO THE DROP down menu and select the desired option. We RECOMMEND USING THE h-IXEDv mode (the default option), which enables both 802.11b and 802.11g wireless clients to join the network.
Wireless DSL Gateway User Manual WPS (WiFI Protected Setup) 7I&I 0ROTECTED 3ETUP 703 PROVIDES AN EASIER WAY TO SET UP A WIRELESS NETWORK Instead of entering passwords or multiple keys on each wireless client (laptop, printer, external hard drive, etc.), the Router can create a wireless network that only requires pressing buttons (one on the Router, and one on the client [either built-in, or on a compatible wireless card]) to allow wireless clients to join the Router’s wireless network.
Chapter 4 Configuring Wireless Settings 3. #LICK Apply at the bottom of the screen. The Router is now ready to accept WPS clients on its wireless network. Joining the WPS Wireless Network 4O JOIN THE 703 WIRELESS NETWORK PRESS THE h7I &I 0ROTECTED 3ETUPv BUTTON ON THE front panel of the Router, then press the WPS button on the wireless client.
Wireless DSL Gateway User Manual This page left intentionally blank.
Configuring Advanced Settings # 5 This chapter explains how to configure the Gateway’s advanced settings, such as remote management, $(#0 settings, and Quality of Service (QoS). Accessing Advanced Setup Screens 4O ACCESS THE !DVANCED 3ETUP SCREENS FOLLOW THESE INSTRUCTIONS 1. /PEN A 7EB BROWSER )N THE h!DDRESSv TEXT BOX TYPE http://192.168.1.1 then press Enter on the keyboard.
Wireless DSL Gateway User Manual 2. 4HE h(OMEv SCREEN APPEARS #LICK Advanced Setup. 3. ! LOGIN WINDOW APPEARS %NTER THE USER NAME AND PASSWORD IN THE APPROPRIate text boxes, then click OK.
Chapter 5 Configuring Advanced Settings 4. 4HE h!DVANCED 3ETUPv SCREEN APPEARS 4O MODIFY A SPECIFIC CONFIGURATION CLICK ON its name in the menu bar on the left, or from the list in the middle of the screen.
Wireless DSL Gateway User Manual DSL Settings To access DSL Settings, select DSL Settings FROM THE h!DVANCED 3ETUPv SCREEN 4HE Gateway’s VPI, 6#), Mode, and QoS (Quality of Service) settings can be changed from this screen, we recommend not changing these values without first consulting the ISP.
Chapter 5 Configuring Advanced Settings We strongly recommend leaving the $(#0 Server option On.
Wireless DSL Gateway User Manual Domain Name This is the domain name provided by Verizon. If Verizon provided domain name information, enter it here. If not, leave the text box intact. DNS (Dynamic or Static) This is the type of DNS server provided by Verizon. If Verizon provided DNS server information, select the type here. If not, leave as is. DNS Server 1 This is the primary DNS server provided by Verizon. If Verizon provided DNS server information, enter it here. If not, leave the text box intact.
Chapter 5 Configuring Advanced Settings The values in the “Modem IP !DDRESSv AND h-ODEM 3UBNET -ASKv TEXT BOXES ARE the IP and subnet mask address of the Gateway as seen on the network. These values can be modified for your ,!. network, but we recommend keeping the default factory settings (IP address 192.168.1.1; subnet mask address 255.255.255.0). the Gateway’s !DDRESS IS MODIFIED VERIFY THE ☞ Note: If3ERVER RANGE IS WITHIN THE SAME SUBNET &OR MORE INFOR,!.
Wireless DSL Gateway User Manual The “7!. )0 !DDRESSv SCREEN APPEARS 7!. )0 !DDRESS ALLOWS MANUAL SET UP OF THE IP address of the Gateway. To do this: Some providers use o to establish communica☞ Note: tion with an end user. Other types of broadband Internet conDSL PPP E nections (such as fixed point wireless) may use either $(#0 or static IP address. If unsure which connection is present, check with Verizon before continuing. 1.
Chapter 5 Configuring Advanced Settings 4. Enable Public/Private IP !DDRESSING 4HIS FEATURE IS USED IN CONJUNCTION WITH -ULTIPLE 3TATIC )0 !DDRESSES 7HEN SELECTED THE 'ATEWAY USES .!4 for private IP addressing for the ,!., allowing both public and private IP addressing to be configured to the ,!. simultaneously, while the $(#0 server is reserved for PRIVATE )0 ADDRESSING !LL COMPUTERS USING PUBLIC IP addresses must have the public IP addresses statically assigned. 5. Select the DNS type.
Wireless DSL Gateway User Manual QoS Settings Upstream Selecting QoS Settings Upstream FROM THE h!DVANCED 3ETUPv SCREEN CAUSES THE h1O3 5PSTREAM 3ETTINGSv SCREEN TO APPEAR QoS (Quality of Service) allows the prioritization of certain types of data traffic (such as VoIP traffic) over other types of traffic (such as standard data). Both upstream (data coming into the network) and downstream (data going out of the network) traffic can be prioritzed using QoS.
Chapter 5 Configuring Advanced Settings Total Available Bandwidth Displays the total amount of available bandwidth (in kilobits per second). High Priority Bandwidth Enter the amount of high priority bandwidth to be used by the prioritized traffic type (cannot exceed total available bandwidth). Priority !LWAYS SET TO h(IGHv AND CANNOT BE CHANGED Protocol Select the data type being configured. Options: 4#0, UDP, )#-0.
Wireless DSL Gateway User Manual QoS Settings Downstream Selecting QoS Settings Downstream FROM THE h!DVANCED 3ETUPv SCREEN CAUSES THE h1O3 $OWNSTREAM 3ETTINGSv SCREEN TO APPEAR 4HE h1O3 $OWNSTREAM 3ETTINGSv SCREEN IS IDENTICAL TO THE h1O3 5PSTREAM 3ETTINGSv SCREEN WITH THE EXCEPTION OF THE h(IGH 0RIORITY "ANDWIDTHv OPTION 5SE THIS SCREEN to configure QoS for data going out of the network. When finished in this screen, click Apply to activate any changes made.
Chapter 5 Configuring Advanced Settings QoS Status Selecting QoS Status FROM THE h!DVANCED 3ETUPv SCREEN CAUSES THE hIP 1O3 3TATUSv screen to appear. This screen displays the status of QoS upstream and downstream traffic, and differentiates both streams into high priority and normal priority traffic.
Wireless DSL Gateway User Manual Remote Management To access the Gateway from the Internet, activate Remote Management by selecting the appropriate On radio button and writing down the 7!. IP address of the Gateway (see “7!. )0 !DDRESSv /N A COMPUTER OUTSIDE OF THE NETWORK OPEN A Web browser and enter the Gateway’s 7!. )0 address in the address text box. The Gateway’s Home screen (or a password prompt, if a password has been set) appears in the browser window.
Chapter 5 Configuring Advanced Settings Dynamic Routing Selecting Dynamic Routing IN THE h!DVANCED 3ETUPv SCREEN GENERATES THE “Dynamic Routingv SCREEN If another gateway or router is set up behind the Gateway in the network configuration, consult the documentation that came with the other gateway to see what kind of Dynamic Routing is required, then select the needed option. When finished in this screen, click Apply to activate any changes made.
Wireless DSL Gateway User Manual UPnP (Universal Plug and Play) Selecting UPnP IN THE h!DVANCED 3ETUPv SCREEN GENERATES THE hUPnPv SCREEN )N this screen, the Universal Plug and Play option is turned on or off by activating the appropriate circle. Universal Plug and Play is a zero-configuration networking protocol that allows hardware and software (such as Netmeeting) to operate more efficiently. If Netmeeting is not running properly, activate UPnP.
Chapter 5 Configuring Advanced Settings Time Zone Selecting Time Zone IN THE h#ONFIGURING THE !DVANCED 3ETTINGSv SCREEN GENERATES THE h4IME :ONEv SCREEN )N THIS SCREEN SELECT THE TIME ZONE IN WHICH THE 'ATEWAY IS BEING USED #LICK IN THE h$AY ,IGHT 3AVINGv CHECK BOX IF $AYLIGHT 3AVINGS 4IME IS currently in effect where the Gateway is being used. When finished in this screen, click Apply to activate any changes made.
Wireless DSL Gateway User Manual This page left intentionally blank.
Configuring Security Settings # 6 This chapter explains how to configure the Gateway’s wired security capabilities, including firewall settings, DMZ hosting, and network address translation. Accessing Wired Security Screens To access the Wired Security configuration screens, follow these instructions: 1. /PEN A 7EB BROWSER )N THE h!DDRESSv TEXT BOX TYPE http://192.168.1.1 then press Enter on the keyboard. 2. 4HE h(OMEv SCREEN APPEARS #LICK Security.
Wireless DSL Gateway User Manual 3. ! LOGIN WINDOW APPEARS %NTER THE USER NAME AND PASSWORD IN THE APPROPRIate text boxes, then click OK. ☞ Note: 4HE DEFAULT USER NAME IS hADMIN v 4HE DEFAULT PASSWORD IS hPASSWORD v 4. 4HE h3ECURITYv SCREEN APPEARS 4O MODIFY A SPECIFIC CONFIGURATION CLICK ON ITS name in the menu bar on the left, or from the list in the middle of the screen.
Chapter 6 Configuring Security Settings Firewall Selecting Firewall in the Security screen generates the “&IREWALL 3ETTINGSv SCREEN Select the level of security needed for the network. High If High IS SELECTED IN THE h&IREWALL 3ECURITY ,EVELv SCREEN THE SERVICES LISTED AT THE BOTtom of the screen (HTTP, DNS, &40, )-!0v , SMTP, 0/0 , NNTP, )03%# )+%, )03%# ESP, HTTPS, and )-!0 ARE THE ONLY ONES ALLOWED TO PASS THROUGH THE FIREWALL !LL other services will be blocked.
Wireless DSL Gateway User Manual Medium If Medium IS SELECTED IN THE h&IREWALL 3ECURITY ,EVELv SCREEN THE SERVICES LISTED AT the bottom of the screen (HTTP, DNS, &40, )-!0v , SMTP, 0/0 , NNTP, )03%# )+%, )03%# %30, HTTPS, and )-!0) are the only ones allowed to pass through the firewall. !LL OTHER SERVICES WILL BE BLOCKED 4HESE SETTINGS CAN BE MODIFIED TO CUSTOMIZE THE firewall settings. When finished with this screen, click Apply to save the changes.
Chapter 6 Configuring Security Settings Low If Low IS SELECTED IN THE h&IREWALL 3ECURITY ,EVELv SCREEN THE SERVICES LISTED AT the bottom of the screen (NETBIOS-SSN, DNS, %0-!0, 02/&),%, NETBIOS-NS, NETBIOS-DGM, -)#2/3/&4 $3, SNMP, ,$!0, and -)#2/3/&4 '#,) can be DENIED ACCESS THROUGH THE FIREWALL #LICK IN THE APPROPRIATE CHECK BOX TO ALLOW OR deny access for a particular service (check mark in the check box to deny; blank CHECK BOX TO ALLOW !LL SERVICES NOT LISTED ARE ALLOWED ACCESS Off If Off IS SELE
Wireless DSL Gateway User Manual Applications Selecting Applications in the Security screen generates the “!PPLICATIONSv SCREEN This screen allows certain programs to bypass the Gateway’s built-in firewall, allowing access to parts of the network (for hosting a Web or ftp server, for example). To use, select the name of a computer on the network from the “0# .AMEv drop-down list, then click Add .
Chapter 6 Configuring Security Settings Rule Management 4O CREATE A CUSTOM SET OF RULES CLICK THE h5SERv RADIO BUTTON THEN CLICK New. The h2ULE -ANAGEMENTv SCREEN APPEARS In this screen, the user can create a custom set of rules for a game or application NOT LISTED IN THE !PPLICATIONS SCREEN %NTER THE h2ULE .AME v h0ROTOCOL v h0ORT 3TART v h0ORT %ND v AND h0ORT -APv IN THE APPROPRIATE TEXT BOXES THEN CLICK Apply.
Wireless DSL Gateway User Manual NAT (Network Address Translation) Selecting NAT IN THE h3ECURITYv SCREEN GENERATES THE h.!4v SCREEN 4HE 'ATEWAY S basic firewall security is based on .!4. Disabling .!4 allows the computers connected to the Gateway to be accessed by outside parties, and can cause the loss of Internet connectivity. Do not turn .!4 off unless instructed to do so by Verizon. When finished with this screen, click Apply to save the changes.
Configuring Parental Controls # 7 This chapter explains how to configure the parental control capabilities of the Gateway, such as services blocking, Web site blocking, and schedule rules. Accessing Parental Control Screens 4O ACCESS THE 0ARENTAL #ONTROL CONFIGURATION SCREENS FOLLOW THESE INSTRUCTIONS 1. /PEN A 7EB BROWSER )N THE h!DDRESSv TEXT BOX TYPE http://192.168.1.1 then press Enter on the keyboard. 2. 4HE h(OMEv SCREEN APPEARS #LICK Parental Control.
Wireless DSL Gateway User Manual 3. ! LOGIN WINDOW APPEARS %NTER THE USER NAME AND PASSWORD IN THE APPROPRIate text boxes, then click OK. ☞ Note: 4HE DEFAULT USER NAME IS hADMIN v 4HE DEFAULT PASSWORD IS hPASSWORD v 4. 4HE h0ARENTAL #ONTROLv SCREEN APPEARS 4O MODIFY A SPECIFIC SETTING CLICK ON ITS name in the menu bar on the left, or from the list in the middle of the screen.
Chapter 7 Configuring Parental Controls To modify Internet privileges (Web, &40, Newsgroups, etc.) for the computers on the network: 1. 3ELECT THE COMPUTER S NETWORK NAME FROM THE h0# .AMEv DROP DOWN MENU 2. Select the Internet service(s) to be blocked by clicking in the appropriate check box. 3. #LICK Apply to block the selected service from the selected computer.
Wireless DSL Gateway User Manual Schedule Rules Selecting Schedule Rules IN THE 0ARENTAL #ONTROL SCREEN GENERATES THE h3CHEDULE 2ULESv SCREEN 3CHEDULE RULES ALLOW COMPUTERS ON THE NETWORK TO ACCESS THE Internet at scheduled times only. To set up schedule rules for a computer on the network: 1. 3ELECT THE COMPUTER S NETWORK NAME FROM THE h0# .AMEv DROP DOWN MENU 2. #LICK View/Edit Access Details 4HE COMPUTER S h!LLOWED !PPLICATION AND 4IMESv SCREEN APPEARS 3.
Chapter 7 Configuring Parental Controls 4a.
Wireless DSL Gateway User Manual ☞ Note: 7HEN USING h7EEKLYv SCHEDULING AN ACCESS PERIOD CANNOT include 12 a.m (midnight). To create an access period that includes midnight, create two access periods, one that ends at 12 a.m. on one day, and one that begins at 12 a.m on the following day. 5. When finished with all scheduling, click Apply to save the changes to the Gateway. Removing a Schedule Rule To remove a scheduled rule, select it from the Rules list box, then click Remove.
Configuring the Gateway’s Utilities 8 This chapter explains how to use the Gateway’s utilities, including how to restore default settings, upgrade the Gateway’s firmware, and perform a ping test. Accessing the Utilities Screens To access the Utilities configuration screens, follow these instructions: 1. /PEN A 7EB BROWSER )N THE h!DDRESSv TEXT BOX TYPE http://192.168.1.1 then press Enter on the keyboard. 2. 4HE h(OMEv SCREEN APPEARS #LICK Utilities.
Wireless DSL Gateway User Manual 3. ! LOGIN WINDOW APPEARS %NTER THE USER NAME AND PASSWORD IN THE APPROPRIate text boxes, then click OK. ☞ Note: 4HE DEFAULT USER NAME IS hADMIN v 4HE DEFAULT PASSWORD IS hPASSWORD v 4. 4HE h5TILITIESv SCREEN APPEARS 4O MODIFY A SPECIFIC CONFIGURATION CLICK ON ITS name in the menu bar on the left, or from the list in the middle of the screen.
Chapter 8 Configuring the Gateway’s Utilities Restore Default Settings To restore the Gateway to its factory default settings, select Restore Default Settings FROM THE 5TILITIES SCREEN 7HEN THE h2ESTORE $EFAULT 3ETTINGSv SCREEN APPEARS CLICK Restore Default Settings !NY CHANGES MADE TO THE 'ATEWAY S SETTINGS WILL BE LOST and the factory default settings restored. During this process, the Gateway’s Power light flashes and the Gateway is disabled.
Wireless DSL Gateway User Manual Multiple PVC Selecting Multiple PVC in the Utilities screen generates the “Multiple 06#v SCREEN which allows the configuration of multiple 06#s. Web Activity Log 4HE 7EB !CTIVITY ,OG PROVIDES INFORMATION ABOUT THE 7EB SITES EACH COMPUTER ON THE 'ATEWAY S NETWORK HAS VISITED 4O ACCESS THE 7EB !CTIVITY ,OG SELECT Web Activity Log from the Utilities screen.
Chapter 8 Configuring the Gateway’s Utilities Auto Refresh 4O SET THE 7EB !CTIVITY ,OG SCREEN TO AUTOMATICALLY REFRESH AT CERTAIN INTERVALS ACTIVATE THE CIRCLE NEXT TO h!UTO 2EFRESH %VERYv AT THE BOTTOM OF THE 7EB !CTIVITY ,OG screen, then enter a time value (in seconds) in the text box, or click on the down ARROW AND SELECT A TIME VALUE FROM THE MENU THAT APPEARS 4HE 7EB !CTIVITY ,OG will refresh at the selected interval.
Wireless DSL Gateway User Manual Apply Pressing this button saves any changes to the System Log screen and causes the Save and Restart screen to appear. Save Log As Pressing this button allows the user to save a log as a file.
Chapter 8 Configuring the Gateway’s Utilities Ping Test Selecting Ping Test FROM THE 5TILITIES SCREEN GENERATES THE h0ING 4ESTv SCREEN WHICH IS USED TO CHECK WHETHER THE 'ATEWAY IS PROPERLY CONNECTED TO THE )NTERNET &OLLOW the on-screen instructions to perform the test. Reboot Selecting Reboot FROM THE 5TILITIES SCREEN GENERATES THE h2EBOOTv SCREEN &ROM THIS screen, the Gateway can be rebooted. To do this: 1. &ROM THE FIRST 2EBOOT SCREEN CLICK Reboot. 2. ! CONFIRMATION WINDOW APPEARS #LICK OK.
Wireless DSL Gateway User Manual 3. The Gateway reboots. Read the onscreen information in the screen that appears. When the Gateway’s Power light stops flashing, the Gateway has rebooted.
Specifications General Model Number GT704-WG (Wireless DSL Gateway) Standards IEEE (10BaseT) )%%% u (100BaseTX) IEEE 802.11g (Wireless) G.dmt G.lite t 2&# , , 2516 Protocol LAN - #3-!/#$ WAN - PPP, $(#0, Static IP WAN &ULL RATE !$3, Interface LAN 10/100 RJ-45 switched port USB port Speed LAN Ethernet: 10/100 Mbps auto-sensing Wireless: 802.
Wireless DSL Gateway User Manual Wireless Operating Range Indoors 5P TO - FT Outdoors -BPS 5P TO - FT Topology -BPS Star (Ethernet) LED Indicators Power, DSL, Internet, Ethernet (4), USB, Wireless Environmental Power %XTERNAL 6 $# M! Certifications &## #LASS " &## #LASS # PART #% -ARK #OMMERCIAL 5, Operating Temperature # TO # & TO & Storage Temperature # TO # & TO & Operating Humidity 10% to 85% non-condensing Storage Humidity 5% to 90%
Regulatory Compliance Notices Class B Equipment 4HIS EQUIPMENT HAS BEEN TESTED AND FOUND TO COMPLY WITH THE LIMITS FOR A #LASS " digital device, pursuant to Part 15 of the &## Rules. These limits are designed to provide reasonable protection against harmful interference in a residential installation. This equipment generates, uses, and can radiate radio frequency energy and, if not installed and used in accordance with the instructions, may cause harmful interference to radio communications.
Wireless DSL Gateway User Manual 2. This device must accept any interference received, including interference that may cause unwanted operation. Important Note This equipment complies with &## RADIATION exposure limits set forth for an uncontrolled environment. This equipment should be installed and operated with minimum distance 20 cm between the radiotor and your body. The tramsmitter must not be co-located or operating in conjunction with any other antenna or transmitter.