
User manual


Conguring Security Settings
6.3 Access Control
6
108
© 2010 Verizon. All Rights Reserved.
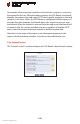
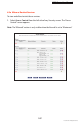
Click 2. Add. The “Add Access Control Rule” screen appears.
Note: To block a service, click Add in the “Blocked” section of the Access Control
screen. To allow outgoing traffic, click Add in the “Allowed” section of the screen.
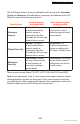
If this access control rule applies to all networked devices, select 3. Any from
the “Networked Computer/Device” list box. If this rule applies to certain
devices only, select User Defined and click Add. Then, create and add a
network object (for more details about adding network objects, see the
“Advanced Settings” chapter of this manual).
Select the Internet protocol to be allowed or blocked from the “Protocol” 4.
drop-down list.
If the rule will be active all the time, select 5. Always from the “When should
this rule occur?” drop-down list. If the rule will only be active at certain times,
select User Defined and click Add. Then, add a schedule rule (for more
details about schedule rules, see the “Advanced Settings” chapter of
this manual).
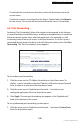
Click 6. Apply to save the changes. The Access Control screen will display a
summary of the new access control rule.
Note: To block a service not included in the list, select User Defined from the
Protocol drop-down menu. The “Edit Service” screen appears. Define the service,
then click OK. The service will then be automatically added to the top section of
the “Add Access Control Rule” screen, and will be selectable.
An access control can be disabled and the service made available without
having to remove the service from the Access Control table. This may be
useful to make the service available temporarily, with the expectation that the
restriction will be reinstated later.
To temporarily disable an access control, clear the check box next to the t
service name.