ePEN_Instruction6_04 6/16/04 1:54 PM Page 1 USA Patent 6,039,746 USA Patent 5,534,003 Distributed by: Atlantic Horizon International, Inc. New York, New York Model No. AH2058 www.ActiveForever.
ePEN_Instruction6_04 6/16/04 1:54 PM Page 2 INSTRUCTION www.ActiveForever.
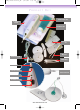
ePEN_Instruction6_04 6/16/04 1:54 PM Page 3 T H E E A S Y W AY TO R E M OV E UNWANTED HAIR CONTENTS ➤ Introduction 3 ➤ The Magic behind e-PEN 4 ➤ Hands Free Conductive Gel Pads 4 ➤ Hair Growth Cycles 4 ➤ Hair Removal Diagrams 5 ➤ Effective use of e-PEN 5 ➤ Product Key 6 ➤ Important Pre -Treatment Notes 7 ➤ How to use e-PEN 8 THE Verseo CONTAINS: ➤ 1 Control Unit (ePEN wand) ➤ 2 x AA (MN 1500) Alkaline Batteries ➤ Conductive Gel ➤ Cotton Buds/Q Tips ➤ Tweezers ➤ Applications 9-12 ➤ Yo
ePEN_Instruction6_04 6/16/04 1:55 PM Page 4 THE VERSEO E-PEN PERMANENT HAIR REMOVAL SYSTEM At last the painless solution for permanent hair removal, (needle free).* This unique product has many advanced features, which include skin-sensor, automatic timer/buzzer, and LED indicator lights. Front of hand-held unit has an adjustable head to ensure comfortable position when using cotton bud/Q tip treatment on face - ideal for treating unwanted facial hair including eyebrows and upper lip.
ePEN_Instruction6_04 6/16/04 1:55 PM Page 5 THE MAGIC BEHIND E- PEN Apply conductive gel provided to treatment area. Insert cotton bud/Q tip into gold cotton bud/Q tip holder. (If using double-ended cotton bud/Q tip, cut in half). Dip cotton bud/Q tip into gel and apply to treatment area. Small pulses of completely safe electrical energy pass through the gel on to the cotton bud/Q tip. When the cotton bud/Q tip is applied to the treatment area, this energy passes through to the hair follicle.
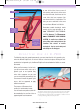
ePEN_Instruction6_04 6/16/04 1:55 PM Page 6 or wax all the hairs from an area of Hair Shaft skin one day, and see hairs in the same area the next week, that these are the same hairs that have regrown. You Outer Skin Surface now know that this is impossible. The hairs you see a week later in the same area are from different hair follicles. Remember needle electrolysis works Follicle The elongated casing that encloses root exactly on the same principle as e- SYSTEM.
ePEN_Instruction6_04 6/16/04 1:55 PM Page 7 PRODUCT KEY E-Pen Control Unit 3 - Fold Soft Pouch Conductive Gel Conductive Pad Set Tweezers E-Pen Pad Lead Cotton Buds Cotton Bud Removable Q-Tip Holder E-Pen Pad Lead Green LED Indicator Light Red LED Indicator Light Gold Activator Button 6 www.ActiveForever.
ePEN_Instruction6_04 6/16/04 1:55 PM Page 8 I M P O RTA N T PRE-TREATMENT NOTES FOR THE E-PEN PERMANENT HAIR REMOVAL SYSTEM For successful treatment, please carry out the following:• Facial Hair Remove all make up using your normal cleanser. The area to be treated must be thoroughly clean, dry and non-greasy. • Body Hair Thoroughly cleanse the treatment area as above. You should cut long hairs as short as possible with scissors or a razor before applying the conductive gel treatment pad.
ePEN_Instruction6_04 6/16/04 HOW 1:55 PM TO Page 9 USE YOUR E-PEN PERMANENT HAIR REMOVAL SYSTEM F AC E T R E AT M E N T • Thoroughly clean treatment area as described on Pre-treatment (Page 7). • Cut the cotton bud/Q tip in half and insert. The cotton bud/Q tip should sit against gold ring with stem fully inserted. • Dip cotton bud/Q tip into the conductive gel making sure that gel also covers the gold cotton bud/Q tip holder at the front of the control unit. Cotton bud should NOT now fall out.
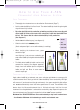
ePEN_Instruction6_04 6/16/04 1:55 PM Page 10 Diagram 1 Diagram 2 Upper lip and Face Eyebrows Breasts Note: The diagrams on this page show one way to hold Bikini Line e-PEN. You may find it easier to hold like a pen, still using finger on the button. T R E AT M E N T OF SINGLE HAIRS W I T H e-PEN C O T T O N BUD Thoroughly clean area as before, cut only long hairs in the treatment area as short as possible.
ePEN_Instruction6_04 6/16/04 1:55 PM Page 11 NB: If skin becomes pink during first treatment, this is quite normal and will disappear after 30 minutes. repeat the treatment the following day. Successful treatment is cumulative - the more you use the product, the better the results. DO NOT, however exceed the maximum recommended use. Facial Upper LIP ( FACE PAD Mode) ➤ Thoroughly clean treatment area as before. ➤ Slide switch mode to OFF position. ➤ Insert lead into jack socket at the end of e-PEN.
ePEN_Instruction6_04 B O DY AND 6/16/04 LEGS 1:55 PM Page 12 ( BODY PAD Mode) ➤ Slide mode switch to the OFF position. ➤ Thoroughly clean the treatment area. • PROBE ➤ Cut any long hairs short. • OFF • FACE PAD • BODY PAD ➤ Place the rectangular shaped pad onto treatment area. ➤ Push white lead clip onto rectangular pad button. ➤ Place circular conductivity pad near the rectangular pad. ➤ Push on the green lead clip. NB: Only the rectangular pad will give treatment.
ePEN_Instruction6_04 6/16/04 UNDER ARMS AND 1:55 PM Page 13 BIKINI LINE ( BODY PAD Mode) Repeat as for legs. The rectangular pad is to be located on the treatment area. Clip on the white cap. The circular pad is to be located close to the rectangular pad. Clip on the green cap. Remove hair with e-PEN or use your own tweezers. • PROBE Place the pads back onto • OFF the silicon plastic sheet • FACE PAD provided.
ePEN_Instruction6_04 6/16/04 1:55 PM Page 14 Is The Verseo e-PEN really painless? Yes. All you feel is a slight tingling sensation when you use it on your face. Apply more gel to reduce this. Metal teeth fillings sometimes react to the treatment and you may experience a slight metallic taste which only lasts for a short time. This is quite normal. Occasionally your skin will turn pink around the treatment area. This again is normal and will disappear in a short time.
ePEN_Instruction6_04 6/16/04 1:55 PM Page 15 GENERAL INFORMATION The conductive and adhesive pads should last for up to 8 treatments. To order more pads or gel, please fill in the order form opposite or telephone on 562-948-1114. The e-PEN ‘wand’ can be cleaned using a damp cloth or sponge. Do not immerse in water. Use 2 x AA (MN 1500) alkaline batteries only. If the red LED light won’t come on this generally means the batteries need replacing.