e wheels TM Assembly and Setup Instructions EW-500 www.ActiveForever.
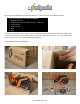
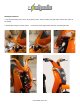
e wheels TM Please observe and follow these instructions closely as it will insure safe and reliable operation. Tools you will need to assemble the EW-500 1. Phillips Screwdriver 2. 12mm Socket Driver or Socket Wrench w/ Extension 3. 17mm Wrench 4. 15mm Wrench 5. Pliers 6. Knife 1. Remove the EW-500 from it’s carton. Start by opening the top to allow access to the inside of the carton. Use a knife to cut each corner from the inside out (Figure A).
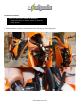
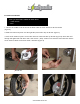
e wheels TM Handlebar Installation Tools you will need to attach the Handlebar - 12mm Socket Driver or Socket Wrench w/ Extension - 17mm Wrench 1. Slide Handlebar assembly onto Fork/Steer tube and align corresponding holes. www.ActiveForever.
e wheels TM Handlebar Installation 2. Connect the Handlebar assembly and Fork/Steer tube together with the bolt and radiused spacer provided (Figure B). The notch shown in Figure B needs to be vertically aligned. 3. Once bolt is in, turn the bars to the left or right as far as they will go. This will allow you to finger tighten the locknut on. Still in the turned position tighten bolt with your 12mm socket driver or socket wrench w/ extension and 17mm wrench. Notch (B) www.ActiveForever.
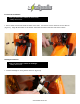
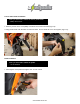
e wheels TM Front Fender Installation Tools you will need to attach the front fender - Phillips Screwdriver 1. Screws come screwed into fender bracket on the forks. You need to unscrew the three screws shown in (Figure C). Align all three holes on the fender with fender bracket on the forks and screw back in. (C) Headlight Installation Tools you will need to attach the headlight - Phillips Screwdriver 1. Connect Headlight to wiring harness shown in (Figure D). (D) www.ActiveForever.
e wheels TM Headlight Installation 2. Use provide fairing tab to cover wiring harness hole. Snap into place and pull until it matches the radius of the fairing. 3. Attach light using the provide screws. 1 in the front on the light bracket the other 2 on the light itself. www.ActiveForever.
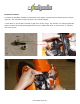
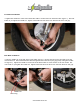
e wheels TM Front Wheel Installation Tools you will need to attach the front wheel - 17mm Wrench - Pliers 1. Unscrew the saddle nut at the end of the brake cable to loosen tension on the front brake. (Figure E). 2. Slide front axle and spacer onto the right side (None brake side) of the fork (Figure F). 3. Move front wheel into place. Insert brake drum into wheel and line up all holes (Figure G). Then slide axle through and tighten bolt with Pliers and 17mm wrench.
e wheels TM Front Wheel Installation 4. Tighten the saddle nut at the end of the brake cable to create tension on the front brake (Figure I). Test front brake as you tighten the saddle nut. Tighten until brake lever has about .75” between the lever and grip. (I) Rear Brake Installation 4. Unscrew saddle nut on the end of the brake cable (Figure J). Remove the barrel plug and slide it into the drum brake arm.
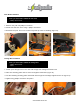
e wheels TM Rear Rack Installation Tools you will need to attach the rear rack - Phillips Screwdriver 1. Remove rear pad with phillips screwdriver 2. Attach rack with four screws using a phillips screwdriver 3. Re-install rear pad. Be sure to use the integrated clip when re-installing (Figure M). (M) Storage Box Installation Tools you will need to attach the storage box - Phillips Screwdriver - Pliers 1. Center open storage box on rear rack with storage lever facing toward the back. 2.
e wheels TM License Plate Holder Installation Tools you will need to attach the license plate holder - Phillips Screwdriver 1. Remove provide screws with phillips screwdriver from license bracket (Figure P). 2. Align plate holder with the holes on licence bracket and re-install all screws and tighten (Figure Q). (P) (Q) Pedal Installation Tools you will need to attach the pedals - 15 mm Wrench 1. Hand tighten each pedal and tighten with 15 mm wrench. www.ActiveForever.