
Instructions / Assembly
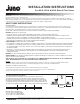
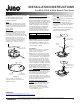
Table Of Contents

IMPORTANT: Trims must be grounded
as outlined below. Failure to do
so can result in electric shock or
undesired operation.
4RLA
The 4RLA trim is retained by push in friction
springs which flex into the side walls of the
housing. The sidewalls of the housing must be
grounded to provide electrical ground to the
trim (see Fig. 2).
5RLA & 6RLA
Securely attach the ground wire terminal to
any screw located in the recessed housing
that fastens metallic components. Screws
can commonly be found near the base of the
recessed housing, where the socket mounting
bracket was installed, or in the torsion
spring bracket. If screws are not present in
the recessed housing, contact a qualified
electrician for assistance in determining a
suitable ground. (see figures 3 and 4)
IMPORTANT: Power to the luminaire
must be turned off prior to installing
these LED trims. Failure to do so
can cause electric shock, which can
result in injury or death.
Installation
Step 1. Confirm the LED trim is compatible
with the recessed housing as outlined
previously in these instructions.
Step 2.
Some recessed housings contain an
adjustable plate or bracket that supports the
socket. The socket may need to be detached
from the plate/bracket, and the plate/bracket
may need to be removed from the housing
prior to installation of the trim. For detailed
instructions on removing the plate or bracket,
refer to manufacturer’s installation instructions.
If the housing has been modified, the luminaire
label provided loose with this retrofit kit must
be affixed to the luminaire in a location visible
after installation and during relamping.
Step 3. Installation into existing housings with
medium base sockets: Screw the medium
base socket adaptor into the socket in the
recessed housing. Securely attach the ground
wire terminal to any screw located in the
recessed housing that fastens metallic
components. Plug the connector provided on
the trim to the mating connector on the socket
adaptor by pushing firmly to ensure connectors
are securely fastened (see Fig. 4).
Installation into dedicated quick connect
housings: Securely attach the ground wire
terminal to any screw located in the recessed
housing that fastens metallic components.
Plug the connector provided on the trim
into the mating connector in the housing
by pushing firmly to ensure connectors are
securely fastened (see Fig. 5).
INSTALLATION INSTRUCTIONS
For 4RLA, 5RLA & 6RLA Retrofit Trim Series
Figure 5
Dedicated Quick
Connect Housing
Quick Connect
To use any of these products in an
ungrounded housing, consult factory for
additional instructions.
Step 4. 4RLA: Insert trim into housing using
push in friction springs. Carefully push trim
to
wards ceiling until fully installed with trim ring
flush to the ceiling.
5RLA & 6RLA: Insert trim torsion springs
into corresponding retaining brackets in
recessed housing. Carefully push trim towards
ceiling until the springs pull the trim flush to
the ceiling.
**
Make certain wires are not pinched
or damaged during installation
.
Step 5. Turn power on to fixture.
Figure 2
Friction
Springs
Housing
Side Wall
Incandescent
Housing
Medium Base
Socket Adapter
Quick Connect
Figure 4
Figure 3
Recessed
Housing
Typical Spring
Retaining Bracket
Ground Terminal
Ground
Terminal
2 of 2
1300 S. Wolf Road • Des Plaines, IL 60018 • Phone 800-323-5068 • Visit us at www.acuitybrands.com/juno-recessed
©2017 Acuity Brands Lighting, Inc Rev 1/19 P6102
WARRANTY
5-year limited warranty. Complete warranty terms located at
www.acuitybrands.com/CustomerResources/Terms_and_conditions.aspx
Technical Services Phone (888) 387-2212
Dedicated Quick Connect Housings
As standard, the primary connection means
provided on the Juno retrofit trims is a
connector that is designed to meet the high
efficiency requirements of California T24.The
connector is only intended to be plugged into
the mating connector in Juno housings
(Refer to chart below) or into the medium
base Socket adaptor (if provided with the
trim). Use of this trim in any other quick
connect housings other than Juno or
removing the factory installed connector is
prohibited and voids the product warranty.
Retrofit Trim Quick Connect Housings
4RLA IC1 LEDT24, IC1R LEDT24, IC1JB
5RLA IC20 LEDT24, IC20R LEDT24
6RLA IC23 LEDT24, IC23R LEDT24