AiP HD Series Speed Dome Camera INSTRUCTION MANUAL
Executive Summary AI’s H.264 video server or HD Speed Dome IP PTZ camera uses the latest compression technologies providing 4-Streaming of H.264 and JPEG in different resolutions. AI’s 4-Streaming technologies allow transmitting digital video at various bitrate and frame rate to fit both high and low bandwidth network environment. Built-in intelligent video analytics engine enables audio and motion detection for extra protection. These features can be easily interfaced by other applications.
Trademark Acknowledgments Microsoft, Windows 2000, Windows XP, Windows Vista, Windows 7, ActiveX, and Internet Explorer are registered trademarks of Microsoft Corporation in the U.S. and/or other countries. Java and all Java-based trademarks and logos are trademarks or registered trademarks of Sun Microsystems, Inc. in the United States and other countries.
Table of Content Chapter 1 System Overview ................................................................................................................................ 4 Chapter 2 Before Accessing IP Camera .............................................................................................................. 5 Chapter 2-1 Configure IP Address Using IPScan Utility .....................................................................................
Chapter 1 System Overview Chapter 1-1 System Requirements The IP Camera’s H.264 video compression technology can provide high compression rate and superior video quality. However, the performance highly depends on both CPU computational power of a client PC and the network bandwidth for transmitting video streaming. The following sections specify system requirement for running the H.
Chapter 2 Before Accessing IP Camera Before accessing to the IP camera, make sure that the camera’s RJ-45 network cable, audio cable, and IP camera’s power cable are properly installed. For setup IP address, please consult your network administrator for available IP addresses. The default IP address of IP camera is 192.168.0.200. User can also use default IP address to verify IP camera’s network connection.
Chapter 2-3 Internet Browser Setting & Software Component Required Make sure that your Internet Browser allows signed ActiveX plug-in running on your PC. Set “Download Signed ActiveX plug-in controls” to “Prompt” and “Run ActiveX control and plug-in” to “Enable” at Internet Explorer->Tools->Options->Security Settings. After finishing above security settings, accessing IP camera’s live video by default IP address of IP camera using Internet Explorer will prompt a Security Warning dialog box.
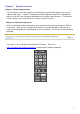
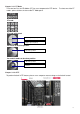
Chapter 3 Start Using the Camera After login H.264 HD video server or IP PTZ camera as administrator, there are two main features—system operation and configuration. Operation and configuration features are described as follows: Chapter 3-1 IP Camera Operational HTML Page Operational HTML page layout 3. 4. 1. 5. 2. 1. 2. 3. 4. 5. Camera Control panel—IP camera control panel. AI Universal ActiveX control—Display RTSP H.264 or JPEG network video.
Chapter 3-2-1 PT Mode There are four Pan and Tilt Modes (PT) for users to operate the PTZ device. modes, please click on the icon under PT Mode panel. To select one of the PT PT mode PT mode with speed Lower speed (inner) Higher speed (outer) Pan mode at absolute position Absolute position Pan and tilt modes at absolute position Absolute position Tilt lens Chapter 3-2-2 ePTZ To perform ActiveX ePTZ feature, please use a computer mouse to drag on the ActiveX control.
AI Universal ActiveX control becomes eZoom mode. Please use computer mouse pointing to the sub-window of PIP view. Dragging the sub-window can perform ePan and eTilt. Using mouse scroll button can perform zoom in and out features. Performing right-mouse click on the video can disable ePTZ feature. Chapter 3-2-3 Camera Control Panel Control panel buttons are described as below: Snapshot: Take a snapshot of the video. Recording at PC Speak on: Speak to remote site (for audio model only).
Chapter 3-3-1 Server Settings Server settings contain H.264 HD video server or IP PTZ camera server’s system information such as MAC address, firmware version, users, system timer, and other system settings. To change or to use these options, please follow the instructions at this section. MAC Address Network MAC address of the video server or camera Firmware Version & OS Version Firmware update allows a user to upgrade H.264 HD video server or IP PTZ camera’s firmware remotely.
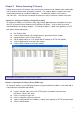
Chapter 3-3-2 User Settings There are ten user accounts allowed for the system. Each account can be configured for its access rights. To add/edit a user, please click on Add/Edit User button. To access H.264 HD video server or IP PTZ camera without authentication, set Bypass Logon radio button to ON. To change account name, please type the new account name in Account edit box. To change new password, please type the new password in the New Password edit box.
Synchronize with a PC A user can synchronize the PC system timer to the IP camera's system timer. Chapter 3-3-4 System Setting Load Default feature allows to load manufacturing default. There are certain critical settings such as IP addresses and video system which are not affected by this operation. To reboot H.264 HD video server or IP PTZ camera, click on Reboot System hyper link. To update firmware of H.
For Internet access configuration, please contact your local ISP for global IP address. Once the physical Internet connection gets installed, enter IP address (global), Subnet Mask, and Gateway IP from the ISP.
Chapter 3-4-4 SMTP Service Alarm or motion notification feature can send an alarm or motion detection snapshot to an E-mail account. To enable alarm or motion sending E-mail feature, please setup the following email accounts. E-mail receiver setting E-mail address— E-mail address of the recipient E-mail sender setting E-mail address— E-mail address of the sender Auto E-mail sent snapshots—constantly send JPEG snapshots within E-mail dwell time.
Send email to Yahoo or Gmail account. Please follow: E-mail Address: Please fill in the SMTP for Yahoo or Gmail account. SMTP Server: For Gmail, please fill in "smtp.gmail.com". For Yahoo E-mail, please fill in "smtp.mail.yahoo.com". SMTP Authentication: Please check "AUTH SSL". SMTP Port: For Gmail, please fill in "465". For Yahoo E-mail, please fill in "465". Authentication: Select "Enable". Auth Account and Password: Please fill in the E-mail address and password and select "Submit".
Chapter 3-5 Video Settings This section describes the details in setting the H.264 video’s attributes. control, video input, and video resolution can be configured. The settings of bit rate Chapter 3-5-1 Video General For transmitting H.264 video over low bandwidth network such as Internet, please set the bit rate close to network upload bandwidth. H.264 IP camera can encode video frames based on the bit rate setting.
Chapter 3-5-3 Video Quality Under the tab < Video Quality >, there are categories including: < Camera Advanced Ⅰ> and < Camera Advanced Ⅱ>. 3-5-3.1 Camera Advance Ⅰ Camera Advanced ⅠSetting Menu can be found under this path: Video Quality > Camera Advanced Ⅰ In the Camera Advanced Ⅰ Setups Menu, users can set various camera parameters including Day/Night (ICR), Mirror and Flip Function.
■ Exposure In the Exposure Mode Setting users can select Auto, Shutter, Iris and Fix four modes. Exposure-Auto Mode In this mode can adjust the parameter of the Brightness/Flickerless/AGC Limit/Shutter Limit. Exposure-Iris Mode In this mode can adjust the parameter of the Brightness/Shutter/Flickerless/AGC Limit. Exposure-Shutter mode In this mode can adjust the parameter of the Brightness/Lens Iris/AGC Limit/Shutter Limit.
AWC Mode Auto White Balance Control(One-Push White Balance). Manual Mode In this mode, users can change the White Balance value manually via specifying R gain and B gain; the range of R/B gain is from 0 to 127. Indoor Mode The indoor mode setting. Outdoor Mode The outdoor mode setting. ■ Sharpness Increasing the sharpness level can make the image looked sharper; especially enhancing the object’s edge. The Sharpness value is adjustable from 0 to 14.
1.3MP IP PTZ Interface Preset Go To have the camera move to a specified Preset position, please select the Preset Point from the drop-down Preset Point list. Then the camera shall readily move to the target position. Chapter 3-6-2 PTZ Advanced Settings 3-6-2.1 Lens Advance Lens Advance Setting Menu can be found under this path: PTZ> PTZ Advance> Lens Advance In the Lens Advance Setup Menu, users can set various Lens parameters including Focus, Focus Sensitivity, Digital Zoom, Zoom Speed and Focus Speed.
3-6-2.2 Pan-Tilt Setup Pan-Tilt Setting Menu can be found under this path: PTZ> PTZ Advance> Pan-Tilt Setup In the Pan-Tilt Setup Menu, users can set various Pan-Tilt parameters including Home Position, Self Return Time, Self Return Mode and Auto Mode. Each setting is specified as follows: Home Position Specify home position for one of the presets. Self Return Time User Define if IP Speed Dome idles for a period of time, the selected function will be activated automatically.
The IP Speed Dome Camera supports totally four Tour Path; each Tour Path consists of up to 32 Preset Points. Please refer to the instructions below to program a Tour table. NOTE: Before setting this function, users must pre-define at least two Preset Points. Tour Path Setting Tour Path Please select the number of Tour Path to be set from the drop-down list in the top of the Tour Setup menu.
Chapter 3-7 SD Card Recording To record video on SD Card, please insert SD card into the SD card slot. feature. The IP camera can start to record video into the SD card. Enable SD card recording Chapter 3-7-1. SD Card Recording Setting For SD card recording setting, please see the following for detail. SD Recording: Enable SD card recording. Alarm/Motion Triggering: Digital input and motion detection SD card recording. Recording Time: Post alarm recording time.
Chapter 3-8 Alarm Settings H.264 D1 video server or IP PTZ camera’s hardware alarm system contains motion detection, alarm sensors, and one alarm/relay output. Many alarm features such as motion/alarm email notification and FTP archiving can be found at this section. Chapter 3-8-1 Motion/Alarm Setup There are motion detection zones allowed in the H.264 D1 video server or IP PTZ camera.
Chapter 3-8-4 Audio Detection For audio model, the IP camera has audio detector detecting acoustic level. If the volume exceeds the audio sensitivity value, audio detector triggers an alarm for notification. Chapter 3-9. Audio Setting Audio setting is based on the following: MIC Volume: MIC or line input volume Audio Input Mode: Choose MIC input or Line input. Audio Input Gain: Voice input gain magnification Audio Output Volume: Line output volume adjustment Audio Coding Type: G.
Appendix Advance Network DDNS and PPPoE Technologies The advantage of using DDNS and PPPoE is to save the cost of IP address. H.264 AVC IP camera’s PPPoE service gets a dynamic global IP address after system reboot. This IP address may get changed periodically. This is the address needed to access the video server over Internet. When ISP re-assigns a new IP address to H.264 AVC IP camera, H.264 AVC IP camera notifies DDNS service. A remote PC can access H.
Execute Live Cams Pro application. Please click on “Add Camera” button on your phone while using Live Cams Pro. Task bar gets prompted as below: Please selection one of the following drivers for cameras: Profile 1: H.264 HD or D1 IP camera. Android Access: Please use your Android phone and select Android Market for downloading IP Cam Viewer/IP Cam Viewer Lite application developed by Robert Chou. Execute IP Cam Viewer/IP Cam Viewer Lite application.
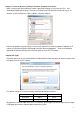
“Add/Edit IP Camera” dialog box gets prompted for editing an IP camera or a DVR. In “Add/Edit IP Camera” dialog box, please enter the following information: 1. Name: Name of the IP camera or DVR’s camera 2. Category: Please select AI. 3. Type: Select device type, 4. IP Address: Please type IP address, for example http://122.116.191.129:86 where 86 is the port number. 5. Provide username and password information. For IP camera, the default username and password are “admin” and “pass”.
Specification Network Function Video compression Resolution Frame rate Video streaming Video bitrate Security Users OSD Alarm Function CPU, memory Web PTZ control PTZ preset scheduling Maintenance Network Interface Client PC requirement Network protocols Mobile phone and PDA System integration AIM Video display OS Two-way Audio H.264, Motion JPEG SXGA(1280 x 1024), D1(720 x 480), CIF(352 x 240) H.
DISTRIBUTOR: AiP HD Series Speed Dome 30