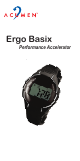
Ergo Basix Performance Accelerator
Table of Contents Warning ERGO BASIX Warning ........................................................... 1 Mission Statement........................................... 2 ERGO Basix Features............................ ........... 3 What's in Your Package ..................................... 3 Operating Your ERGO Basix............................. 5 Attaching Your Heart Rate Monitor ................. 5 Buttons and Functions..................................... 6 Modes of Operation .......................
CONGRATULATIONS! Welcome to the future of wireless heart rate technology! Your purchase shows that you are serious about your exercise and are committed to achieving your best. Today, getting the most from your exercise do not necessarily mean you have to spend longer periods of time to achieve your goals. With Target Heart Rate Training, you will increase the effectiveness of your workout by monitoring and quantifying your results every step of the way.
ERGO BASIX FEATURES Conductive Fabric Heart Rate Strap Backlight with SmartLite Shock Resistant Design Water Resistant to 30 Meters ECG Accurate Heart Rate EZ-Set Target Zone Pat. NO.US6345197B1 Automatic Programming with Audible & Visual Alarm Indicators 12/24 hr. Time Display with Daily Alarm In Zone Goal Count Down Timer (0-60minutes) Calorie Counter WHAT'S IN YOUR PACKAGE Your ERGO Basix package includes: A Ergo Basix Sleek, sporty styling with an easy to read display and comfortable button locations.
A B 4
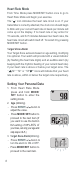
OPERATING YOUR ERGO BASIX I. Attaching Your Heart Rate Monitor 1.) Attach the transmitter belt to your chest Step 1: Moisten each of the two conductive fabrics of the Chest Belt. Step 2: Insert the two Pins at the back of the transmitter into the two mounting holes on the Conductive Fabric Chest Belt. Push the transmitter downwards and lock the transmitter in place. Press Press Step 3: Adjust the tension of the Elastic Strap and check that theconductive fabrics are firmly against your skin. 2.
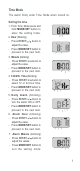
Buttons and Functions MODE / SETButton - Press momentarily to c h a n g e MODE /SET RESET/ / modes; toproceed to the next item in the setting mode. - Press and hold to enter or exit the setting mode. RESET/ / Button - Press momentarily to activate the night light for 3 seconds; Press momentarily to adjust the digits in the setting mode (press and hold to change it fast).
Time Mode The watch firstly enter Time Mode when turned on. Setting the time 1. From Time Mode press and hold MODE/SET button to enter the setting mode. 2. Hour (blinking) - Press RESET/ / buton to adjust the value. - Press MODE/SET button to proceed to the next item. 3. Minute (blinking) - Press RESET/ / buton to adjust the value. - Press MODE/SET button to proceed to the next item. 4. 12/24 Hr. Time (blinking) - Press RESET/ / buton to select 12 or 24 hour time.
Heart Rate Mode From Time Mode press MODE/SET button once to go to Heart Rate Mode and begin your exercise. The ‘‘ ’’ icon indicates the heart rate circuit is on. If your transmitter is correctly attached, the clock icon should begin to blink and your current heart rate in beats per minute will come up on the display. If no heart rate or key action for 15 seconds, and for 5 minutes between two heart rates, the heart rate circuit will switch itself off. To restart it by pressing MODE/SET button.
4. Upper Target Zone Limit (blinking) - Press RESET/ / buton to adjust the value. - Press MODE/SET button to proceed to the next item. 5. Lower Target Zone Limit (blinking) - Press RESET/ / buton to adjust the value. - Press MODE/SET button to proceed to the next item. 6. In-Zone Goal Count-down Timer (blinking) - Press RESET/ / buton to adjust the value. - Press MODE/SET button to proceed to the next item. 7. Exercise Factor (blinking) - Press RESET/ / buton to adjust the value.
Calorie Mode From Time Mode, press MODE/ SET button 3 times to enter Calorie Mode. The calorie counter automatically(and only) activates when the watch is receiving the heart rate signals. To clear the calories , simply press and hold RESET/ / button in the Calorie Mode. If not clear, the calories consumed in the next exercise will add up. Note: The rate of calorie consumption can vary drastically from one individual to another.
Table of Exercise Factor Settings Exercise Light Aerobics Basketball Bowling Cycling Dancing Football Golf Hiking Jumping Rope Running Skating (Ice/Inline) Skiing (Cross -Country) Skiing (Downhill/ Water) Swimming Stair Climbing Tennis Volleyball Walking Weight Training 6 7 2 3-5 3 6-7 4-5 3-5 8 8-10 5 6-7 5 4 4 4-5 3 3 3-4 Intensity Level Medium High 7,8 8,9 3 6-8 4-6 8 6 5-8 9,10 11-15 6,7 8-10 6,7 5-7 5,6 6-7 4,5 4-6 5-8 9 10-12 4 9,10 7,8 9,10 7 9-11 11,12 16,17 8,9 11,12 8 8-10 7,8 8,9 6 7 9,10 B
Chest Transmitter Battery Replacement Step 1: Remove the transmitter from the belt.(Fig.1) Step 2: Use a coin to unlock the battery door, and then replace the old battery inside with a new one. (Fig.2) Step 3: Lock the battery door firmly into place making sure the O-ring seal does not get pinched or distorted. Fig.2 Fig.1 Unlock Lock push push GENERAL PRECAUTIONS Do not operate buttons under water.
TECHNICAL SPECIFICATIONS Shock Resistance Shock Resistant Design Water Resistance 98 feet (or 30 meters) Not intended for diving Operating Temperature 32 F to 122 F (0 C to 50 C) Battery Type Heart Rate transmitter: Lithium CR2032 Watch: Lithium CR2032 Battery Life Chest transmitter: Approx. 2.5 years, average use of 1 hr./day, 7 days/ week. Watch: Approx. 1.5 years, average use of 1 hr./day,7 days/ week.
TECHNICAL DISPLAY GUIDE Display Items Time Default Setting Range 8 AM / 12 Hr. *AM & PM indicators shown only in the Setting 12/24 hr. clock Mode. Alarm Time 8 AM/ OFF ON/OFF Age 30 7 - 99 Heart Rate Display TZ Alarm 20 - 250 bpm OFF ON/OFF Upper Target Zone 162 beats per minute OFF, 20 - 250 Limit Lower Target Zone 124 beats per minute OFF, 20 - 250 Limit Note : Upper TZ Limit cannot be set less than Lower TZ Limit and Lower TZ Limit cannot be set more than Upper TZ Limit.
Warranty This product is warranted by Acumen Inc. for one year from the date of purchase (with the exception of batteries and elastic chest strap) against defects in workmanship and material. During this one-yeart period, these defects will be repaired or the product will be replaced by Acumen Inc. at its sole discretion without charge.
SERVICE & REPAIR Do not attempt to repair your product. Should the product malfunction, please visit our website at www.acumeninc.com for Consumer Customer Service. If the problem cannot be resolved, return the product to the factory for repair. Under no circumstances should you attempt to open the housing and repair the product. Should you do this, your warranty will be voided. In USA, securely package and return the product pre-paid to: Acumen Inc., 101A Executive Dr., Suite 100, Sterling, VA 20166 USA.