Use this Navigation Manual for vehicles with software update (Ver. ST03) The information and specifications included in this publication were in effect at the time of approval for printing. Honda Motor Co., Ltd., reserves the right, however, to discontinue or change specifications or design at any time without notice and without incurring any obligation. Accessories Precautions The GPS antenna is located in the dashboard.
Contents Quick Reference Guide 2 System Setup P. 21 Start-up 22 Voice Control System 24 Routing 54 Guidance 63 On Demand Multi-Use Display™ 87 Interface Settings 27 Map 70 P.2 Personal Information 39 Data Reset 86 System Setup P.21 Navigation P.89 2 Navigation P.
Quick Reference Guide Overview—Functions at a Glance Navigation You can select any place/landmark as a destination by using voice control or the Interface Dial. The navigation system gives you turn-by-turn driving directions to your destination. Store home address (P47) Register 1 home address. Store contacts (P40) Store up to 200 contacts in 2 address books. Enter destination (P90) Select your destination using 12 methods. Select route (P115) Set route preferences and select one of 3 routes.
Audio FM/AM Radio (P155) SiriusXM® Radio (P161) iPod® (P185) Internet Radio (P197) Compact Disc (P166) USB Flash Drive (P202) Hard Disk Drive (HDD) (P173) Bluetooth® Audio (P208) Quick Reference Guide The advanced audio system provides clear, well-defined sound and makes the most of your music. Enjoy listening to a variety of audio sources, such as: AcuraLink® (P258) AcuraLink® provides you with important information and messages between your vehicle and Acura.
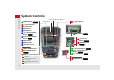
Quick Reference Guide System Controls On Demand Multi-Use DisplayTM 1 PHONE Button (P214) le E (Eject) Button Navigation Screen 2 9 (Power) Button 3 Volume Knob 4 NAV Button 5 BACK Button 6 a (Display Mode) Button (P75) lf Microphone (P24) 7 Interface Dial/ENTER Button (P7) lg Left Selector Wheel (P150) lh SOURCE Button 8 INFO Button 9 MENU Button (P150) 0 SETTINGS Button Models with RES NAV FRONT F A UDIO AUDIO lb FRONT AUDIO Button lc REAR AUDIO Button (P282) ld REAR 9 (Power) Button Navigat
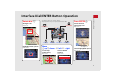
Audio Source Select to change an audio source. You can change the position of icons. Shortcuts Places (P45) Phone (P224) Audio (P148) Quick Reference Guide On Demand Multi-Use Display™ Basic Operation * For detail informations about Climate, see your owner's manual. Select Tune. Select Presets. AM, FM, SiriusXM®, Pandora® , AhaTM bn : Select the preset station (AM/FM/Pandora®/AhaTM) or category (SiriusXM®). Select and hold to search that station on preset screen.
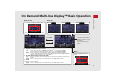
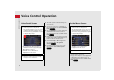
Quick Reference Guide Voice Control Operation Voice Portal Screen a Press and release the d (Talk) button on the top screen of any mode. The system prompts you to say a voice command and gives examples. Press and release the d (Talk) button again to bypass this prompt. The audio system is muted during voice control mode. You can use other voice commands on the Voice Portal screen. Voice Command Index (P330) Say d “Voice Help” to enter supported commands for the current screen.
Rotate dial i You will see these icons in each chapter. They represent how you can operate the Interface Dial.
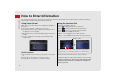
Quick Reference Guide How to Enter Information You can enter information (e.g., city names, street names, personal names, and business names comprising letters, numbers, and symbols) when prompted on input screens by two different methods. Using Voice Control Using the Interface Dial When you see d in this manual, voice commands are available for that feature. Rotate i to highlight a character. Say the letter, number, or symbol (e.g., say d “A”). Use spelling assist (e.g.
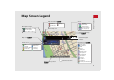
Map orientation (P77) North up Streets Freeways State routes Verified streets Unverified streets One-way streets 3D map Heading up GPS signal strength Best reception Current map scale Quick Reference Guide Map Screen Legend Good reception No icon: Poor/No reception AcuraLink® Message icon (P14) Map scale (P81) AcuraLink® signal indicator Landmark icons (P72) Feature areas Acura dealer Honda dealer Park Airport/Business Hospital Water Area Shopping Mall Golf Course Cemetery ATM University
Quick Reference Guide During Route Guidance During route guidance, route information is displayed on the map screen and guidance screen. Press the NAV button to toggle between the map and guidance screen. Map Screen Day or Night Mode Tracking dots (P119) Calculated route (P116) Guide to destination or waypoint Next guidance indicator Distance to the next guidance point.
The “Home” feature automatically routes you to your home address from any location simply by selecting Go Home, or saying d “Go Home.” Storing Your Home Address a Press the SETTINGS button. e Enter a name. Going Home a From the map screen, press the MENU button. SETTINGS b Rotate i to select Navi Settings. Press u. MENU Quick Reference Guide Navigation—Home Addresses and Going Home b Rotate i to select Go Home. Press u. f Rotate i to select Address. Press u. g Enter an address.
Quick Reference Guide Navigation—Entering a Destination Enter your destination using one of several methods, then follow route guidance on the map or guidance screen to your destination. You can also perform these steps using d voice commands. a From the map screen, press the MENU button. MENU e Rotate i to select your destination street from the list. Press u. h Rotate i to select Set as Destination. Press u. Route guidance to the destination begins. b Rotate i to select Address. Press u.
You can alter your route by adding waypoints to visit, adding streets to avoid, or changing your destination during route guidance. Adding a Waypoint (“Pit Stop”) You can add up to four waypoints along your route. (P131) a From the map screen, press the MENU button. b Rotate i to select Destination List. Press u. c Rotate i to select Add New Destination. Press u. d Rotate i to select Find Along Route. Press u. e Rotate i to select location and search method. Press u.
Quick Reference Guide AcuraLink® AcuraLink® Messages AcuraLink® provides a direct communication link between you and Acura. It sends and receives several kinds of messages through the Acura server.
(P267) The rear passengers can enjoy a wide array of audio/visual sources with the Rear Entertainment System (RES). The rear passengers can use wireless headphones and operate the system with the rear control panel. Overhead Screen and Rear Control Panel RES Pull down the bottom edge of the screen. Basic Operation Select the audio source. Press the buttons to select items. Press the Release button to remove the rear control panel.
Quick Reference Guide Voice Help This navigation system comes with voice help, which shows you what command to say when using the voice command functions. Command Help a Press and release the d (Talk) button. b Say d “Voice Help.” e Press and release the d (Talk) button. f Say one of the options for a list of available commands by category (e.g., d “Route commands”). a Move r and rotate i to select Getting Started on the voice help screen. Press u. For “Voice Settings” and “All Commands.
Why does the vehicle position icon on the map “lag” a short distance behind my actual position, especially at intersections? This is normal. The navigation system is unaware of the width of intersections. Large differences in vehicle position can indicate a temporary loss of the GPS signal.
How to Use This Manual This section explains different methods on how you can easily find information in this manual. Searching the Table of Contents (P1) Two types of Tables of Contents help you find your desired information. Table of Contents Chapter Contents First, find the general chapter related to what you are looking for (e.g., entering a destination from the Address Book). Then, go to that chapter to view a more specific table of contents.
After following the menu tree, step-by-step instructions explain how to achieve the desired result. Menu Tree The menu tree helps guide you through the system’s menu options. To get to your desired function, follow the menu tree in order of the steps shown. NOTE: All menu options can also be activated with voice commands. Press the hard button on the system control panel. Select the menu option with the Interface Dial. Press the MENU button. Rotate i to select Address Book. Press u.
20
System Setup This section describes the start-up procedure and the navigation and setup functions. Start-up .............................................................. 22 Voice Control System ........................................ 24 Command Input .............................................. 24 Voice Recognition ............................................ 25 Interface Settings .............................................. 27 Personal Information ........................................
Start-up System Setup The navigation system starts automatically when you set the power mode to ACCESSORY or ON. At start-up, the following Confirmation screen is displayed. 1. Press u to select OK. If you do not select OK, the map screen is displayed after a certain period of time. Your current position is displayed on the map screen. 2. Press the NAV button if a different mode is selected. Your current position is displayed on the map screen.
Start-up ■ Limitations for Manual Operation Certain manual functions are disabled or inoperable while the vehicle is in motion. You cannot select a grayedout option using the Interface Dial until the vehicle is stopped. System Setup Disabled option Voice commands are still operable while the vehicle is in motion.
Voice Control System System Setup Your vehicle has a voice control system that allows hands-free operation of most of the navigation system functions. The voice control system uses the d (Talk) and J (Hang-Up/Back) buttons on the steering wheel and a microphone near the map lights on the ceiling. A “Getting Started” feature provides a tutorial that explains how to use the voice control system. 2 Getting Started Tutorial P.
Voice Control SystemVoice Recognition Voice Recognition • Make sure the correct screen is displayed for the voice command that you are using. 2 Voice Commands P. 330 • Close the windows and moonroof. 1 Voice Recognition The voice control system can only be used from the driver’s seat because the microphone unit removes noises from the front passenger’s side.
Voice Control SystemVoice Recognition Settings Voice Recognition Settings H SETTINGS button System Settings Voice Reco System Setup Rotate i to select an item. Press u. The following items are available: • Guidance Volume: Adjusts the voice prompt volume level. 2 Sound and Beep Settings P. 28 • Voice Prompt: Turns the voice prompt on or off. On (factory default): Provides the voice prompts. Off: Disable the feature. • Song by Voice: Turns the Song By VoiceTM on or off. 2 Song By VoiceTM (SBV) P.
Interface Settings Display Settings H SETTINGS button System Settings Display 1. Rotate i to select an item. Press u. 2. Rotate i to make the adjustment. Press u. You can set separate daytime and nighttime settings for Brightness, Contrast, and Black Level. Adjust each setting when the display is in either daytime or nighttime mode. System Setup Adjusts the screen’s preferences.
Interface SettingsSound and Beep Settings Sound and Beep Settings H SETTINGS button System Settings Sound/Beep System Setup Changes the system sound and beep settings. Rotate i to select an item. Press u. 1 Sound and Beep Settings Guidance Volume If you set Guidance Volume to 0, you will not hear route guidance or voice command confirmations. You can also adjust Guidance Volume by rotating the volume knob while the route guidance or voice command confirmations is announced.
Interface SettingsClock Adjustment Clock Adjustment H SETTINGS button System Settings Clock Rotate i to select an item. Press u. Auto Time Zone If you live and work in two different time zones, you may want to turn Auto Time Zone to OFF. When driving near a time zone boundary, the displayed time zone may fluctuate between the two zone times. System Setup Set the automatic adjustment of the system clock for daylight saving and international time zones.
Interface SettingsClock Adjustment ■ Setting the Clock Type System Setup H SETTINGS button System Settings Clock Clock/Wallpaper Type Clock 1. Rotate i to select an option to change the design. Press u. 2. Move r to select OK. Press u. ■ Setting the Clock H SETTINGS button System Settings Clock Clock Adjustment 1. Rotate i to select an item. Press u. 2. Rotate i to select a minute. Press u.
Interface SettingsWallpaper Settings Wallpaper Settings Select, delete, and import wallpaper pictures for display on the screen. 1 Wallpaper Settings H SETTINGS button System Settings Clock Clock/Wallpaper Type 1. Connect the USB flash drive to the USB port. 2. Move y to select Wallpaper. must be in the USB flash drive’s root directory. Images in a folder cannot be imported. • The file name must be fewer than 255 characters.
Interface SettingsWallpaper Settings ■ Select wallpaper 1 Select wallpaper System Setup H SETTINGS button System Settings Clock Clock/Wallpaper Type Wallpaper 1. Rotate i to select a desired wallpaper. Press u. The preview is displayed on the left side on the screen. The pop-up menu appears on the screen. 2. Rotate i to select Set. Press u. The display will return to the wallpaper list. 32 From the pop-up menu, rotate to select Preview and press to see a preview at full-size screen.
Interface SettingsWallpaper Settings ■ Delete wallpaper 1. Rotate i to select a wallpaper that you want to delete. Press u. System Setup H SETTINGS button System Settings Clock Clock/Wallpaper Type Wallpaper The preview is displayed on the left side on the screen. The pop-up menu appears on the screen. 2. Rotate i to select Delete. Press u. The confirmation message will appear. 3. Rotate i to select Yes. Press u. The display will return to the wallpaper list.
Interface SettingsUnit Settings Unit Settings H SETTINGS button System Settings Others Units System Setup 34 Sets the map units to either miles (factory default) or kilometers (km). Rotate i to select the map unit. Press u.
Interface SettingsLanguage Settings Language Settings H SETTINGS button System Settings Others Language English, Français (French), Español (Spanish). Rotate i to select the system language. Press u. 1 Language Settings Voice confirmation of cities and streets only occurs when English is the system language. When Français or Español is selected, some messages continue to be displayed in English. System Setup Set the system language used on all screens.
Interface SettingsVoice Command Tips Voice Command Tips H SETTINGS button System Settings Others Voice Command Tips System Setup Alerts you when manual control of the system is disabled to prevent distraction while driving. Only voice commands are available. Rotate i to select the map unit. Press u. The following items are available: • On (factory default): Displays a message. • Off: Disables the message.
Interface SettingsBackground Color Background Color H SETTINGS button System Settings Others Background Color Rotate i to select a desired color. Press u. System Setup Changes the background color of the navigation screen and the On Demand MultiUse DisplayTM.
Interface SettingsHeader Clock Display Header Clock Display H SETTINGS button System Settings Others Header Clock Display System Setup Selects whether the clock display comes on. Rotate i to select an option. Press u. The following options are available: • On (factory default): The system displays the clock in the navigation screen. • Off: Disables the feature.
Personal Information H SETTINGS button Navi Settings Personal Info Rotate i to select an item. Press u. 1 Personal Information Personal information cannot be backed up or moved to another navigation system. System Setup Use the personal information menu to select and set your address books, home address, and PINs. You can also delete unwanted destinations from the list of previously routed destinations.
Personal InformationAddress Book Address Book H SETTINGS button Navi Settings Personal Info Address Book 1 Address Book System Setup Store up to 200 address entries in two address books (Driver 1 and Driver 2). You can add, edit, and delete information in the address books. Move w or y to display only the addresses in the selected category. Move r to change the user address book (DRIVER 1 or DRIVER 2). Up to 200 addresses can be stored to each address book of Driver 1 and Driver 2 separately.
Personal InformationAddress Book System Setup 2. Rotate i to select an item. Press u. The following items are available: • Name: Edits the name of the entry. • Address: Edits the address of the entry. • Phone No.: Edits the phone number of the entry. • Category: Specifies the category of the entry. • Alert: Alerts you when you approach the address entry. On: Beeps and displays a message when your vehicle gets near the entry. Off (factory default): Disables the feature. 3. Rotate i to select Name.
Personal InformationAddress Book The following items are available: 1 Adding an Address Book Entry System Setup • Current Position: Select your current location. • Address: Enter an address on the character input screen when prompted. 2 Address P. 92 • Previous Destinations: Select a previous destination. 2 Previous Destination P. 99 When you use Place Name or Place Category, the phone number is automatically entered. You can also add a phone number and category.
Personal InformationAddress Book ■ Selecting an Address Book Category 1. Rotate i to select an address. Press u. 2. Rotate i to select Category. Press u. Up to 100 categories (including “Unfiled”) can be stored to each address book of Driver 1 and Driver 2 separately. If you delete a category that is used by other addresses, the category type for those addresses changes to “Unfiled.
Personal InformationAddress Book ■ Deleting an Address Book Entry 1 Deleting an Address Book Entry System Setup H SETTINGS button Navi Settings Personal Info Address Book 1. Rotate i to select the address to delete. Press u. 2. Move r and rotate i to select Delete. Press u. 3. Rotate i to select Yes. Press u to delete the address. 44 When you transfer the vehicle to a third party, delete all address book entries.
Personal InformationAddress Book ■ Setting Place Shortcuts ■ Storing an address on the Shortcut System Setup You can store up to six addresses previously stored in your Address Book, and a home address for your preset destinations. 1. Select Shortcuts. 2. Select Places. 3. Select Edit or No Entry. If you select No Entry, go to step 6. 4. Select Add. All six preset icons appear. 5. Select the preset number to which you want to store an address.
Personal InformationAddress Book System Setup 6. Select an address you want to store as a preset. ■ Deleting a preset address 1. Select Shortcuts. 2. Select Places. 3. Select Edit. 4. Select Delete. 5. Select the preset number with the destination you want to delete.
Personal InformationHome Address Home Address H SETTINGS button Navi Settings Personal Info Edit Go Home 1. Edit the name, address, and phone number the same way as an address in the address book. 2 Adding an Address Book Entry P. 40 2. Move r and rotate i to select OK. Press u. If you have PIN-protected your home addresses, enter your PIN when prompted. Press u to select OK. PINs are optional. 2 PIN Numbers P.
Personal InformationPIN Numbers PIN Numbers H SETTINGS button Navi Settings Personal Info PIN Number System Setup Set a four-digit PIN for protecting personal addresses and your home address. Once you set a PIN, you are prompted to enter it whenever you access a personal address or a home address. 1. Rotate i to select the PIN to create. Press u. 1 PIN Numbers PIN Personal Identification Number (PIN) is a password used to access personal data. PINs are optional.
Personal InformationPrevious Destination Previous Destination H SETTINGS button Navi Settings Personal Info Previous Destination 1. Rotate i to select the destination to delete. Press u. 1 Previous Destinations Up to 50 destinations can be stored. To cancel the selection of a previous destination, rotate i to highlight the destination again. Press u to de-select it.
Personal InformationCategory History Category History H SETTINGS button Navi Settings Personal Info Category History System Setup The navigation system maintains a list of your recently used place categories as a shortcut for selecting the same categories in the future. You can delete some or all of your recently used categories from the list. 1. Rotate i to select the category to delete. Press u. Repeat the procedure as necessary. Items to be deleted are indicated with a trash icon. 2.
Personal InformationDownload POI Download POI ■ Importing POI Categories System Setup Import custom Points of Interest (POI) into the navigation system and set the POI as a destination. You can also add, edit, and delete POIs. 1 Importing POI Data H MENU button (on map) More Search Methods Download POI 1. Connect a USB flash drive with stored POI data to the USB connector. 2. Move r and rotate i to select Import from USB. Press u. For more information about connecting a USB flash drive.
Personal InformationDownload POI System Setup 3. Rotate i to select a category to import. Press u. 1 Editing POI Categories ■ Editing POI Categories H SETTINGS button Navi Settings Personal Info Download POI 1. Rotate i to select the downloaded POI category to edit. Press u. 52 Continued If you select From AcuraLink, you can edit Alert only.
Personal InformationDownload POI System Setup 2. Rotate i to select an item. Press u. The following items are available: • Alert Setting: Alerts you when you approach the places/landmarks in the category. On: Beeps and displays a message when your vehicle gets near the places/ landmarks in the category. Off (factory default): Disables the feature. • Delete Category: Deletes all places/landmarks and icon in the selected category. • Edit Icon: Changes the category icon.
Routing H SETTINGS button Navi Settings Routing System Setup Choose various settings that determine the navigation system functionality during route calculation. Rotate i to select an item. Press u. The following items are available: • Route Preference: Changes the route preferences (calculating method). 2 Route Preference P. 55 • Unverified Routing: Sets whether you use the route guidance in unverified areas. 2 Unverified Routing P.
RoutingRoute Preference Route Preference H SETTINGS button Navi Settings Routing Route Preference 1. Rotate i to select an item. Press u. 2. Rotate i to select Min or Max. Press u. Repeat step 1 and 2 as necessary. 3. Move r to select OK. Press u. The calculated route may be the shortest route or the route you would choose.
RoutingRoute Preference ■ Optimal Routes 1 Optimal Routes System Setup H SETTINGS button Navi Settings Routing Route Preference You can select desired routes by sorting the route list. The three top routes can be displayed on the Select a route screen. 2 Viewing the Routes P. 115 1. Move r and rotate i to select Optimal Routes. Press u. 2. Rotate i to select a list item to move. Press u. 3. Rotate i to select a desired location. Press u. 4. Move r and rotate i to select OK. Press u.
RoutingUnverified Routing Unverified Routing H SETTINGS button Navi Settings Routing Unverified Routing Rotate i to select On or Off. Press u. 1 Unverified Routing Unverified roads are found in rural areas, and typically include residential streets away from the center of a town. They may not be accurate, and can contain errors in location, naming, and address range. System Setup Receive turn-by-turn map and voice guidance in unverified areas.
RoutingUnverified Routing Differences System Setup 58 Off On (factory default) Cautionary messages Cautionary pop-up screens and voice announcements remind you to obey all traffic restrictions when starting route guidance, approaching an unverified area, and entering an unverified street. Cautionary pop-up screens and voice announcements remind you to obey all traffic restrictions when entering an unverified street. Guidance (map/voice) There is no turn-by-turn map or voice guidance.
RoutingTraffic Rerouting Traffic Rerouting H SETTINGS button Navi Settings Routing Traffic Rerouting Rotate i to select an option. Press u. 1 Traffic Rerouting Traffic Rerouting requires an AcuraLink RealTime Traffic™ subscription. 2 AcuraLink® P. 258 Automatic traffic rerouting may not provide a detour route depending on circumstances. System Setup A faster route can be calculated based on continuously updated traffic information. 2 Traffic Rerouting™ P.
RoutingEdit POI Search Radius Along Route Edit POI Search Radius Along Route System Setup H SETTINGS button Navi Settings Routing Edit POI Search Radius Along Route Select the distance from your highlighted route line (on either side of your route) that the system will search for a waypoint. 2 Adding Waypoints P. 131 You can specify a different search distance for freeways and surface streets. 1. Rotate i to select an item. Press u. 2. Rotate i to select a search distance. Press u.
RoutingAvoided Area Avoided Area H SETTINGS button Navi Settings Routing Avoided Area 1. Move r and rotate i to select New Area, or rotate i to select an existing area to edit. The maximum size of an “avoid area” is approximately 1/2 mile. If your selected area contains a freeway, you are asked “Do you want to avoid freeways?” Answering “No” allows you to use a route through an avoid area on a freeway without any pop-up messages. System Setup Specify up to five areas to avoid (e.g.
RoutingAvoided Area System Setup 5. Rotate i to select a method for specifying the area. Press u. The following options are available: • Address: Specify the general area by entering an address. 2 Address P. 92 • Map Input: Specify the general area by map input. 2 Map Input P. 111 6. If you select Map Input, scroll the map to position the cursor over your desired start point, adjusting the map scale as necessary. Press u to mark the start point.
Guidance H SETTINGS button Navi Settings Guidance Rotate i to select an item. Press u. System Setup Choose various settings that determine the navigation system functionality during route guidance. The following items are available: • Guidance Mode: Sets whether to display only the map screen or a split mapguidance screen. 2 Guidance Mode P. 64 • Street Name Guidance: Sets whether to read out the street names during voice guidance. 2 Street Name Guidance P.
GuidanceGuidance Mode Guidance Mode H SETTINGS button Navi Settings Guidance Guidance mode 1 Guidance Mode System Setup Select the display mode for the map and guidance screens. Rotate i to select an option. Press u. The guidance mode can also be selected from the map menu. 2 Map Menu P. 122 Press the NAV button to switch between the map, next guidance direction, and a list of guidance directions. Turn-by-Turn Directions The next guidance point appears on the multiinformation display.
GuidanceGuidance Mode Direction List screen Next Maneuver screen Near the next guidance point System Setup • Direction List: Displays the map and direction list simultaneously on the map screen. When you approach a guidance point, the next guidance point appears. Next guidance point Guidance direction list • Next Maneuver: Displays the map and next guidance point simultaneously on the map screen.
GuidanceStreet Name Guidance Street Name Guidance H SETTINGS button Navi Settings Guidance Street Name Guidance System Setup The navigation system includes the street names during voice guidance (e.g., “Turn right on Main Street”). Rotate i to select an option. Press u. The following options are available: • On (factory default): Voice guidance includes the street names. • Off: Disables the feature.
GuidanceNon-map screens Non-map screens H SETTINGS button Navi Settings Guidance Non-map screens Rotate i to select an option. Press u. System Setup The navigation system temporarily interrupts the screen display to view the guidance screen as you approach a guidance point. The following options are available: • On: The guidance screen interrupts other mode screens (e.g., audio, phone, etc, except the rear view camera mode). • Off (factory default): Disables the feature.
GuidanceGuidance Point Guidance Point H SETTINGS button Navi Settings Guidance Guidance Point System Setup Set the guidance point to display on the map screen. Rotate i to select an option. Press u. The following options are available: • Destination (factory default): Displays the remaining/arrival time and distance to the destination. • Next Point: Displays the remaining/arrival time and distance to the next waypoint.
GuidanceEstimated Time Estimated Time H SETTINGS button Navi Settings Guidance Estimated Time Rotate i to select an option. Press u. System Setup Select the estimated time to display on the screen. The following options are available: • Arrival: Displays the arrival time to the destination or the next waypoint. • Remaining (factory default): Displays the remaining time to the destination or the next waypoint.
Map H SETTINGS button Navi Settings Map System Setup Select the landmark icons to display on the map, change the orientation of the map, display your current location, and learn the meaning of the icons, colors, and symbols displayed on the map. Rotate i to select an item. Press u. The following items are available: • Show Icon on Map: Selects the icons to display on the map. 2 Showing Icons on Map P. 72 • Color (Day): Selects the color of the map for the Day mode. 2 Color P.
MapEstimated Time • Map Legend: Displays an overview of the map features. 2 Map Legend P. 80 • Display Tracking: Sets whether to display the tracking dots on the map. 2 Display Tracking P. 84 System Setup • Current Location: Displays and saves your current location. 2 Current Location P. 79 • Delete Tracking: Deletes the tracking dots on the map. 2 Deleting Tracking Dots P. 84 • Correct Vehicle Position: Adjusts the position of the vehicle on the map. 2 Correct Vehicle Position P.
MapShowing Icons on Map Showing Icons on Map H SETTINGS button Navi Settings Map Show Icon on Map System Setup Select the icons that are displayed on the map. 1. Rotate i to select an item. Press u. You can display or hide the icons using voice commands on the Voice Portal screen (e.g., say d “Display hospital”). 2 Map Display Commands P. 330 If you have PIN-protected your address book, enter your PIN when prompted. Move r to select OK. PINs are optional. 2 PIN Numbers P. 48 2.
MapShowing Icons on Map ■ Fine-tuning the Icons 1. Rotate i to select the icons to display on the map. Press u. Pressing u toggles the icon display on or off. System Setup Icons in some categories can be fine-tuned to display or hide. Repeat the procedure as necessary. 2. Move r and rotate i to select OK. Press u.
MapColor Color Set separate map colors for Day and Night modes. System Setup ■ Color (Day) 1 Color (Day) H SETTINGS button Navi Settings Map Color (Day) Rotate i to select a color for the Day mode. Press u. ■ Color (Night) 1 Color (Night) H SETTINGS button Navi Settings Map Color (Night) Rotate i to select a color for the Night mode. Press u. 74 The factory default is set to Beige. The factory default is set to Blue.
MapColor ■ Switching Display Mode Manually 1 Switching Display Mode Manually 1. Press the a button. The Brightness bar is displayed for a few seconds. A visual guide helps you see the difference between Day and Night modes. 2 Day or Night Mode P. 10 System Setup Set the screen brightness separately for Day and Night modes. Press the a (Display mode) button to cycle through the display modes (Day to Night to Off). Rotate i to adjust the brightness. Press u. 2. Press the a button again.
MapColor System Setup Illumination control Priority Operation a button 1 Selects Day, Night, or Off display mode. This button has the highest priority and overrides all other display control adjustments listed below. Remember: Once you press this button, you assume full manual control of the display mode until the power mode is set to VEHICLE OFF (LOCK).
MapView (Map Orientation) View (Map Orientation) H SETTINGS button Navi Settings Map View Rotate i to select an option. Press u. 1 View (Map Orientation) d “Display Heading-up” (on Voice Portal screen), d “Display North-up” (on Voice Portal screen), d “Display 3D map” (on Voice Portal screen) System Setup Select the map orientation. The red arrow in the symbol always points North. Heading-up and 3D map view switch to the North-up view on the maximum map scale.
Map3D Angle Adjustment 3D Angle Adjustment H SETTINGS button Navi Settings Map 3D Angle Adjustment System Setup Adjust the viewing angle. Rotate i to adjust the angle. Press u. Straight Line Guide H SETTINGS button Navi Settings Map Straight Line Guide Set whether to display a straight guideline to the destination or waypoint Rotate i to select an option. Press u. The following options are available: • On (factory default): Displays the straight guideline on the map.
MapCurrent Location Current Location H SETTINGS button Navi Settings Map Current Location 1 Current Location d “Display Current Location” (on Voice Portal screen) ■ To save your current location in the address book: You can also save the current location by saying d “Register the Current Location”. 1. Press u to select Address Book. Move w to scroll the map as necessary. System Setup Display and save your current location for future use as a destination.
MapMap Legend Map Legend H SETTINGS button Navi Settings Map Map Legend System Setup 80 See an overview of the map lines, areas, routes, traffic information, and navigation icons. Move w or y select an item. The system displays the map legend. 1 Map Legend A visual guide helps you see the map legend. 2 Map Screen Legend P. 9 2 AcuraLink Real-Time Traffic™ P.
MapMap Legend ■ Map Scale and Functions 1 Map Scale and Functions Map Scale (top: mile, bottom: metric) Function page 1/20 1/8 80 1/4 1/2 1 200 400 800 1.6 2 5 15 50 150 350 1000 3.2 8 24 80 240 560 1600 ✔ ✔ ✔ ✔ ✔ ✔ System Setup You can change the map scale using voice commands on the Voice Portal screen (e.g., say d “Display 2 mile scale”). 2 Map Scale Commands P. 330 The functions that are available from the map screen depend on the map scale.
MapMap Legend ■ Map Icons and Functions System Setup Display or hide all icons on the map screen, with the exception of Honda/Acura Dealer icons which are always shown.
MapMap Legend ■ Traffic icon 1 Traffic Incident Traffic incident Icon display control Icon selectable Icon searchable Yes No Yes When you use the Interface Dial to position the cursor (round red circle) over the traffic incident icon, you can view the summary of the incident. Press u on the traffic incident icon to view a pop-up message describing the incident in detail.
MapDisplay Tracking Display Tracking H SETTINGS button Navi Settings Map Display Tracking System Setup The navigation system can be set to display white tracking dots (“breadcrumbs”) on the map screen. Rotate i to select an option. Press u. The following options are available: • On: The system displays the white tracking dots. 2 Tracking Dots P. 119 • Off (factory default): Disables the feature.
MapCorrect Vehicle Position Correct Vehicle Position H SETTINGS button Navi Settings Map Correct Vehicle Position 1. Put the vehicle in Park. 2. Rotate i to select Correct Vehicle Position. Press u. 3. Scroll the map to position the cursor over at your correct position. Press u. 4. Rotate i to position the arrowhead in the correct direction the vehicle is facing.
Data Reset Defaulting All the Settings H SETTINGS button System Settings Factory Data Reset System Setup Reset all the menu and customized settings as the factory defaults. 1. Rotate i to select Yes. Press u. The confirmation message will appear. 2. Rotate i to select Yes. Press again to reset the settings. The confirmation message will appear. Press to select OK.
On Demand Multi-Use Display™ Changing the Screen Settings Adjusts the screen settings of the On Demand Multi-Use Display™. 2. Select Screen Settings. 3. Use N, B or other icons to adjust the setting. Use the / / turn the page. / System Setup 1. Select More. icons to Select to go back to the previous screen. The followings are adjustable screen settings: • Sync Display Brightness: Selects whether the screen brightness synchronizes with the instruments panel brightness.
88
Navigation This section describes how to enter a destination, select a route to take, and follow the route to your destination. It also describes how to change your route or destination along the way. Entering a Destination ........................... 90 Address ................................................. 92 Address Book......................................... 98 Previous Destination............................... 99 Place Category ..................................... 100 Local Search..............
Entering a Destination H MENU button (on map) 1 Entering a Destination This section describes how to enter a destination for route guidance. Navigation Navigation” Select More Search Methods to display additional menu entries. If you press the MENU button when en route, the Route Option screen is displayed. 2 Changing Your Route P. 129 Prior to departure, you can set areas along your route to avoid. 2 Avoiding Streets P.
Entering a Destination • Go Home: Sets your home address as a destination. 2 Going Home P. 11 • Place Category: Sets a destination by selecting a place/landmark. 2 Place Category P. 100 • Place Name: Sets a destination by entering a place name. 2 Place Name P. 104 Navigation • Local Search: Sets a destination by using Local Search. 2 Local Search P. 102 • Place Phone No.: Sets a destination by entering the phone number of a place/ landmark. 2 Place Phone Number P.
Entering a DestinationAddress Address H MENU button Address 1 Address Enter an address to use as the destination. The state or province you are currently in is displayed (e.g., California). Navigation Rotate i to select an item. Press u. The following items are available: • City: Selects your destination city. 2 Selecting a City P. 94 • Street: Selects your destination street. 2 Selecting a Street P. 95 • House Number: Enters the house number to select the street.
Entering a DestinationAddress ■ Selecting the State or Province 1 Selecting the State or Province Move w or y to select the following areas: H MENU button Address Change State ■ Selecting a City by Zip Code • USA for the U.S. mainland, Alaska, Hawaii, and Puerto Rico • Canada • Mexico Navigation Rotate i to select a state from the list. Press u. 1 Selecting a City by Zip Code H MENU button Address ZIP Code If your city is not listed, it may be part of a larger metropolitan area.
Entering a DestinationAddress 3. Rotate i to select the destination city from the list. Press u. Navigation Next, you are prompted to enter a street name. 2 Selecting a Street P. 95 1 Selecting a City Vehicle position may not be displayed when: • The automobile is traveling off-road. • The vehicle position data cannot be updated. You do not need to enter spaces or symbols (e.g., &, -, %). Partial matches are supported (e.g., “ANGELES” to find “LOS ANGELES”).
Entering a DestinationAddress 2. Rotate i to select your destination city from the list. Press u. Non-detailed area mark: Try entering the street first and then select the city. Next, you are prompted to enter a street name. 2 Selecting a Street P. 95 ■ Selecting a Street If your city is not listed, it may be part of a larger metropolitan area. Try entering the street first. 1 Selecting a Street When entering the names of major freeways, you can use the following abbreviations.
Entering a DestinationAddress 2. Rotate i to select your destination street from the list. Press u. Navigation A list of matching hits is automatically displayed after you enter several letters, with the closest match at the top of the list. Matching letters are highlighted. 1 Selecting a Street If you did not select a city first and there is more than one city with the specified street, a list of cities is displayed. 3. Enter the street number. Only valid street numbers can be entered. 4.
Entering a DestinationAddress ■ Selecting a Street by House Number H MENU button Address House Number 1. Enter the house number. 2. Move r to select OK. Press u. Navigation Only a valid house number can be entered. If you did not yet select a street name, enter a street name when you are prompted. 3. Rotate i to select your destination street from the list. Press u. Select a city when you are prompted. 4. Set the route to your destination. 2 Calculating the Route P.
Entering a DestinationAddress Book Address Book H MENU button Address Book 1 Address Book Select an address stored in your address book to use as the destination. Navigation 1. Rotate i to select your destination from the list. Press u. 2. Set the route to your destination. 2 Calculating the Route P. 114 Move w or y to display only the entries in the categories you have created. 2 Selecting an Address Book Category P. 43 If you have PIN-protected your address book, enter your PIN when prompted.
Entering a DestinationPrevious Destination Previous Destination H MENU button Previous Destination 1 Previous Destination Select an address from a list of your 50 most recent destinations to use as the destination. The list is displayed with the most recent destination at the top. 2. Set the route to your destination. 2 Calculating the Route P. 114 Your home address and addresses stored in your address book are not added to the list of previous destinations.
Entering a DestinationPlace Category Place Category H MENU button Place Category 1 Place Category Select the category of a place (e.g., Banking, Lodging, Restaurant) stored in the map database to search for the destination. Navigation 1. Rotate i to select a category. Press u. This option is convenient if you do not know the exact name of a place or if you want to narrow down the number of matches returned for places with a common name.
Entering a DestinationPlace Category 3. Rotate i to select an item. Press u. 1 Place Category The straight line distance (as the crow flies, not driving distance) and direction to the destination are shown for the highlighted place. Navigation The following items are available: • Search by Name: Searches for a place in the subcategory by name. Enter a city name when prompted. • City Vicinity: Searches for a place in the subcategory within a 20-mile radius of a specific city.
Entering a DestinationLocal Search Local Search H MENU button Local Search 1 Local Search Select a place via Local Search database as the destination. Navigation 1. Rotate i to select a category (e.g., Community). Press u. The screen in this section may differ from the actual ones. Local Search is a subscription service. For more information, contact an Acura dealer or visit owners.acura.com. 2. Rotate i to select a subcategory. Press u.
Entering a DestinationLocal Search 3. Rotate i to select an item. Press u. Navigation The following items are available: • Search nearby: Finds the nearest POI around your vehicle. • Search from Map: Selects a POI by scrolling the Interface Dial on the map screen. • Search from Destination: Selects a POI around the destination. Search the category by scrolling the Interface Dial. 4. Set the route to your destination. 2 Calculating the Route P.
Entering a DestinationPlace Name Place Name H MENU button Place Name 1 Place Name Enter the name of a place (e.g., business, hotel, restaurant) stored in the map database to use as the destination. Navigation 1. Enter a place name. 2. Move r to select OK to display a list of matching hits. Press u. You can find a place by name using voice commands. Say d “Place Name” on the Voice Portal screen. Say a category, for example d “ATM/Bank.” Say the name of the place, for example d “ABC Bank.
Entering a DestinationPlace Name ■ Place Name in Multiple Categories 1 Place Name in Multiple Categories If the place name is in multiple categories in the map database, the following screen is displayed. Navigation 1. Rotate i to select a place name. Press u. Matching letters are in highlighted. 2. Rotate i to select a subcategory. Press u.
Entering a DestinationPlace Name 3. Rotate i to select a place. Press u. 4. Set the route to your destination. 2 Calculating the Route P. 114 Navigation 106 1 Place Name in Multiple Categories Move r to select Sort by City or Sort by Distance.
Entering a DestinationPlace Phone Number Place Phone Number H MENU button More Search Methods Place Phone Number 1 Place Phone Number Select a destination by phone number. Only phone numbers in the database are recognized. 2. Rotate i to select OK. Press u. 3. Set the route to your destination. 2 Calculating the Route P. 114 Continued Phone numbers of private residences entered in your address book are not stored in the database and thus cannot be used to search for a destination.
Entering a DestinationDownload POI Download POI H MENU button More Search Methods Download POI Select a place imported into the navigation system as the destination. Navigation 1. Rotate i to select a category from the list. Press u. 1 Download POI Move r and rotate i to select the following items: • Import from USB: Imports POI data into the navigation system. 2 Importing POI Categories P. 51 • Delete All: Deletes all POI entries. • Help with Feature: Views tips for the Download POI feature.
Entering a DestinationScenic Route Scenic Route H MENU button More Search Methods Scenic Route Select a scenic road as a destination (U.S. and Canada only). If you select a scenic road that runs through multiple states, only the portion of the road in the selected state is displayed. Navigation 1. Rotate i to select a state. Press u. 1 Scenic Route 2. Rotate i to select a scenic road. Press u. 3. Set the route to your destination. 2 Calculating the Route P.
Entering a DestinationIntersection Intersection H MENU button More Search Methods Intersection Select the intersection of two streets as the destination. The state or province for your current location is displayed at the top of the screen (e.g., California). Navigation 1. Rotate i to select the intersection search method. Press u. 2. Set the route to your destination. 2 Calculating the Route P. 114 The following options are available: • City: Selects the city where the intersection is located.
Entering a DestinationMap Input Map Input H MENU button More Search Methods Map Input Use the Interface Dial to manually select an icon or a location on the map screen as the destination. 1. Rotate i to select an item. Press u. Navigation You are prompted to define the map area to display. The following items are available: • Current Position: Your current location is centered on the map. • State: You are prompted to select the state. 2 Selecting the State or Province P.
Entering a DestinationMap Input 2. Scroll the map to position the cursor over your desired destination, adjusting the map scale as necessary. Navigation If the address is not the desired location, scroll the map to another location and try again. 3. Press u to display the route calculation menu. 2 Calculating the Route P. 114 4. Rotate i to select Set as Destination. Press u. 112 1 Map Input Auto Zoom Press u repeatedly on the map to zoom in (to the scale 1/4 mile) while scrolling the map.
Entering a DestinationCoordinate Coordinate H MENU button More Search Methods Coordinate 1 Coordinate Specify a location using latitude and longitude map coordinates. 1. Enter the latitude and select OK. Navigation 2. Enter the longitude and select OK. Latitude and longitude must be entered up to the seconds’ value. 3. Move w to scroll the map to position the cursor over your desired destination, adjusting the map scale as necessary.
Calculating the Route This section describes how to calculate your route. 1. Rotate i to select Set as Destination. Press u. Navigation The system calculates and displays the route line on the map screen. 2 Route Line P. 118 Move w to scroll the map around the destination. The straight line distance (as the crow flies, not driving distance) and direction to the destination are shown. You cannot use voice commands while the system is calculating the route.
Calculating the RouteViewing the Routes Viewing the Routes View three different routes to your destination. Rotate i to select a route. Press u. The system calculates and displays the route line on the map screen. 2 Route Line P. 118 It is not unusual for some calculated route options to be identical. Sever Routes is a subscription service. For more information, contact an Acura dealer or visit owners.acura.com. Navigation The travel distance and estimated travel time is displayed for each route.
Driving to Your Destination This section describes how to follow the route guidance to your destination, receive traffic information and choose the icons displayed on the map screen. Viewing the Route 1 Viewing the Route Navigation d “Display Map” ■ Map Screen After calculating the route to your destination, the route is displayed on the map screen. 2 Map Screen Legend P.
Driving to Your DestinationViewing the Route ■ Guidance Screen 1 Guidance Screen The guidance screen offers an alternative way to view your route. You can also view a list of guidance directions. Turn-by-Turn Directions The next guidance point appears on the multiinformation display. 2 Turn-by-Turn Directions P. 10 Navigation The next guidance point is displayed as you approach each guidance point on the route. A visual guide helps you check the guidance screen. 2 Guidance Screen P.
Driving to Your DestinationViewing the Route ■ Route Line 1 Route Line When driving on verified streets, the route line is light blue. The route line display changes when driving on unverified streets: Navigation Straight line guide Blue-pink route line 118 • If Unverified Routing is Off, the route line uses verified streets only (when possible). If Straight Line Guide is set to On, a pink “vector line” pointing directly towards your destination is displayed. 2 Straight Line Guide P.
Driving to Your DestinationViewing the Route ■ Deviating From the Planned Route ■ Tracking Dots You can display a series of dots (breadcrumbs) to track the path you are taking. If needed, you can follow the dots back to the mapped road you originally left. 2 Display Tracking P. 84 Navigation If you leave the calculated route, the system automatically recalculates a route to the desired destination based on your current location and direction. 2 Route Preference P.
Driving to Your DestinationListening to Voice Guidance Listening to Voice Guidance H ENTER button (on map) Voice As you approach each guidance point, a pop-up window is displayed on the map screen with instructions for you to follow. Voice guidance for each guidance point is also provided.
Driving to Your DestinationReaching a Waypoint Reaching a Waypoint When you reach a waypoint, a pop-up message is displayed. You can continue or pause the route guidance. Select Yes to continue the guidance. Navigation Rotate i to select No to pause the route guidance. Press u. ■ Resuming the route guidance You can resume the route guidance in the following ways: • Restart the engine when you stop your car (e.g., to rest, stop for gas, etc.). 2 Resuming Your Trip P.
Map Menu Displaying the Map Menu Use the Map Menu to control the icons displayed on the screen and to display traffic information and messages. You can also use the Map Menu to find locations or to cancel the route. Navigation 1. On the map screen, press u. The Map Menu is displayed on the map screen. 1 Map Menu If you scroll the map while en route, press the NAV (or BACK) button to return to the current position map screen, then press u.
Map MenuDisplaying the Map Menu • Guidance Volume: Adjusts the navigation system volume level. Directions The system provides freeway exit information only in the U.S. Navigation • Map/Guidance: Allows you to select the map and guidance settings (display mode, icons to display on the map, map orientation, map color, and 3D view angle), display your current location and an overview of the map features. 2 Guidance Mode P. 64 2 Showing Icons on Map P. 72 2 Color P. 74 2 View (Map Orientation) P.
Map MenuHide Traffic Flow Hide Traffic Flow H ENTER button (on map) Hide Traffic Flow Hide the traffic flow indicator on the map screen. Press the ENTER button and select Display Traffic Flow to display the traffic flow indicator on the map screen.
Map MenuDirections Directions H ENTER button (on map) Directions 1 Directions Display a list of the guidance points on your route for your confirmation. The system displays a map of the guidance point. Guidance points with exit information are indicated by a (freeway exit information) icon. Move r to select Exit Info to display the exit information. 2 Freeway Exit Information P. 126 The system provides freeway exit information only in the U.S. Navigation 1.
Map MenuDirections ■ Freeway Exit Information 1 Freeway Exit Information Navigation H ENTER button (on map) Directions Exit Info d “Display Freeway Exit Information” Display a list of the freeway exits for the route. You can view freeway exit information (whether the exit is near gas stations, restaurants, ATMs, etc.) and add new destinations or waypoints to the calculated route.
Map MenuTraffic Rerouting™ Traffic Rerouting™ When driving to your destination, the system automatically searches for a faster route based on traffic flow information and traffic incidents. 2 AcuraLink Real-Time Traffic™ P. 14 2 Traffic Rerouting P. 59 1 Traffic Rerouting™ This feature requires an AcuraLink Real-Time Traffic™ subscription. Automatic traffic rerouting may not provide a detour route depending on circumstances.
Map MenuTraffic Rerouting™ 2. Rotate i to select Avoid. Press u. Repeat step 1 to 2 as necessary. Navigation You can choose to avoid up to 10 traffic incidents. It is not always possible for the system to calculate a route that avoids all traffic incidents or specific traffic incidents you select. The “On Route” tab on the Traffic List screen is only available during route guidance. 3. Move r to select Reroute. Press u. The system recalculates a detour route that avoids the traffic incidents.
Changing Your Route H MENU button (when en route) 1 Changing Your Route This section describes how to alter your route, add an interim “waypoint” (pit stop), choose a different destination, cancel your current destination, and continue your trip after stopping. If you press the MENU button when not en route, the Destination Menu screen is displayed. 2 Entering a Destination P. 90 Navigation Rotate i to select an item. Press u.
Changing Your RoutePausing the Route • Change Route Preference: Changes the route preferences (calculating method). 2 Route Preference P. 55 • Detour: Calculates a detour route. 2 Taking a Detour P. 137 Navigation • Avoid Streets: Avoids streets along your route. 2 Avoiding Streets P. 137 Pausing the Route H MENU button (when en route) Pause Guidance Pause the route guidance and return to the map screen. The destination icons and all waypoint flags remain displayed on the map.
Changing Your RouteAdding Waypoints Adding Waypoints Add up to four waypoints (pit stops) along the route to your destination. Waypoints allow you to stop for gas or food, for example, and then continue on to your destination. Press the NAV button to return to the map screen without adding a waypoint at any time. The search corridor used for adding waypoints can be adjusted. 2 Edit POI Search Radius Along Route P. 60 Navigation Waypoints are displayed on the map screen as small, numbered red flags.
Changing Your RouteAdding Waypoints ■ Adding Waypoints from the Route Menu H MENU button (when en route) Destination List Add New Destination Find Along Route 1 Adding Waypoints Search method “Search around” method Navigation 1. Rotate i to select a search method to add a waypoint. Press u. “Search along” method The following items are available: • Search Around: Searches in a spiral pattern around the location you select.
Changing Your RouteAdding Waypoints 3. Rotate i to select a place. Press u. The waypoint is added to the Destination List. Navigation 4. Rotate i to select a location and move the order of destinations. Press u. 5. Move r and rotate i to select Start Route. Press u. The route is automatically recalculated and displayed on the map screen.
Changing Your RouteAdding Waypoints ■ Adding Waypoints from the Navigation Menu 1 Adding Waypoints from the Navigation Menu H MENU button (when en route) Destination List Add New Destination Use Nav Menu Navigation 1. Rotate i to select a method to enter a waypoint. 2 Entering a Destination P. 90 A new destination is added to the end of the Destination list. 2. Move r and rotate i to select Start Route. Press u. The route is automatically recalculated and displayed on the map screen.
Changing Your RouteEditing the Destination List Editing the Destination List ■ Editing the Order of Waypoints 1 Editing the Order of Waypoints H MENU button (when en route) Destination List Navigation 1. Move r and rotate i to select Edit Order. Press u. Move r to rotate i to select Show All on Map to display the destination and waypoints on the map screen. 2. Rotate i to select a list item to move. Press u. 3. Rotate i to select a new location. Press u. 4.
Changing Your RouteEditing the Destination List ■ Deleting Waypoints 1 Deleting Waypoints H MENU button (when en route) Destination List Navigation 1. Rotate i to select a list item to delete. Press u. 2. Rotate i to select Delete. Press u. 3. Rotate i to select Yes. Press u. 136 Move r and rotate i to select Delete All to delete the destination and all the waypoints. Select Show on Map to display the waypoint on the map screen.
Changing Your RouteTaking a Detour Taking a Detour H MENU button (when en route) Detour 1 Taking a Detour Calculate a detour route manually. The system attempts to calculate a new route by avoiding the next 5 miles (while on a freeway) or 1 mile (while on a surface street). H MENU button (when en route) Avoid Streets Select a street or streets along your route to avoid. 1. Rotate i to select the street you want to avoid. Press u. Repeat the procedure to avoid other streets. 2.
Changing Your Destination There are several methods you can use to change the route destination. Find Nearest Place 1 Find Nearest Place Navigation H ENTER button (on map) Search Nearby d “Find Nearest…” Search for the nearest place/landmark on the map screen and set it as your destination. The Find Nearest voice command is the fastest method of specifying a place/landmark as your destination. Many kinds of places can be found. 2 Find Place Commands P. 331 1. Rotate i to select Search Nearby.
Changing Your DestinationSelecting a Destination on the Map Selecting a Destination on the Map Select a new destination when en route by selecting a location on the map. If there is more than one icon or street under the map cursor, you are prompted to select the item from a list. Navigation 1. Scroll the map to position the cursor over your desired destination, adjusting the map scale as necessary. Press u.
Changing Your DestinationEntering a New Destination Entering a New Destination H MENU button (when en route) Destination Enter a new destination using the Destination Menu screen even when you are en route. Navigation 1. Rotate i to select a method to enter a new destination. 2 Entering a Destination P. 90 After entering a new destination, the address is displayed on the Calculate Route screen. 2. Rotate i to select Set as Destination. Press u. 3. Move r to select Clear Current Route. Press u.
Resuming Your Trip Stop your vehicle en route (e.g., to rest, stop for gas, etc.), and then continue on your route. If you did not complete your route, the Continue Trip screen is displayed when you restart your vehicle. 1 Resuming Your Trip The Continue Trip screen has the same options as when you calculate a route. 2 Calculating the Route P. 114 You can also cancel your destination by pressing any hard button except the a button You can continue on the same route.
142
Audio This section describes how to operate the audio system. You can play music from a wide array of media sources, and control the audio system using the audio buttons, the Interface Dial, or voice control. Audio System .................................................. 144 About Your Audio System.............................. 144 USB Port ........................................................ 145 Auxiliary Input Jack ........................................ 146 Audio System Theft Protection ..........
Audio System About Your Audio System The audio system features AM/FM radio and the SiriusXM® Radio service. It can also play audio CDs, WMA/MP3/AAC files, Hard Disc Drive (HDD) audio, USB flash drives, and iPod®, iPhone® and Bluetooth® devices. You can operate the audio system from the buttons and switches on the panel, the icons on the touchscreen interface. Audio iPod® USB Flash Drive Remote Controls 1 About Your Audio System SiriusXM® Radio is available on a subscription basis only.
Audio SystemUSB Port USB Port Install the iPod® or iPhone® dock connector or the USB flash drive to the USB port. 1 USB Port • Do not leave the iPod® or USB flash drive in the vehicle. Direct sunlight and high temperatures may damage it. • Do not connect the iPod® or USB flash drive using a hub. Audio • Do not use a device such as a card reader or hard disk drive, as the device or your files may be damaged. • We recommend backing up your data before using the device in your vehicle.
Audio SystemAuxiliary Input Jack Auxiliary Input Jack Use the jack to connect standard audio devices. 1. Open the AUX cover. 2. Connect a standard audio device to the input jack using a 1/8 inch (3.5 mm) stereo miniplug. Audio 146 The audio system automatically switches to the AUX mode. 1 Auxiliary Input Jack You can return to the AUX mode by selecting Change Source on the Audio menu screen or Audio Source on the touchscreen.
Audio SystemAudio System Theft Protection Audio System Theft Protection The audio system is disabled when it is disconnected from the power source, such as when the battery is disconnected or goes dead. In certain conditions, the system may display Enter code. If this occurs, reactivate the audio system. ■ Reactivate the audio system 1. Set the power mode to ON. 3. Press and hold the audio system power button for more than two seconds. Audio 2. Turn on the audio system.
Audio SystemSetting Audio Shortcuts Setting Audio Shortcuts You can store up to six radio stations, and HDD audio album/play lists when playing AM, FM, or SiriusXM® radio, or HDD audio. ■ Storing a station or song 1. Select Shortcuts. Audio 2. Tune to a radio station or select a song. 2 Playing FM/AM Radio P. 155 2 Playing SiriusXM® Radio P. 161 2 Playing Hard Disc Drive (HDD) Audio P. 173 3. Select Audio. 4. Select Edit or No Entry. If you select No Entry, go to step 6. 5. Select Add. 6.
Audio SystemCustomizing Audio Source ■ Deleting a preset station or song 1. Select Shortcuts. 2. Select Audio. 3. Select Edit. Audio 4. Select Delete. 5. Select the preset icon with the radio station or a song you want to delete. Customizing Audio Source 1 Customizing Audio Source You can customize order of the source list icons. 1. Select Audio Source. 2. Select Edit Order. This operation is not allowed while the vehicle is in motion. 3. Select two icons you want to swap. 4. Select Done.
Audio Remote Controls Steering Wheel Controls Allows you to operate the audio system while driving. SOURCE Button Left Selector Wheel Cycles through the audio modes as follows: FM AM SiriusXM® CD HDD USB iPod® Bluetooth® Audio Pandora® AhaTM AUX Audio SOURCE Button Left Selector Wheel Roll Up: To increase the volume. Roll Down: To decrease the volume. Push: To mute. Push again to unmute. • When listening to the radio Move to the right: To select the next preset radio station.
Audio Settings H SETTINGS button Audio Settings 1. Move w or y to select an audio mode you want to set. 2. Rotate i to select an item. Press u. Audio The following items are available: • Source Select Popup: Selects whether the list of selectable audio sources comes on when the AUDIO button is pressed. • HD Radio Mode (AM/FM mode): Selects whether the audio system automatically switches to the digital radio waves or receives the analogue waves only.
Audio SettingsSteering Wheel Controls • Update Gracenote Album Info (CD or HDD mode): Updates the Gracenote® Album Info (Gracenote® Media Database) from CD or from USB. 2 Updating Gracenote® Album Info P. 183 • DVD Auto Play (DVD mode): Turns the auto play feature on or off. • Audio Language (DVD mode): Selects a language for the audio that is available on the DVD. Audio • Subtitle Language (DVD mode): Selects a language for the subtitle that is available on the DVD.
Audio SettingsAdjusting the Sound Adjusting the Sound Interface Dial 1 Adjusting the Sound H MENU button Sound 1. Rotate i to select the sound mode to adjust. Press u. 2. Rotate i to adjust the desired level. Press u. SVC adjusts the volume level based on the vehicle speed. As you go faster, audio volume increases. As you slow down, audio volume decreases. DTS Neural Surround is a trademark of DTS, Inc. Audio Bass The SVC has four modes: Off, Low, Mid, and High.
Audio SettingsAdjusting the Sound On Demand Multi-Use DisplayTM 1 Adjusting the Sound 1. Select More. 2. Select Sound. 3. Use N, B or other icon to adjust the setting. Audio 154 Use the / / turn the page. / icons to Select to go back to the previous screen. Select Off, Low, Mid or High for the SVC setting. 2 Adjusting the Sound P. 153 You can also adjust the sound to select the On Demand Multi-Use DisplayTM.
Playing FM/AM Radio Selecting FM/AM Mode Interface Dial 1 Playing FM/AM Radio d “Display audio screen” 1. Press the MENU button.(in AUDIO mode) 2. Rotate i to select Change Source. Press u. You can control the AM/FM radio using voice commands. 2 Voice Control Operation P. 6 3. Rotate i to select the frequency band (FM, AM). Press u. The band and frequency are displayed on the navigation screen. On Demand Multi-Use DisplayTM Stereo reproduction in AM is not available. 1. Select Audio Source. 2.
Playing FM/AM RadioAudio Screen Control 1 Audio Screen Control On Demand Multi-Use DisplayTM Preset screen Tune screen Select Tune. Select Presets. Audio Station Number The following items are available: • b n: Tune the radio frequency. Select and hold to search that station on preset screen. • c x: Search up and down the selected band for a station with a strong signal. • More: Display the menu items. 2 Audio Menu P.
Playing FM/AM RadioAudio Menu Audio Menu Interface Dial H MENU button (in FM/AM mode) Rotate i to select an item. Press u. Audio The following items are available: • Sound: Adjusts the settings of the audio speaker’s sound. 2 Adjusting the Sound P. 153 • Scan: Scans for stations with a strong signal in the current band and plays a 10second sample. Select Stop Scan to stop scanning and play the current selection. • Station List: Displays the stored station list.
Playing FM/AM RadioAudio Menu • Radio Text: Displays the text information broadcast by the current RDS station. • Tag Song: Displays the TAG information saved to the audio system when an HD RadioTM station is selected. Audio • Tagged Song List: You can store the TAG information in the connected iPod®/ iPhone®.
Playing FM/AM RadioAudio Menu On Demand Multi-Use DisplayTM 1. Select More. 2. Select a setting item. Audio The following items are available: • Sound: Displays the sound preferences screen. 2 Adjusting the Sound P. 153 • Scan: Scans for stations with a strong signal in the current band and plays a 10second sample. Select Stop Scan to stop scanning and play the current selection. • Save Preset: Stores the station into the preset memory. • Screen Settings: Adjusts the screen’s preferences.
Playing FM/AM RadioAudio Menu ■ Radio Data System H MENU button (in FM mode) Station List Provides text data information related to your selected RDS-capable FM station. ■ To find an RDS station from Station List Audio Rotate i to select the station. Press u. ■ Manual update Updates your available station list at any time. Rotate i to select Refresh. Press u.
Playing SiriusXM® Radio Selecting SiriusXM® Mode Interface Dial 1 Playing SiriusXM® Radio 1. Press the MENU button. (in AUDIO mode) You can control the SiriusXM® radio using voice commands. 2 Voice Control Operation P. 6 2. Rotate i to select Change Source. Press u. 3. Rotate i to select XM. Press u. On Demand Multi-Use DisplayTM 1. Select Audio Source. 2. Select the XM icon. The band and channel are displayed on the On Demand Multi-Use DisplayTM.
Playing SiriusXM® RadioAudio Screen Control On Demand Multi-Use DisplayTM Preset screen Tune screen Select Tune. Select Presets. Audio Station Number The following items are available: • b n: Select to display and select an SiriusXM® Radio category. Select and hold to search that station on preset screen. • c x: Select to the previous or next channel. Select and hold to change the channel rapidly. • More: Display the menu items. 2 Audio Menu P.
Playing SiriusXM® RadioAudio Menu Audio Menu Interface Dial H MENU button (in SiriusXM® mode) Rotate i to select an item. Press u. Audio The following items are available: • Sound: Adjusts the settings of the audio speaker’s sound. 2 Adjusting the Sound P. 153 • Scan: Scans for channels in the selected mode and plays a 10- second sample. Select Stop Scan to stop scanning and play the current selection. • Save Preset: Stores the station into the preset memory.
Playing SiriusXM® RadioAudio Menu On Demand Multi-Use DisplayTM 1. Select More. 2. Select a setting item. Audio The following items are available: • Sound: Displays the sound preferences screen. 2 Adjusting the Sound P. 153 • Save Preset: Stores the station into the preset memory. • Screen Settings: Adjusts the screen’s preferences. 2 Changing the Screen Settings P. 87 • Scan: Scans for channels with a strong signal in the selected mode and plays a 10second sample.
Playing SiriusXM® RadioSiriusXM® Radio Service SiriusXM® Radio Service ■ Subscribing to SiriusXM® Radio 1. You need your radio ID ready before registering for subscription. To see the ID in the display: Operate the On Demand Multi-Use DisplayTM until channel 0 appears. 1 Subscribing to SiriusXM® Radio Contact Information for SiriusXM® Radio: SiriusXM® Radio at www.siriusxm.com or (800) 852-9696 2.
Playing a Disc Your audio system supports audio CDs, CD-Rs and CD-RWs in either MP3, WMA, or AAC format. With the CD loaded, select the CD mode. 1 Playing a Disc NOTICE Audio Selecting Disc Mode Do not use CDs with adhesive labels. The label can cause the CD to jam in the unit. 1. Insert a disc into the disc slot. WMA and AAC files protected by digital rights management (DRM) cannot be played. The audio system displays Unplayable File, then skips to the next file.
Playing a DiscAudio Screen Control Audio Screen Control Control the audio system through the navigation screen and On Demand Multi-Use DisplayTM. Interface Dial 1. Rotate i or press u to display the song list. Press MENU button to display the menu items On Demand Multi-Use DisplayTM • Random: Plays all tracks/files in random order. • Repeat: Repeats the current track/file. • Scan: Provides 10-second sampling of all tracks on the CD (all files in the current folder in MP3, WMA, or AAC).
Playing a DiscAudio Menu Audio Menu Interface Dial H MENU button (in CD mode) Rotate i select an item. Press u. Audio The following items are available, depending on the type of disc: • Sound: Adjusts the settings of the audio speaker’s sound. 2 Adjusting the Sound P. 153 • Scan: Scan Folders (MP3/WMA/AAC): Provides 10-second sampling of the first file in each of the main folders. Scan Tracks: Provides 10-second sampling of all tracks on the CD (all files in the current folder in MP3, WMA, or AAC).
Playing a DiscAudio Menu • Change Source: Changes the audio source mode. • Rec to HDD: Records a music CD onto the HDD for playback using HDD Audio. 2 Recording a Music CD to HDD P. 174 • Music Search: Selects a file from the Music Search list. 2 How to Select a File from the Music Search List (MP3/WMA/AAC) P. 170 1. Select More. Audio On Demand Multi-Use DisplayTM 2. Select a setting item.
Playing a DiscAudio Menu ■ How to Select a File from the Music Search List (MP3/WMA/AAC) H MENU button (in CD mode) Music Search Rotate i, move w or y to select a file from the Music Search list. Press u.
Playing a DiscRecommended CDs Recommended CDs • Use only high-quality CD-R or CD-RW discs labeled for audio use. • Use only CD-R or CD-RW discs on which the recordings are closed. • Play only standard round-shaped CDs. 1 Recommended CDs Also includes: For DTS patents, see http://patents.dts.com. Manufactured under license from DTS Licensing Limited. DTS, the Symbol, & DTS and the Symbol together are registered trademarks, and DTS Neural Surround is a trademark of DTS, Inc. © DTS, Inc.
Playing a DiscRecommended CDs Audio ■ Protecting CDs Follow these precautions when handling or storing CDs: • Store a CD in its case when it is not being played. • When wiping a CD, use a soft clean cloth from the center to the outside edge. • Handle a CD by its edge. Never touch either surface. • Never insert foreign objects into the CD player. • Keep CDs out of direct sunlight and extreme heat. • Do not place stabilizer rings or labels on the CD.
Playing Hard Disc Drive (HDD) Audio The Hard Disc Drive (HDD) Audio function plays tracks from music CDs that have been recorded onto the built-in HDD. You can arrange the tracks in playlists or play the tracks using various search methods. Selecting HDD Mode 1. Press the MENU button. (in AUDIO mode) 2. Rotate i to select Change Source. Press u. 3. Rotate to select HDD. Press to play tracks stored on the HDD. You can control the HDD audio using voice commands. 2 Voice Control Operation P.
Playing Hard Disc Drive (HDD) AudioRecording a Music CD to HDD Recording a Music CD to HDD The songs on music CDs are automatically recorded by factory default to the HDD the first time you play each disc. You can then play the songs directly from the HDD. 1 Recording a Music CD to HDD Audio Recording indicator You can add tracks to user playlists, where you can mix and match tracks from other CDs recorded on the HDD. 2 Editing an Album or Playlist P. 179 2 Editing Track Information P.
Playing Hard Disc Drive (HDD) AudioAudio Screen Control Audio Screen Control Control the audio system through the navigation screen and On Demand Multi-Use DisplayTM. Interface Dial 1. Rotate i or u press to display the song list. Press MENU button to display the menu items 2 Audio Menu P. 176 On Demand Multi-Use DisplayTM 1. Select n skip to the next playlist/ album, and b to skip to the beginning of the previous playlist/ album.
Playing Hard Disc Drive (HDD) AudioAudio Menu Audio Menu Interface Dial H MENU button (in HDD mode) Rotate i to select an item. Press u. Audio The following items are available: • Sound: Adjusts the settings of the audio speaker’s sound. 2 Adjusting the Sound P. 153 • Scan: Scan Albums: Provides 10-second sampling of the first track in each album. Scan Tracks: Provides 10-second sampling of all tracks on HDD. • Music Search: Selects a file from the Music Search list.
Playing Hard Disc Drive (HDD) AudioAudio Menu On Demand Multi-Use DisplayTM 1. Select More. 2. Select a setting item. Audio The following items are available: • Sound: Displays the sound preferences screen. 2 Adjusting the Sound P. 153 • Screen Settings: Displays the screen preferences screen. 2 Changing the Screen Settings P.
Playing Hard Disc Drive (HDD) AudioAudio Menu ■ How to Select a Track from the Music Search List H MENU button (in HDD mode) Music Search 1. Move w or y to select a search category. Press u. Audio 2. Rotate i to select a track from the Music Search list. Press u.
Playing Hard Disc Drive (HDD) AudioAudio Menu ■ Editing an Album or Playlist 1 Editing an Album or Playlist H MENU button (in HDD mode) Edit/Delete 1. Rotate i to select Albums or Playlist. Press u. The pop-up menu appears on the screen. 3. Rotate i to select an item. Press u. The following items are available: • Edit Name: Enter a new name using the interface dial or the On Demand MultiUse DisplayTM. Each album CD counts as an original playlist.
Playing Hard Disc Drive (HDD) AudioAudio Menu ■ Creating a new Playlist H MENU button (in HDD mode) Edit/Delete Playlists Create New Playlist 1. Enter the playlist name using the interface dial or the On Demand Multi-Use DisplayTM. Audio 180 2. Select tracks from the music search list.
Playing Hard Disc Drive (HDD) AudioAudio Menu ■ Editing Track Information H MENU button (in HDD mode) Edit/Delete Tracks Change the track title, artist name, genre and composer. You can also delete tracks. Rotate i select a track you want to edit or delete. Press u. Audio The pop-up menu appears on the screen. The following items are available: • Edit Name: Enter the track information (track name, track artist, etc.) using the interface dial or the On Demand Multi-Use DisplayTM.
Playing Hard Disc Drive (HDD) AudioAudio Menu ■ Displaying Music Information H MENU button (in HDD mode) Edit/Delete Music information (album name, artist name, genre) can be acquired by accessing the Gracenote® Album Info. Audio 1. Rotate i to select Albums. Press u. 2. Rotate i to select an album that you want edit or delete. Press u. The pop-up menu appears on the screen. 3. Rotate i to select Edit Name. Press u. 4. Move r to select Get Music Info. Press u.
Playing Hard Disc Drive (HDD) AudioAudio Menu ■ Updating Gracenote® Album Info 1 Updating Gracenote® Album Info H SETTINGS button (in HDD mode) Audio Settings CD/HDD Update the Gracenote® Album Info (Gracenote® Media Database) that is included with the navigation system. 2. Rotate i to select Update Gracenote Album Info. Press u. • Consult a dealer. • Visit http://www.navteq.com/gracenote/acura. Once you perform an update, any information you edited before will be overwritten or erased.
Playing Hard Disc Drive (HDD) AudioAudio Menu ■ Deleting All HDD Data H SETTINGS button Audio Settings CD/HDD Delete All HDD Data Delete all music data on the HDD. Rotate i to select Yes. Press u.
Playing an iPod® ■ Connecting an iPod® 1 Connecting an iPod® • Do not connect your iPod® using a hub. • Do not use a device such as a card reader or hard disk drive, as the device or your tracks may be damaged. • Displayed messages may vary depending on the device model and software version. Audio • We recommend backing up your data before using the device in your vehicle. Your audio system may not work with all software versions of these devices. 1. Open the USB cover. 2.
Playing an iPod®Selecting iPod® Mode Selecting iPod® Mode 1. Connect the iPod® to the USB adapter cable in the console compartment. Interface Dial 2. Press the MENU button. (in AUDIO mode) 3. Rotate i, select Change Source. Press u. 4. Rotate i, select iPod. Press u. Audio On Demand Multi-Use DisplayTM 2. Select Audio Source. 3. Select the iPod icon. 186 1 Playing an iPod® You can control an iPod® using voice commands. 2 Voice Control Operation P. 6 2 Song By VoiceTM (SBV) P.
Playing an iPod®Audio Screen Control Audio Screen Control Control the audio system through the navigation screen and On Demand Multi-Use DisplayTM. Interface Dial 1. Rotate i or press u o display the song list. This function may not be available depending on models or versions. Select r to go back to the previous screen. Audio 2. Rotate i, move w or y to select a song from the list. Press u. 1 Audio Screen Control Press MENU button to display the menu items. Track list 2 Audio Menu P.
Playing an iPod®Audio Screen Control On Demand Multi-Use DisplayTM Album Image Album Bar Select an album image. Audio Select the album bar. The following items are available: • (Play/Pause): Plays or pauses a song file. • cx: Select the previous or next track. Select and hold to move rapidly within a track. • Album bar: Select to display the album search screen. Select c or x to search for an album. • More: Select to display the menu item. 2 Audio Menu P. 189 • Repeat: Repeats the current track.
Playing an iPod®Audio Menu Audio Menu Interface Dial H MENU button (in iPod® mode) Rotate i to select an item. Press u. Audio The following items are available: • Sound: Adjusts the settings of the audio speaker’s sound. 2 Adjusting the Sound P. 153 • Music Search: Selects a song from the Music Search list. 2 How to Select a Song from the Music Search List P. 191 • Change Source: Changes the audio source mode. • Shuffle/Repeat: Repeat Song: Repeats the current track.
Playing an iPod®Audio Menu On Demand Multi-Use DisplayTM 1. Select More. 2. Select a setting item. Audio The following items are available: • Sound: Displays the sound preferences screen. 2 Adjusting the Sound P. 153 • Screen Settings: Displays the screen preferences screen. 2 Changing the Screen Settings P.
Playing an iPod®Audio Menu ■ How to Select a Song from the Music Search List H MENU button (in iPod® mode) Music Search 1. Move w or y to select a search category. Press u. Audio 2. Rotate i to select a file from the Music Search list. Press u.
Playing an iPod®Song By VoiceTM (SBV) Song By VoiceTM (SBV) Use SBV to search for and play music from your HDD or iPod® using voice commands. ■ Settings Song By VoiceTM (SBV) H SETTINGS button System Settings Song by Voice Audio Rotate i to select On or Off. Press u. The following items are available: • On (factory default): Song By Voice commands are available. • Off: Disable the feature.
Playing an iPod®Song By VoiceTM (SBV) ■ Searching for music using Song By VoiceTM (SBV) 1. Set the Song by Voice setting to On. 3. Press the d button and say a command. Example 1: Say “(List) ‘Artist A’“ to view a list of songs by that artist. Select the desired song to start playing. Song By VoiceTM Commands List 2 Song By VoiceTM commands P. 334 NOTE: Song By VoiceTM commands are available for tracks stored on the HDD or iPod®.
Playing an iPod®Song By VoiceTM (SBV) ■ Phonetic Modification 1 Phonetic Modification H SETTINGS button System Settings Song by Voice Phonetic Modification Phonetic Modification is grayed out when Song By Voice is set to Off. Add phonetic modifications of difficult or foreign words so that it is easier for SBV to recognize artists, songs, albums, and composers in voice commands when searching for music on the HDD or iPod®. You can store up to 2,000 phonetic modification items. Audio 1.
Playing an iPod®Song By VoiceTM (SBV) 3. Rotate i to select the item to modify (e.g., Artist). Press u. The list of the selected item appears on the screen. Audio 4. Rotate i to select an entry (e.g., No Name). Press u. The pop-up menu appears on the screen. 5. Rotate i to select Modify. Press u. The listen to the current phonetic modification, rotate i to select Play. Press u. To delete the current phonetic modification, rotate i to select Delete. Press u.
Playing an iPod®Song By VoiceTM (SBV) 6. Enter the phonetic spelling you wish to use (e.g., “Artist A”) when prompted. Audio 196 7. Move r to select OK to exit. The artist “No Name” is phonetically modified to “Artist A.” When in the SBV mode, you can press the d (Talk) button and use the voice command “Play ‘Artist A’” to play songs by the artist “No Name.
Playing Internet Radio Selecting Internet Radio Mode 1. Connect a compatible phone through Bluetooth®. Interface Dial 2. Press the MENU button. (in AUDIO mode) 1 Playing internet Radio To find out if your phone is compatible with this feature, visit www.acura.com/handsfreelink, or call 1-888-528-7876. 3. Rotate i to select Change Source. Press u. 4. Rotate i to select Pandora or Aha. Press u. 2. Select Audio Source. Audio On Demand Multi-Use DisplayTM 3. Select the Pandora or Aha icon.
Playing Internet RadioPandora® Menu Pandora® Menu Interface Dial Rotate i to select an item. Press u. Press MENU button to display the menu items. 1 Pandora® Menu Pandora, the Pandora logo, and the Pandora trade dress are trademarks or registered trademarks of Pandora® Media, Inc., used with permission. Pandora® is currently available exclusively in the United States.
Playing Internet RadioPandora® Menu On Demand Multi-Use DisplayTM 1. Select b or n to change a station. 2. Select x to skip a song. Select song. or to evaluate a Audio Select song. to resume or play a Select More to display the menu item. 2 Adjusting the Sound P. 153 2 Changing the Screen Settings P.
Playing Internet RadioAhaTM Radio Menu AhaTM Radio Menu 1 AhaTM Radio Menu Interface Dial Rotate i to select an item. Press u. Press MENU button to display the menu items. AhaTM by Harman is a cloud-based service that organizes your favorite web content into live radio stations. You can access podcasts, internet radio, location-based services, and audio updates from social media sites. Audio You can control AhaTM Radio using voice commands. 2 Voice Control Operation P.
Playing Internet RadioAhaTM Radio Menu ■ How to Select a Station from the Station List H MENU button (in AhaTM mode) Station List Rotate i to select a station form the Station list. Press u.
Playing a USB Flash Drive ■ Connecting a USB Flash Drive 1 Connecting a USB Flash Drive • Do not connect your USB flash drive using a hub. • Do not use a device such as a card reader or hard disk drive, as the device or your tracks may be damaged. Audio • We recommend backing up your data before using the device in your vehicle. 1. Open the USB cover. 2. Install the USB flash drive to the USB connector. ■ USB Flash Drives Use a recommended USB flash drive of 256 MB or higher.
Playing a USB Flash DriveSelecting USB Mode Selecting USB Mode 1. Connect the USB flash drive to the USB port in the console compartment. Interface Dial 2. Press the MENU button. (in AUDIO mode) 3. Rotate i to select Change Source. Press u. 4. Rotate i to select USB. Press u. 2. Select Audio Source. 3. Select the iPod icon. You can control a USB flash drive using voice commands. 2 Voice Control Operation P. 6 Files in WMA/AAC format protected by digital rights management (DRM) cannot be played.
Playing a USB Flash DriveAudio Screen Control Audio Screen Control Control the audio system through the navigation screen and On Demand Multi-Use DisplayTM. Interface Dial 1. Rotate i or press u to display the song list.. Audio 2. Rotate i, move w or y to select a song from the list. Press u. Press MENU button to display the menu items 2 Audio Menu P. 205 On Demand Multi-Use DisplayTM 1. Select b to skip to the next folder, and n to skip to the beginning of the previous folder. 2.
Playing a USB Flash DriveAudio Menu Audio Menu Interface Dial H MENU button (in USB mode) Rotate i to select an item. Press u. Audio The following items are available: • Sound: Adjusts the settings of the audio speaker’s sound. 2 Adjusting the Sound P. 153 • Scan: Scan Folders: Provides 10-second sampling of the first file in each of the main folders. Scan Tracks: Provides 10-second sampling of all files in the current folder. • Random/Repeat: Repeat Folder: Repeats all files in the current folder.
Playing a USB Flash DriveAudio Menu On Demand Multi-Use DisplayTM 1. Select More. 2. Select a setting item. Audio The following items are available: • Sound: Displays the sound preferences screen. 2 Adjusting the Sound P. 153 • Screen Settings: Displays the screen preferences screen. 2 Changing the Screen Settings P.
Playing a USB Flash DriveAudio Menu ■ How to Select a File from the Music Search List H MENU button (in USB mode) Music Search 1. Move w or y to select a search category. Press u. Audio 2. Rotate i to select a file from the Music Search list. Press u.
Playing Bluetooth® Audio Your audio system allows you to listen to music from your Bluetooth®-compatible phone. This function is available when the phone is paired and connected to the vehicle’s Bluetooth® HandsFreeLink® (HFL) system. 2 Bluetooth® HandsFreeLink® P. 212 Audio Selecting Bluetooth® Audio Mode 1. Make sure that your phone is on, paired, and linked to HFL. 2 Phone Settings P. 232 Interface Dial 2. Press the MENU button. (in AUDIO mode) 3. Rotate i to select Change Source. Press u. 4.
Playing Bluetooth® AudioAudio Screen Control Audio Screen Control Control the audio system through the navigation screen and On Demand Multi-Use DisplayTM. Interface Dial 1. Press MENU button. (in BT mode). 2. Rotate i select an item. Press u. 1 Audio Screen Control To play the audio files, you may need to operate your phone. If so, follow the phone maker’s operating instructions. The pause function and Music Search may not be available on some phones.
Playing Bluetooth® AudioAudio Screen Control On Demand Multi-Use DisplayTM 1. Select b or n to change folders. 2. Select c or x to change files. Select More to display the menu items, then select a setting item. Audio Select n or h to play or pause a song file. The following items are available: • Sound: Displays the sound preferences screen. 2 Adjusting the Sound P. 153 • Screen Settings: Displays the screen preferences screen. 2 Changing the Screen Settings P.
Bluetooth® HandsFreeLink® This section describes how to operate Bluetooth® HandsFreeLink®. You can place and receive phone calls using your vehicle’s audio system without handling your cell phone. Bluetooth® HandsFreeLink® ................212 Using HFL .............................................212 Pairing a Phone .....................................214 Importing Phonebook Data ...................220 Setting Up Speed Dialing ......................221 Phonebook Phonetic Modification.........
Bluetooth® HandsFreeLink® Bluetooth® HandsFreeLink® (HFL) allows you to place and receive phone calls using your vehicle’s navigation system, without handling your cell phone. Using HFL ■ HFL Buttons 1 Bluetooth® HandsFreeLink® To use HFL, you need a Bluetooth®-compatible cell phone. For a list of compatible phones, pairing procedures, and special feature capabilities: Visit www.acura.com/handsfreelink, or call 1-888-528-7876.
Bluetooth® HandsFreeLink®Using HFL ■ HFL Status Display 1 Bluetooth® HandsFreeLink® The navigation screen notifies you when there is an incoming call. Bluetooth® Indicator Comes on when your phone is connected to HFL. Caller’s Name Battery Level Status Roam Status Signal Strength ■ Limitations for Manual Operation Certain manual functions are disabled or inoperable while the vehicle is in motion. You cannot select a grayed-out option until the vehicle is stopped.
Bluetooth® HandsFreeLink®Pairing a Phone Pairing a Phone H PHONE button 1 Pairing a Phone When no Bluetooth®-compatible phone is paired, the following screen appears: 1. Rotate i to select Yes. Press u. 2. Make sure your phone is in search or discoverable mode. Press u. HFL automatically searches for a Bluetooth® device. Bluetooth® HandsFreeLink® 214 Your Bluetooth®-compatible phone must be paired to HFL before you can make and receive hands-free calls.
Bluetooth® HandsFreeLink®Pairing a Phone 4. HFL gives you a pairing code on the navigation screen. Confirm if the pairing code on the screen and your phone match. This may vary by phone. 5. You will receive a notification on the screen if pairing is successful. H SETTINGS button Phone Settings Connect Phone 1. Rotate i to select Add Bluetooth Device. 2. Make sure your phone is in search or discoverable mode. Press u. HFL automatically searches for a Bluetooth® device.
Bluetooth® HandsFreeLink®Pairing a Phone 3. When your phone appears on the list, select it by pressing u. If your phone does not appear, you can select Refresh to search again. Bluetooth® HandsFreeLink® 216 If your phone still does not appear, move r to select Phone not Found? and search for Bluetooth® devices using your phone. From your phone, select HandsFreeLink. 4. HFL gives you a pairing code on the navigation screen. Confirm if the pairing code on the screen and your phone match.
Bluetooth® HandsFreeLink®Pairing a Phone ■ Changing the Pairing Code 1 Changing the Pairing Code H SETTINGS button System Settings Edit Pairing Code Rotate i to select Fixed or Random. Press u. The pairing code may be six or four digits depending on your phone. The default pairing code is 0000 until you change the setting. To create your own, select Fixed, and delete the current code, then enter a new one.
Bluetooth® HandsFreeLink®Pairing a Phone ■ Changing the Currently Paired Phone H SETTINGS button Phone Settings Bluetooth Device List 1. Rotate i to select a paired phone you want to replace. Press u. 2. Rotate i to select Replace This Device. Press u. 3. HFL enters the pairing process and searches a new phone. Bluetooth® HandsFreeLink® 218 Follow the prompts to pair a new phone. 4. You will receive a notification on the screen if pairing is successful.
Bluetooth® HandsFreeLink®Pairing a Phone ■ Deleting a Paired Phone H SETTINGS button Phone Settings Bluetooth Device List 1. Rotate i to select a paired phone you want to replace. Press u. 2. Rotate i to select Delete This Device. Press u. 4. You will receive a notification on the screen if deletion is successful. Bluetooth® HandsFreeLink® 3. You will receive a confirmation message on the screen. Rotate i to select Yes. Press u.
Bluetooth® HandsFreeLink®Importing Phonebook Data Importing Phonebook Data When your phone is paired, the contents of its phonebook and call history are automatically imported to HFL. Bluetooth® HandsFreeLink® 220 1 Importing Phonebook Data When you select a person from the list in the cellular phonebook, you can see up to three category icons. The icons indicate what types of numbers are stored for that name.
Bluetooth® HandsFreeLink®Setting Up Speed Dialing Setting Up Speed Dialing H MENU button (on Phone screen) Speed Dial Up to 20 speed dial numbers can be stored per phone. 1. Rotate i to select New Entry. Press u. When a voice tag is stored, press the d button to call the number using the voice tag. Say ”Call“ and the voice tag name. Bluetooth® HandsFreeLink® 2. Rotate i to select a number entry method. Press u.
Bluetooth® HandsFreeLink®Setting Up Speed Dialing ■ Registering a Voice Tag to a Speed Dial Entry H SETTINGS button Phone Settings Edit Speed Dial Avoid using duplicate voice tags. 1. Select an existing speed dial entry. Avoid using ”home“ as a voice tag. 2. From the pop-up menu, rotate i to select Edit. Press u. It is easier for HFL to recognize a longer name. For example, use ”John Smith“ instead of ”John.“ 3. Rotate i to select Voice Tag. Press u.
Bluetooth® HandsFreeLink®Setting Up Speed Dialing ■ To delete a voice tag 1. Select an existing speed dial entry. 2. From the pop-up menu, rotate i to select Edit. Press u. 3. Rotate i to select Voice Tag. Press u. 4. From the pop-up menu, rotate i to select Clear. Press u. ■ To delete a speed dial 1. Select an existing speed dial entry. 2. From the pop-up menu, rotate i to select Delete. Press u. 3. You will receive a confirmation message on the screen. Rotate to select Yes. Press u.
Bluetooth® HandsFreeLink®Setting Up Speed Dialing ■ Setting Phone Shortcuts 1 Setting Phone Shortcuts You can preset five previously stored speed dial entries, and make a call from one of the preset numbers, or call history when the phone is paired and connected to the vehicle‘s Bluetooth® HandsFreeLink® (HFL) system. 2 Setting Up Speed Dialing P. 221 ■ To preset a speed dial 1. Select Shortcuts. 2. Select Phone. Bluetooth® HandsFreeLink® 3. Select Speed Dial. 4. Select Edit or No Entry.
Bluetooth® HandsFreeLink®Setting Up Speed Dialing 6. Select a number you want to store as a shortcut. 1. Select Shortcuts. 2. Select Phone. 3. Select Speed Dial. 4. Select a preset number. Dialing starts automatically.
Bluetooth® HandsFreeLink®Setting Up Speed Dialing ■ To delete a speed dial 1. Select Shortcuts. 2. Select Phone. 3. Select Speed Dial. 4. Select Edit. 5. Select Delete. 6. Select the preset number with the phone number you want to delete. Bluetooth® HandsFreeLink® 226 ■ To make a call from call history 1. Select Shortcuts. 2. Select Phone. 3. Select Call History. 4. Select a phone number. Dialing starts automatically.
Bluetooth® HandsFreeLink®Phonebook Phonetic Modification Phonebook Phonetic Modification H SETTINGS button System Settings Phonebook Phonetic Modification Add phonetic modifications or a new voice tag to the phone's contact name so that it is easier for HFL to recognize voice commands. 1 Phonebook Phonetic Modification You can store up to 20 phonetic modification items. ■ To add a new voice tag 1. Rotate i to select the phone you want to add phonetic modification to. Press u.
Bluetooth® HandsFreeLink®Phonebook Phonetic Modification 3. Move w or y and rotate i to select a contact name. Press u. The pop-up menu appears on the screen. Bluetooth® HandsFreeLink® 228 4. Rotate i to select Modify. Press u. 5. Using the d button, follow the prompts to complete the voice tag. 6. You will receive a confirmation message on the screen. Rotate i to select OK. Press u. 7. The screen returns to the New Voice Tag screen. Move r and rotate i to select OK. Press u.
Bluetooth® HandsFreeLink®Phonebook Phonetic Modification ■ To modify a voice tag 1. Rotate i to select the phone you want to add phonetic modification to. Press u. 1 Phonebook Phonetic Modification You can only modify or delete contact names for the currently connected phone. 2. Rotate i to select a contact name you want to modify. Press u. The pop-up menu appears on the screen. 4. Using the d button, follow the prompts to complete the voice tag. 5.
Bluetooth® HandsFreeLink®Phonebook Phonetic Modification ■ To delete a modified voice tag 1. Rotate i to select the phone you want to delete phonetic modification. Press u. 2. Rotate i to select a contact name you want to delete. Press u. The pop-up menu appears on the screen. Bluetooth® HandsFreeLink® 3. Rotate i to select Delete, then press u. Items to be deleted are indicated with a trash icon. 4. Move r and rotate i to select OK. Press u.
Bluetooth® HandsFreeLink®Phonebook Phonetic Modification ■ To delete all modified voice tags 1. Rotate i to select the phone you want to delete phonetic modification. Press u. The contact name list appears. 3. You will receive a confirmation message on the screen. Rotate i to select OK. press u. Bluetooth® HandsFreeLink® 2. Move r and rotate i to select Delete All. Press u.
Bluetooth® HandsFreeLink®Phone Settings Phone Settings H SETTINGS button Phone Settings Set HFL options and features. ■ Editing a Security PIN 1 Editing a Security PIN H SETTINGS button Phone Settings Bluetooth Device List You can protect each of the six cell phones with a security PIN. Bluetooth® HandsFreeLink® 1. Rotate i to select the phone you want to add a security PIN to. Press u. 2. Rotate i to select Edit PIN. Press u. 3. Enter a new four-digit number.
Bluetooth® HandsFreeLink®Phone Settings ■ Editing User Name 1 Editing User Name H SETTINGS button Phone Settings Bluetooth Device List You can use the keyboard on the On Demand Multi-Use Display™ to input numbers. Edit the user name of a paired phone as follows: 1. Rotate i to select a phone you want to edit. Press u. 2. Rotate i to select Edit Device Name. Press u. Rotate i or move r to select OK to enter the name. Press u. Move w to delete. Bluetooth® HandsFreeLink® 3.
Bluetooth® HandsFreeLink®Phone Settings ■ Automatic Transferring H SETTINGS button Phone Settings Auto Transfer If you get into the vehicle while you are on the phone, the call can be automatically transferred to HFL. Rotate i to select On. Press u. Bluetooth® HandsFreeLink® ■ Auto Answer H SETTINGS button Phone Settings Auto Answer You can set HFL to automatically answer an incoming call in four seconds. Rotate i to select On. Press u.
Bluetooth® HandsFreeLink®Phone Settings ■ Ring Tone H SETTINGS button Phone Settings Ring Tone You can change the ring tone setting. Rotate i to select your desired setting item. Press u. • Fixed: The fixed ring tone sounds from the speaker. • Mobile Phone: The ring tone stored in the connected cell phone sounds from the speaker. • Off: No ring tones sound from the speaker.
Bluetooth® HandsFreeLink®Phone Settings ■ Automatic Phone Sync setting 1 Automatic Phone Sync setting H SETTINGS button Phone Settings Automatic Phone Sync Rotate i to select On or Off. Press u. Bluetooth® HandsFreeLink® 236 ■ Use Contact Photo H SETTINGS button Phone Settings Use Contact Photo You can display a caller's picture on an incoming call screen. Rotate i to select On. Press u. Select On if you want your call history and phonebook automatically imported to HFL.
Bluetooth® HandsFreeLink®Making a Call Making a Call You can make calls by inputting any phone number, or by using the imported phonebook, call history, speed dial entries, or redial. 1 Making a Call Any voice-tagged speed dial entry, phonebook name, or number can be dialed by voice from most screens. Press the d button and say ”Call“ and the voice tag name, ”Call by name“ and the phonebook name, or ”Call“ and the phone number. The maximum range between your phone and vehicles is 30 feet (10 meters).
Bluetooth® HandsFreeLink®Making a Call ■ Using the Phonebook 1 Using the Phonebook H MENU button (on Phone screen) Phonebook 1. The phonebook is stored alphabetically. Move r to Search. You can use the keyboard on the touch screen for an alphabetical search. Bluetooth® HandsFreeLink® 238 2. Rotate i to select a number. Press u. Dialing starts automatically. This function is disabled while the vehicle is moving.
Bluetooth® HandsFreeLink®Making a Call ■ Entering a Phone Number 1 Entering a Phone Number H MENU button (on Phone screen) Dial 1. Rotate i to select a number. Press u. 2. Rotate i to select h. Press u. This function is disabled while the vehicle is moving. However, you can call a stored voicetagged speed dial number, phonebook name, or number using voice commands. 2 Limitations for Manual Operation P. 213 2 Setting Up Speed Dialing P.
Bluetooth® HandsFreeLink®Making a Call ■ Using Call History 1 Using Call History H MENU button (on Phone screen) Call History Call history is stored by All, Dialed, Received, and Missed. 1. Move w or y to select All, Dialed, Received, and Missed. 2. Rotate i to select a number. Press u. Dialing starts automatically. Bluetooth® HandsFreeLink® Multi-information Displays 1. Press the h button. 2. Move the left selector wheel right to select Call History. 3.
Bluetooth® HandsFreeLink®Making a Call ■ Using Speed Dial 1 Using Speed Dial H MENU button (on Phone screen) Speed Dial Rotate i to select a number. Press u. Dialing starts automatically. Move r to select More Speed Dials to view another paired phone's speed dial list. You can make a call from that list using the currently connected phone. Multi-information Display 1. Press the h button. 2. Move the left selector wheel left to select Speed Dial. 3.
Bluetooth® HandsFreeLink®Receiving a Call Receiving a Call When there is an incoming call, an audible notification sounds (if activated) and the Incoming call screen appears. 1. Press the h button to answer the call. 2. Press the J button to decline or end the call. Bluetooth® HandsFreeLink® 242 1 Receiving a Call Call Waiting Press the h button to put the current call on hold to answer the incoming call. Press the h button again to return to the current call.
Bluetooth® HandsFreeLink®Receiving a Call ■ Options During a Call 1 Options During a Call The available options are shown on the Phone screen. Rotate i to select the option. Press u. Touch Tones: Available on some phones. You can select the icons on the On Demand Multi-Use DisplayTM. The mute icon appears when Mute is selected. Select Mute again to turn it off. • Mute: Mute your voice. • Transfer: Transfer a call from HFL to your phone. • Touch Tones: Send numbers during a call.
Text/E-mail Message Setting a Text Message/E-mail ■ To turn on or off the text/E-mail function H SETTINGS button Phone Settings Enable Text/Email Rotate i to select On or Off. Press u. Bluetooth® HandsFreeLink® ■ To turn on or off the text/E-mail notice H SETTINGS button Phone Settings New Text/Email Alert Rotate i to select On or Off. Press u. The following items are available: • On: A pop-up notification comes on every time you receive a new text message.
Text/E-mail MessageSetting a Text Message/E-mail ■ To set up the auto reading option H SETTINGS button System Settings Message Auto Reading Rotate i to select On, Off or Auto. Press u. • On: A text/E-mail message is always read aloud. • Off: A text/E-mail message is not read aloud. • Auto: A text/E-mail message is read aloud only when driving.
Text/E-mail MessageSelecting a Mail Account Selecting a Mail Account H SETTINGS button Phone Settings Select Account If a paired phone has text message or mail accounts, you can select one of them to be active and receive notifications. Rotate i to Text Messages or an E-mail account you want. Press u. Bluetooth® HandsFreeLink® 246 1 Selecting a Mail Account You can also select a mail account from the folder list screen or the message list screen. Move r to select Select Account, then press u.
Text/E-mail MessageReceiving a Text/E-mail Message Receiving a Text/E-mail Message HFL can display newly received text and E-mail messages as well as 20 of the most recently received messages on a linked cell phone. Each received message can be read aloud and replied to using a fixed common phrase. 1. A pop-up appears and notifies you of a new text or E-mail message. 2. Rotate i to select Read to listen to the message. Press u. 3. To discontinue the message readout. Press u.
Text/E-mail MessageDisplaying Messages Displaying Messages 1 Displaying Messages ■ Displaying text messages The icon appears next to an unread message. H MENU button (on Phone screen) Text/Email 1. Select account if necessary. 2. Rotate i to select a message. Press u. Bluetooth® HandsFreeLink® 248 The text message is displayed. The system automatically starts reading the message aloud. If you delete a message on the phone, the message is also deleted in the system.
Text/E-mail MessageDisplaying Messages ■ Displaying E-mails 1 Displaying E-mails H MENU button (on Phone screen) Text/Email 1. Rotate i to select a folder. Press u. The text message is displayed. The system automatically starts reading the message aloud. Bluetooth® HandsFreeLink® 2. Rotate i to select a message. Press u. Received text and E-mail message may appear in the message list screen at the same time. In this case, text messages are titled No subject.
Text/E-mail MessageDisplaying Messages ■ Read or stop reading a message 1. Go to the text or E-mail message screen. The system automatically starts reading the message aloud. 2 Displaying Messages P. 248 Bluetooth® HandsFreeLink® 2. Press u to stop reading. Press u again to start reading the message from the beginning. ■ Reply reading a message 1. Go to the text or E-mail message screen. The system automatically starts reading the message aloud. 2 Displaying Messages P. 248 2.
Text/E-mail MessageDisplaying Messages 3. Rotate i to select the reply message. Press u. The pop-up menu appears on the screen. 4. Select Send to send the message. Message Sent appears on the screen when the reply message was successfully sent. 1 Reply to a message The available fixed reply messages are as follows: • Talk to you later, I’m driving. • I’m on my way. • I’m running late. • OK • Yes • No 1. Go to the text message screen. The system automatically starts reading the message aloud.
Text/E-mail MessageRoadside Assistance* Roadside Assistance* H MENU button (on Phone screen) Roadside Assistance Provides a nationwide service for unexpected incidents. You can call for assistance using a phone paired and connected to Bluetooth® HandsFreeLink®. Rotate i to select a phone number. Press u. Dialing starts automatically.
Text/E-mail MessageHFL Menus HFL Menus 1 HFL Menus The power mode must be in ACCESSORY or ON to use HFL. To use HFL, you must first pair your Bluetooth®compatible cell phone to the system while the vehicle is parked. ■ Phone Settings screen 1. Press the SETTINGS button. 2. Rotate i to select Phone Settings, then press u. Some functions are limited while driving. A message appears on the screen when the vehicle is moving and the operation is canceled.
Text/E-mail MessageHFL Menus Delete All Delete all the previously stored speed dial numbers. Manual Input Edit Speed Dial New Entry Import from Call History Import from Phonebook Edit Bluetooth® HandsFreeLink® (Existing entry list) Delete Auto Transfer Auto Answer Ring Tone Enter a phone number to store as a speed dial number. Select a phone number from the call history to store as a speed dial number. Select a phone number from the phonebook to store as a speed dial number.
Text/E-mail MessageHFL Menus ■ Phone screen 1. Press the PHONE button. 2. Press the MENU button to display the menu items. Enter a phone number to dial. Phonebook*1 Display the paired phone’s phonebook. Manual Input Enter a phone number to store as a speed dial number. New Entry Import from Call History Import from Phonebook Speed Dial*1 Select a phone number from the call history to store as a speed dial number. Select a phone number from the phonebook to store as a speed dial number.
Text/E-mail MessageHFL Menus Redial the last number dialed in the phone’s history. Redial*1 All *1 Call History Dialed Received Missed Bluetooth® HandsFreeLink® Roadside Assistance*1,2 Display the last 20 outgoing, incoming and missed calls. Display the last 20 outgoing calls. Display the last 20 incoming calls. Display the last 20 missed calls. Makes a call to the number for the Roadside Assistance service. (Read/Stop) Select a message and press . Previous Message is read aloud.
AcuraLink® This section describes how Acura directly communicates important information to you regarding your vehicle. AcuraLink®............................................ 258 In Case of Emergency........................... 258 Security Features .................................. 260 Operator Assistance ............................. 261 AcuraLink® Message ........................... 262 AcuraLink® Subscription Status............
AcuraLink® Is a subscription-based service that provides convenient features such as voice communication in case of emergency, online security, one-on-one operator assistance, and the transmission of important messages regarding your vehicle’s status. For information on traffic rerouting and traffic information updates, provided by the AcuraLink® server. In Case of Emergency AcuraLink® On Demand Multi-Use DisplayTM AcuraLink® also provides services you can operate from the Internet or your smartphone.
AcuraLink®In Case of Emergency ■ Manual operator connection ASSIST Button 1 Manual operator connection If you need to talk to the AcuraLink® operator in an emergency situation, you can manually connect to them by pressing the ASSIST button with the power mode in ACCESSORY or ON. 1. Open the cover attached to the ceiling console. Do not press the button while driving. When you need to contact the operator, park the vehicle in a safe place.
AcuraLink®Security Features Security Features Your subscribed telematics service provider can track your vehicle’s location, remotely lock or unlock doors, and help you find your vehicle. To use these features, you need your user ID and personal identification number (PIN). ■ Stolen vehicle tracking This feature searches and tracks down your vehicle position even if it is on the move. If you believe that your vehicle has been stolen, contact the police as well as the provider.
AcuraLink®Operator Assistance Operator Assistance Connect to the AcuraLink® operator when trying to find a destination or for roadside assistance. 1. Press the LINK button. 1 Operator Assistance Remain attentive to road conditions and driving during operator assistance. Connection to the operator begins. LINK Button 2. Talk to the operator. AcuraLink® To disconnect, rotate i to select Hang Up, select End Call on the On Demand Multi-Use DisplayTM, or press the Hang-up button.
AcuraLink®AcuraLink® Message AcuraLink® Message Message Icon AcuraLink® sends you messages on vehicle features, safety and emissions recall campaigns, maintenance reminders, and diagnostic information. When you receive a new message, an icon appears on the upper right corner of the navigation screen. ■ Message category AcuraLink® 262 There are six message categories. • Feature Guide: Messages about your vehicle and its features are sent daily for the first 90 days.
AcuraLink®AcuraLink® Message ■ Reading a message 1 Reading a message ■ Message Options If there is no message listed on the menu, AcuraLink/Messages is grayed out and cannot be selected. The message icon disappears once you read the message. However, the exclamation mark that indicates that the message has a high priority remains. • : A read message with high priority. AcuraLink® 1. Press the INFO button, rotate i to select AcuraLink/Messages, then press u.
AcuraLink®AcuraLink® Message • • • • Find Acura Dlr.: Searches for the nearest Acura dealer. Delete: Deletes the displayed message. Call Your Dealer: Calls your Acura dealer using HFL. Schedule Dealer Appointment: Automatically sets an appointment date at your dealer. • Phone number: Dials a number displayed in the message via HFL. • Diagnostic Info: Updates the current diagnostic message by connecting to the Acura server using HFL.
AcuraLink®AcuraLink® Subscription Status AcuraLink® Subscription Status H SETTINGS button (in FM mode) Info Settings AcuraLink Subscription Status Signal strength Information You can check the signal strength. Current Contract The AcuraLink® subscription number and subscription level is displayed. Service AcuraLink® Item Confirm your AcuraLink® subscription status. You can confirm the type of service. Subscription You can confirm the expiration date.
266
Rear Entertainment System Rear seat passengers can enjoy a completely separate entertainment source than front passengers, including movies, games, and other audio choices. Rear Entertainment System ..................268 Auxiliary Console Panel .........................268 HDMI® Input Jack (Ultrawide RES only).269 Playable Discs........................................270 Rear Control Panel Operation...............271 Selecting the Audio Source ...................271 Rear DVD Menu ..........................
Rear Entertainment System The Rear Entertainment System (RES) is operable from both the front control panel and the rear control panel. 2 Front Control Panel Operation P. 282 2 Rear Control Panel Operation P. 271 Auxiliary Console Panel Auxiliary input jacks and headphone connectors for the rear entertainment system are on the back of the center console compartment.
Rear Entertainment SystemHDMI® Input Jack (Ultrawide RES only) HDMI® Input Jack (Ultrawide RES only) There is an HDMI® input jack on the back of the center console compartment. The system will accept HDMI® input from video games and video equipment which are equipped with an HDMI® jack. Open the outlet cover and insert the cable.
Rear Entertainment SystemPlayable Discs Playable Discs The discs that come with these labels can be played in your vehicle’s rear entertainment system. Also look for the region code of 1 or ALL on the package or jacket on the disc. DVD-ROMs are not playable in this unit. The disc packages or jackets should have one of these marks. Also includes: Rear Entertainment System 270 1 Playable Discs This product incorporates copyright protection technology that is protected by U.S.
Rear Control Panel Operation Selecting the Audio Source 1 Rear Control Panel Operation ■ RES 1. Press the Rear Power button on the front control panel. In the procedures of this section, “select” means the following actions: 2. Press the audio source button on the rear control panel. RES You can also change the audio source by the front control panel. 2 Selecting the Audio Source using front control panel P. 282 Press the cursor buttons on the rear control panel. 3.
Rear Control Panel OperationRear DVD Menu Rear DVD Menu H MENU button (in the DVD mode) Select an item. Press the ENTER button. The following items are available: • Top Menu: Displays the top menu of the DVD. • Menu: Displays the menu of the DVD. Rear Entertainment System • Play Mode: Displays while a DVD is playing and changes the DVD’s audio, subtitle, or angle settings. 2 Setting the Play Mode P. 273 • Initial Settings: Displays while a DVD is not playing and changes the DVD preferences.
Rear Control Panel OperationRear DVD Menu ■ Setting the Play Mode H MENU button (in the DVD mode) Play Mode 1. Select an item. Press the ENTER button. 2. Select an option. Press the ENTER button. The following items are available: • Audio: Selects the language of the DVD audio. • Angle: Selects the angle of a scene shot with multiple cameras. Rear Entertainment System • Subtitle: Selects the language of the DVD subtitle.
Rear Control Panel OperationRear DVD Menu ■ Searching a Title/Chapter H MENU button (in the DVD mode) Search/NumInput 1. Select an item. Press the ENTER button. 2. Select a number. Press the ENTER button. The following items are available: • Title: Skips to a title you specify. Rear Entertainment System 274 • Chapter: Skips to a chapter you specify. • NumInput: Enters a number of a title or chapter to skip. RES Enter a number and select ENT. Press the ENTER button.
Rear Control Panel OperationScreen and Surround Settings Screen and Surround Settings H SETUP button (in the DVD mode) Select an item. Press the ENTER button. The following items are available: • Brightness (Ultrawide RES only): Adjusts the screen’s brightness. Adjust the brightness using the Interface Dial and press the ENTER button. • Appearance (Ultrawide RES only): Selects the color of the rear menu screen. • Aspect Ratio: Selects an aspect ratio of the image 2 Setting the RES Aspect Ratio P.
Rear Control Panel OperationScreen and Surround Settings ■ Adjusting the Screen H SETUP button (in the DVD mode) Display Adjust 1. Select an item. Press the ENTER button. 2. Make the adjustment. Press the ENTER button. The following items are available: • Brightness (RES only): Adjusts the screen’s brightness. Rear Entertainment System 276 • Contrast: Adjusts the screen’s contrast. • Black Level: Adjusts the screen’s black level. • Color: Adjusts the screen’s color strength.
Rear Control Panel OperationScreen and Surround Settings ■ Setting the RES Aspect Ratio H MENU button (in the DVD mode) Aspect Ratio Select an option. Press the ENTER button. ■ Setting the Ultrawide RES Aspect Ratio 1. Select an item. Press the ENTER button. 2. Select an item. Press the ENTER button. Rear Entertainment System H MENU button (in the DVD mode) Aspect Ratio The following items are available: • Wide: Selects the wide screen option (Normal, Full, Super Full, Ultra Full).
Rear Control Panel OperationDVD Initial Settings (RES only) DVD Initial Settings (RES only) H MENU button (in the DVD mode) Initial Settings Set the DVD default settings so that you do not have to select the settings each time you play a DVD. 1. Select an item. Press the ENTER button. 2. Select an option. Press the ENTER button. The following items are available: Rear Entertainment System 278 • Language Settings: Selects a menu language of the DVD (top) menu. 2 Selecting the DVD Menu Language P.
Rear Control Panel OperationDual Screen Mode (Ultrawide RES only) ■ Selecting the DVD Menu Language H MENU button (in the DVD mode) Initial Settings Language Settings 1. Select an item. Press the ENTER button. 1 Selecting the DVD Menu Language When you select Other, enter a 4-digit language code. 2 List of Language Codes P. 343 2. Select a language. Press the ENTER button. Dual Screen Mode (Ultrawide RES only) ■ Single Mode The selected source is displayed in the center of the screen.
Rear Control Panel OperationDual Screen Mode (Ultrawide RES only) ■ Single mode to Dual mode DVD Press the DUAL button. Select the side (e.g., “Left”). Select a source (e.g., “AUXVIDEO”). DVD AUX-VIDEO DVD Rear Entertainment System Press the SWAP button. ■ Dual mode to Single mode AUX-VIDEO DVD DVD Press the SINGLE button. 280 AUX-VIDEO Select a source (e.g., “DVD”).
Rear Control Panel OperationReplacing the Batteries Replacing the Batteries 1. Remove the rear control panel. Cover 2 Overhead Screen and Rear Control Panel P. 15 2. Open the cover. 1 Replacing the Batteries An improperly disposed of battery can hurt the environment. Always confirm local regulations for battery disposal. 3. Change the batteries.
Front Control Panel Operation Operate the Rear Entertainment System (RES) from the front control panel. Selecting the Audio Source using front control panel 1. Press the Rear 9 (Power) button on the front control panel. 2. Press the REAR AUDIO button. The rear source is displayed on the front audio screen and the On Demand Multi-Use Display™. The rear source is heard from the front speakers. Rear Entertainment System 282 3. Select Rear Audio Source on the On Demand Multi-Use Display™. 4.
Front Control Panel OperationRear System Setup Rear System Setup H SETTINGS button Rear Ent Settings 1. Rotate i to select an item. Press u. 2. Rotate i to select an option. Press u. The following items are available: • Source Select Popup: Selects whether the list of selectable audio sources comes on when the AUDIO button is pressed. • Rear Speaker: Sets the front audio source to play through the rear speakers, even when the RES is on.
Front Control Panel OperationSetting the DVD Menu Setting the DVD Menu Interface Dial H MENU button (in DVD mode) 1. Rotate i to select an item. Press u. Select Other Function to display additional menu entries. 2. Rotate i to select an option. Press u. Rear Entertainment System 284 The following items are available: • Top Menu: Displays the top menu of the DVD. • Menu: Displays the menu of the DVD. • Repeat: Repeat Title: Repeats the current title. Repeat Chapter: Repeats the current chapter.
Front Control Panel OperationSetting the DVD Menu • • • • • • • Play/Pause: Pauses or resume the playback. Stop: Stops the playback. Audio/Subtitle: Selects the language of the DVD audio and the DVD subtitle. Angle: Selects the angle of a scene shot with multiple cameras. Back: Hides the DVD menu. Number Input: Enters a number of a title or chapter to skip. Search: Skips to a title or chapter by Interface Dial. On Demand Multi-Use Display™ 1. Select More. 2. Select a setting item.
Wireless Headphones Using the Wireless Headphones Audio for the Rear Entertainment System is sent to the wireless headphones that come with the system. 1. Pivot the earpieces outward. 1 Using the Wireless Headphones When you remove the headphones, the earpieces automatically pivot inward, and the headphones turn off. When not in use, store the headphones in the back pocket of either front seat. Some state and local government agencies prohibit the use of headphones by the driver of a motor vehicle.
Wireless HeadphonesChanging the Sound Source (Ultrawide RES only) Changing the Sound Source (Ultrawide RES only) 1 Changing the Sound Source (Ultrawide RES only) ■ Wireless Headphone In dual screen mode, you can switch the sound source of the wireless headphones between the left and right side screens. Slide the tab to ”L” for the left side, or “R” for the right side. You can switch the sound source from the setup menu if you connected a set of wired headphones. 1.
Wireless HeadphonesReplacing the Batteries Replacing the Batteries 1. Insert a coin in the slot and twist it slightly to pry the cover away from the earpiece. 2. Pull the cover outward, and pivot it out of the way. 3. Remove the battery. 4. Install the new battery in the earpiece as shown in the diagram next to the battery slot. Rear Entertainment System 288 Battery Type: AAA battery 5. Slide the cover back into place on the earpiece, then press down on the back edge to lock it in place.
Other Features This section describes the useful functions incorporated into the navigation system to help make your journey easier and more enjoyable. Trip Computer ....................................... 290 Calendar ................................................ 291 Information Functions .......................... 292 System Device Information ................... 292 Map Data Update ................................ 292 Info Screen Preference ......................... 293 Multi-view Rear Camera........
Trip Computer H INFO button Trip Computer 1 Trip Computer View the distance traveled and average fuel consumption. Move w or y to select the trip information. Displays the following trip information: • Instant Fuel: The current estimated instant fuel economy. • Average Fuel: The average fuel economy since the last key cycle. • 1st, 2nd, 3rd Prev.: The previous average fuel consumption. • RANGE: The estimated distance you can travel on the fuel remaining in the tank. These values are estimates only.
Calendar H INFO button Calendar View the calendar screen. Move w or y to select the months of the year.
Information Functions System Device Information H SETTINGS button Navi Settings Map System Device Information View database, software, device, and vehicle identification information. Map Data Update H SETTINGS button Navi Settings Map Map Data Update Check the map data update status when updating the map database. Other Features 292 1 System Device Information You will need this information when ordering a map update. 2 Obtaining a Navigation Update P.
Information FunctionsInfo Screen Preference Info Screen Preference H SETTINGS button Info Settings Other Info Screen Preference Select the top menu when the INFO button is pressed. Rotate i to select your desired setting item. Press u. The following options are available: • Info Top: A brief menu pops up. • Info Menu (factory default): A full menu pops up. • Off: A menu does not pop up.
Multi-view Rear Camera About Your Multi-View Rear Camera The navigation screen can display your vehicle’s rear view. The display automatically changes to the rear view when the shift lever is moved to Reverse. ■ Multi-View Rear Camera Display Area Wide View Mode Guidelines Bumper Normal View Mode Approx. 20 inches (50 cm) Top Down View Mode Approx. 79 inches (2 m) Other Features Approx. 118 inches (3 m) You can view three different camera angles on the rearview display.
Multi-view Rear CameraAbout Your Multi-View Rear Camera ■ Multi-View Rear Camera Settings H SETTING button Camera Settings Rotate i to select an item. Press u. The following items are available: • Fixed Guideline: On (factory default): Guidelines appear when you shift into Reverse. Off: Guidelines do not appear when the dynamic guideline is off. Other Features • Dynamic Guideline: On (factory default): Guidelines move according to the steering wheel direction. Off: Guidelines do not move.
296
Troubleshooting Troubleshooting ................................... 298 Map, Voice, Entering Destinations ........ 298 Traffic .................................................. 300 Guidance, Routing ............................... 301 Update, Coverage, Map Errors ............. 303 Display, Accessories.............................. 303 Miscellaneous Questions ...................... 303 Error Messages...................................... 304 Navigation System................................ 304 CD Player .
Troubleshooting Map, Voice, Entering Destinations Problem Solution The Startup Confirmation screen is displayed every time I start the car. This is normal. The Startup Confirmation screen reminds you and your guest drivers to always operate the navigation system in a safe manner. The Startup Confirmation screen goes off after a certain period of time and the top screen of the last mode is displayed. The navigation system reboots by itself (returns to the opening screen).
TroubleshootingMap, Voice, Entering Destinations Problem Solution I cannot select an option using the Interface Dial. To reduce potential driver distraction, certain onscreen functions and features are limited or inoperable while the vehicle is moving. Use voice commands or pull over to proceed. The navigation system pronunciation of street names in the guidance command or destination address sounds strange.
TroubleshootingTraffic Traffic Problem Troubleshooting 300 Solution AcuraLink Real-Time Traffic™ information could not be received or is not displayed properly. • Check that the traffic status indicator is available on the map screen. 2 Map Screen Legend P. 9 • Check that the traffic icons are turned on. 2 Showing Icons on Map P. 72 • AcuraLink® automatically updates traffic information every five minutes. If the information remains the same, press the LINK button, and connect to the operator.
TroubleshootingGuidance, Routing Guidance, Routing Problem The navigation system does not route me the same way I would go or the same way as other mapping systems. Solution The navigation system attempts to generate the optimal route. You can change the route preferences used when calculating a route. 2 Route Preference P. 55 The navigation system wants to route me around Press the SETTINGS button. Select Navi Settings > Routing, and set Traffic potential traffic problems.
TroubleshootingGuidance, Routing Problem Solution The screen is showing white dots as I drive along. These dots are called “breadcrumbs.” These are displayed if Display Tracking is set to On. 2 Display Tracking P. 84 How do I remove the white dots (“breadcrumbs”) from my screen? Press the SETTINGS button. Select Navi Settings > Map, set Display Tracking to Off or select Delete Tracking to remove the white dots from the map. 2 Display Tracking P.
TroubleshootingUpdate, Coverage, Map Errors Update, Coverage, Map Errors Problem Solution My city is not part of a fully verified detailed coverage area. The mapping database is constantly undergoing revision. You can access the most recent information on the internet. 2 Map Coverage P. 319 Does the navigation system work outside North America? The navigation system contains maps for the 50 U.S. states, Canada, Puerto Rico, and Mexico. The navigation system will not work in other countries.
Error Messages Navigation System Error Message Solution The display temperature is too high. For protection, the system will shut off until the display cools down. This message appears briefly when the display temperature is too high. The navigation system turns off until the display cools down. The system turns back on automatically when the display cools down. System temp is low. System will shut down until it warms up.
Error MessagesCD Player CD Player If a disc error occurs, you may see the following error messages. Cause Error Message Unplayable File Bad Disc Please Check Owner’s Manual Push Eject Track/file format not supported Mechanical error Mecha Error Bad Disc Please Check Owner’s Manual Servo error Check Disc • Current track/file will be skipped. The next supported track/file plays automatically. • Press the (eject) button and remove the disc, and check that the error message is cleared.
Error MessagesHard Disc Drive (HDD) Audio Hard Disc Drive (HDD) Audio If an error occurs while playing the Hard Disc Drive (HDD) Audio, you may see the following error messages. If you cannot clear the error message, contact a dealer. Error Message HDD access error. Please consult your dealer. Troubleshooting 306 Solution — The display system temperature is too high. For protection, the system will shut off until the display cools down.
Error MessagesiPod®/USB Flash Drive iPod®/USB Flash Drive If an error occurs while playing an iPod® or USB flash drive, you may see the following error messages. If you cannot clear the error message, contact a dealer. Solution Error Message USB Error Appears when there is a problem with the audio system. Check if the device is compatible with the audio system. Incompatible USB Device Please Check Owner’s Manual Appears when an incompatible device is connected. Disconnect the device.
Error MessagesPandora® Pandora® If an error occurs while playing Pandora®, you may see the following error messages. If you cannot clear the error message, contact a dealer. Error Message Troubleshooting 308 Cause Solution Incompatible USB Device Please Check Owner’s Manual Appears when an incompatible device is connected. Disconnect the device. Then turn the audio system off, and turn it again. Do not reconnect the device that caused the error.
Error MessagesPandora® Cause Error Message Cannot connect to PANDORA. When stopped, check your mobile device. When not driving, please see mobile device. Solution • Turn the phone screen on, and make sure it is unlocked. The display on your smartphone is turned • The Pandora® version is not supported. off. Update to the latest version. Your smartphone is locked. The home screen or the app screen (music screen) is not displayed on your smartphone.
Error MessagesPandora® Error Message Unable to play PANDORA. Please try again later. Appears when you try to play PANDORA. Solution Try again later. Unable to play PANDORA. Music licensing restricts play in this area. Try again later. Unable to play PANDORA. When stopped, log-in to PANDORA. Log in to the PANDORA sever. This PANDORA station is currently not available. Please select another station. Troubleshooting 310 Cause Appears when the station you selected is not currently available.
Error MessagesAhaTM Radio AhaTM Radio If an error occurs while playing AhaTM Radio, you may see the following error messages. If you cannot clear the error message, contact a dealer. Error Message Solution Cannot connect to AcuraLink. When stopped, check your mobile device. Appears when the AhaTM app is not activated. Check your device. Incompatible USB Device Please Check Owner’s Manual Appears when an incompatible device is connected. Disconnect the device.
312
Reference Information System Initialization ..............................314 Entering the Security Code....................314 Acquiring GPS Information....................314 Startup Confirmation Screen .................315 Map Matching ......................................315 System Limitations ................................316 GPS System...........................................316 Address Calculation ..............................316 Database ..............................................
System Initialization The navigation system must be initialized if power to the navigation system is interrupted for any reason (e.g., the battery was disconnected). 1. Set the power mode to ON, and turn on the audio system. Acquiring GPS Information 2. Press and hold the 9 (Power) button for more than two seconds. Entering the Security Code The system is reactivated when the system’s control unit recognizes that the system is in your vehicle.
System InitializationStartup Confirmation Screen Startup Confirmation Screen The Startup Confirmation screen is displayed when initialization has successfully completed. It is displayed every time you start your vehicle. Press u to select OK to continue. If you are experiencing GPS reception problems: 2 GPS System P. 316 Map Matching Map matching is the process of using the acquired GPS information to locate your position on the map screen.
System Limitations GPS System The signals received from the GPS satellites are extremely weak (less than a millionth of the strength of a local FM station) and require an unobstructed view of the sky. The GPS antenna is located in the dashboard.
System LimitationsDatabase In addition, the map database contains verified and unverified areas. Unverified streets may be missing from the map, in the wrong location, or have an incorrect name or address range. A message will warn you if your route includes unverified streets. Exercise additional caution when driving in unverified areas.
Client Assistance Resolving Problems Reporting Errors If you run into a specific issue that you cannot resolve, consult the following help resources: You can help to improve database accuracy by reporting any errors you encounter. • For navigation system issues: 2 Troubleshooting P. 298 There are also FAQs available online at www.acuranavi.com. • Report errors in freeways and main “verified” roads shown in black on the map at http://mapreporter.navteq.com/ dur-web-external/. American Honda Motor Co.
Client AssistanceMap Coverage Map Coverage The navigation system provides map coverage for the United States, Canada, Puerto Rico, and Mexico. The map coverage consists of accurately mapped (verified) metropolitan areas and a less accurate (unverified) rural database. Note that unverified areas are constantly being reviewed and converted to verified areas each year. Map coverage update information is available from Acura Client Relations or online at www.acuranavi.com.
Client AssistanceTraffic Information Traffic Information Continuously updated traffic information is available in major metropolitan areas across the 48 contiguous states and some cities in Canada. A list of coverage areas is available online. To find traffic information: 1. Visit www.acura.com/realtimetraffic. 2. Select Real-Time Traffic on the MDX. 3. Click AcuraLink Real-Time Traffic.
Legal Information Copyrights User Agreements • Infogroup-Data: Certain business data provided by Infogroup © 2011, All RIghts Reserved. ■ Navigation System User Agreement • EXIT-Data: © ZENRIN CO., LTD. 2011. All rights reserved. • Building foot print: © ZENRIN CO., LTD. 2011. All rights reserved. • Junction View Data: © ZENRIN USA, INC. 2011. All rights reserved.
Legal InformationUser Agreements • The terms and conditions hereof apply to all subsequent users and owners as well as to the original purchaser. • The logos of oil companies, hotels, convenience stores, and other businesses are displayed for your information and convenience, and in no way imply any sponsorship, approval or endorsement of these companies, or their products. The logos are trademarks of their respective owners.
Legal InformationUser Agreements EFFORT (INCLUDING LACK OF NEGLIGENCE) IS WITH YOU. ALSO, THERE IS NO WARRANTY AGAINST INTERFERENCE WITH YOUR ENJOYMENT OF THE SOFTWARE OR AGAINST INFRINGEMENT. IF YOU HAVE RECEIVED ANY WARRANTIES REGARDING THE DEVICE OR SOFTWARE THOSE WARRANTIES DO NOT ORIGINATE FROM, AND ARE NOT BINDING ON, MS.
Legal InformationUser Agreements • UPGRADES If the SOFTWARE is provided by ALPINE separate from the DEVICE on separate media or via web download or other means, and is labeled “For Upgrade Purposes Only” you may install one (1) copy of such SOFTWARE onto the DEVICE as a replacement copy for the existing SOFTWARE, and use it in accordance with this EULA, including any additional EULA terms accompanying the upgrade SOFTWARE.
Legal InformationUser Agreements issued by U.S. and other governments. For additional information on exporting the SOFTWARE, see http:// www.microsoft.com/exporting/. ■ Gracenote Music Recognition Service (CDDB) available at www.honda.com (in U.S.) or www.honda.ca (in Canada). Music recognition technology and related data are provided by Gracenote®. Gracenote is the industry standard in music recognition technology and related content delivery.
Legal InformationUser Agreements (collectively, “Gracenote Servers”) and to perform other functions. You may use Gracenote Data only by means of the intended End-User functions or this application or device. You agree that you will use Gracenote Data, the Gracenote Software, and Gracenote Servers for your own personal non-commercial use only. You agree not to assign, copy, transfer, or transmit the Gracenote Software or any Gracenote Data to any third party.
Legal InformationAs required by the FCC As required by the FCC 1. This device complies with Part 15 of the FCC Rules and Canadian RSS-210/ RSSGen. Operation is subject to the following two conditions: (1) this device may not cause harmful interference, and (2) this device must accept any interference received, including interference that may cause undesired operation. 3.
328
Voice Commands Voice Commands .................................. 330 Navigation Commands......................... 330 Voice Portal Commands ....................... 332 Phone Commands................................ 332 Info Commands ................................... 333 Climate Control Commands................. 333 Audio Commands ................................ 334 On-Screen Commands ......................... 338 Spelling Assistance ...............................
Voice Commands Navigation Commands The system accepts these commands on a map/guidance screen. ■ General Commands Voice Commands 330 Display phone (equivalent to PHONE) Display audio (equivalent to AUDIO) Display navigation (if en route, displays the Route screen) Display information (equivalent to INFO) Display menu (equivalent to MENU.
Voice CommandsNavigation Commands ■ Find Place Commands German restaurant Greek restaurant Indian restaurant Italian restaurant Japanese restaurant Korean restaurant Mexican restaurant Pizza Seafood restaurant Thai restaurant Vegetarian restaurant Vietnamese restaurant Other restaurant Shopping Shopping area Accessory store Book store Clothing store Grocery store Home improvement store Mall Office supply store Pharmacy Pet food store Sewing store Shoe store Sporting goods store Toy store Voice Command
Voice CommandsVoice Portal Commands Travel center Airport Automobile club Bus station Camping Commuter rail station Ferry terminal Named place Park & ride Parking garage Parking lot Rental car agency Rest area Ski area Tourist information Train station Travel agency Truck stop Voice Commands 332 ■ Route Commands Voice Portal Commands The system accepts these commands when a route is set.
Voice CommandsInfo Commands Info Commands The system accepts these commands on any screen.
Voice CommandsAudio Commands • Passenger ventilated seat low*2 ■ HDD commands *1: These commands toggle the function on and off, so the command may not match your intended action. *2: Not available on all models • • • • • • • • • • • • • • • • • • • • Audio Commands The system accepts these commands on most screens. ■ Using Song By VoiceTM TM Voice Commands 334 Song By Voice is a feature that allows you to select music from your Hard Disc Drive or iPod® device using your voice.
Voice CommandsAudio Commands • • • • XM preset # (#: 1 to 12) XM scan*1 XM category mode XM channel mode *1: These commands toggle the function on and off, so the command may not match your intended action. NOTE: Radio volume levels cannot be controlled using voice control.
Voice CommandsAudio Commands ■ Bluetooth® Audio commands ■ Pandora® commands ■ Internet service commands • • • • • • • The system accepts these commands while the Pandora® is playing.
Voice CommandsAudio Commands Rear radio preset # (#: 1 to 12) Rear radio FM preset # (#: 1 to 12) Rear radio AM preset # (#: 1 to 6) Rear radio scan* Rear radio select XM Rear XM channel # (#: 0 to 255) Rear XM channel up Rear XM channel down Rear XM category up Rear XM category down Rear XM preset # (#: 1 to 12) Rear XM scan* Rear XM category mode Rear XM channel mode * These commands toggle the function between on and off, so the command may not match your intended action.
Voice CommandsOn-Screen Commands ■ Rear HDD Commands Rear HDD play Rear HDD skip forward Rear HDD skip back Rear HDD album up Rear HDD album down Rear HDD track up Rear HDD track down Rear HDD playlist up Rear HDD playlist down Rear HDD track random* Rear HDD track repeat* Rear HDD track scan* Rear HDD normal play (resumes “Play” from the random-, repeat-, or scan-play) Voice Commands 338 * These commands toggle the function between on and off, so the command may not match your intended action.
Voice CommandsSpelling Assistance ■ Numbers ■ Letters Say … Say … or Number … Say … Say … Or say… One A Apple/Alpha 2 Two B Boy/Bravo 3 Three C Charlie 4 Four D Dog/Delta 5 Five E Edward/Echo 6 Six F Frank/Foxtrot 7 Seven G George/Golf 8 Eight H Henry/Hotel 9 Nine I Igloo/India 0 Zero J John/Juliet K King/Kilo L Larry/Lima M Mary/Mike Nancy/November O Oscar P Paul/Papa Q Queen/Quebec R Robert/Romeo S Sam/Sierra T Tom/Tango U Uncle/Uniform
Voice CommandsSpelling Assistance ■ Accented Letters Say … Voice Commands 340 Say … Say … or Symbol … Ô O circumflex Ö O umlaut Ù U grave Ú U acute Û U circumflex Ü U umlaut ■ Symbols Say … or Symbol … Say … Say … or Symbol … Á A acute ? Question mark À A grave ! Exclamation point  A circumflex $ Dollar Ä A umlaut # Pound Ç C cedilla * Asterisk È E grave + Plus É E acute - Hyphen Ê E circumflex : Colon Ë E umlaut ; Semicolon Í I acute / Slash
Voice CommandsSpelling Assistance Say … Say … or Symbol … Dot “ Double quote , Comma ‘ Apostrophe ¡ Inverted exclamation point ¿ Inverted question mark « Left-pointing double angle quotation mark » Right-pointing double angle quotation mark % Percent _ Underscore < Less than > Greater than { Open brace } Close brace ^ Caret ` Back quote Voice Commands .
List of Categories Fuel/Auto All Types Acura Dealers Honda Dealers Gas Station Hydrogen Station Auto Parts & Electronics List of Categories 342 Auto Repair & Maintenance Car Wash & Detailing Motorcycle Dealers Other Car Dealers Roadside Assistance Lodging All Types Bed & Breakfast Hotel/Motel Resort Shopping All Types Mall/Department Store Accessories/Jewelry Office Supplies/Electronics Auto Parts & Electronics Pharmacy/Drug Store Recreation All Types Museum Books/Music/Video Pet Food/Supplies Park/
List of Language Codes Language Language Input Code Language Input Code Input Code Corsican 0315 Hungarian 0821 0102 0101 Croatian 0818 Icelandic 0919 Afrikaans 0106 Czech 0319 Indonesian 0914 Albanian 1917 Danish 0401 Interlingue 0905 Amharic 0113 Dutch 1412 International 0901 Arabic 0118 English 0514 Inupiaq 0911 Armenian 0825 Esperanto 0515 Irish 0701 Assamese 0119 Estonian 0520 Italian 0920 Aymara 0125 Faroese 0615 Japanese 1001 Azerbaijani 0126
List of Language Codes Language List of Language Codes 344 Language Input Code Malagasy 1307 Sand Input Code 1907 Language Input Code Telugu 2005 Malay 1319 Sanskrit 1901 Thai 2008 Malayalam 1312 Scottish Gaelic 0704 Tibetan 0215 Maltese 1320 Serbian 1918 Tigris 2009 Maori 1309 Serbo-Croatian 1908 Tonga 2015 Marathi 1318 Seth-Thu 1920 Turki 2011 Moldavian 1315 Setswana 2014 Turkish 2018 Mongolian 1314 Shona 1914 Twi 2023 Nauruan 1401 Sindhi 1904
Index Symbols a (Display Mode) Button ..................... 75 J (Hang-Up/Back) Button ............... 6, 24 d (Talk) Button..................................... 6, 24 Numerics 3D Angle Adjustment ................................ 78 A B Black Level.................................................. 27 Bluetooth® Audio Playing.................................................... 208 Voice Commands List ............................. 336 Bluetooth® HandsFreeLink® Editing User Name/PIN ....................
Index Disc Playing ....................................................166 Voice Commands List ..............................335 Display Tracking .........................................84 Driving ....................................................119 Setting ......................................................84 Download POI Editing Category .......................................52 Importing Category ...................................51 Setting Destination..................................
Index Navigation Menu (Route Option) ........... 129 Night Mode Switching Display Mode ............................ 75 Non-map screens........................................ 67 O On Demand Multi-Use DisplayTM Basic Operation........................................... 5 Customizing Audio Source ...................... 149 Screen Settings ......................................... 87 Shortcuts .................................. 45, 148, 224 Sound .....................................................
Index Traffic Rerouting ......................................127 Auto Reroute ..........................................127 Navi Settings .............................................59 Travel (Place Category) ............................100 Trip Computer ..........................................290 Troubleshooting.................................17, 298 U Unit Settings ...............................................34 Unverified Routing.....................................