
Installation manual


Page 25
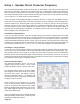
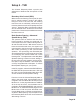
When setting up your speaker array using the PC
program, select the side THEATER tab, the PRO
SETUP top tab and then the 2-LEVELS sub tab.
In the window toward the right are the text buttons
that engage the pink noise generator. Here you
can SEQUENCE (noise will move from speaker
to speaker automatically), ADVANCE (go to the
next speaker in order when pressed), or select
a specic speaker in which the noise will remain
until another option is selected or the Noise Test
OFF button is pressed.
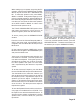
With pink noise playing through a speaker, aim
the SPL meter at the speaker but note the position
of where the meter is. You can spin it but you do
not want to move it from that spot. Raise or lower
that speaker channels audio level (UP or DN but-
tons). Any adjustments made here occur in real
time (instantly). The level noted in Decibels (dB)
will also change. Adjust that speaker’s level such
that the needle on the SPL meter is swinging with
75 dB as a center point. Then proceed to adjust
another speaker by selecting its NOISE button
and then aiming the SPL meter toward it.
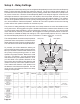
From the front of the Cinema Rhapsody Mach 4,
while in the setup mode, use the Mode knob to
navigate to the word PRO SETUP and press the
Mode knob.
On the page that features LABELS/AV in the top
left corner, use the Mode knob to navigate to the
LEVELS option and press the Mode knob.
You are now on the Levels page with the NOISE
ON and the L or Left channel active. To select
a specic channel, turn the Mode knob to that
channel. Turning the Input knob will adjust that
channels volume. Use the SPL meter as noted
above to set the levels.
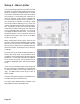
To engage Noise Sequence in which the pink
noise advances from channel to channel automati-
cally, turn the Mode knob to NOISE and turn the
Input knob so that the display reads SEQ.
While Storing of Balance Presets is done on this
screen, ADA suggests waiting to store these pre-
sets until the Delay Levels are also adjusted. The
Balance Preset stores both the Balance Levels
and Delay Levels.