RELEASED APRIL 2002 CINEMA RHAPSODY MACH II Version 3.46 INSTALLATION MANUAL 602-610 Mamaroneck Avenue, White Plains, NY, 10605, www.ada-usa.
Safety Instructions & Electrical Warning READ INSTRUCTIONS - All the safety and operating instructions should be read before the appliance is operated. RETAIN INSTRUCTIONS - The operating instructions should be retained for future reference. HEED WARNING - All warnings on the appliance and in the operating instructions should be adhered to. FOLLOW INSTRUCTIONS - All operating and use instructions should be followed.
Contents Safety Instructions & Electrical Warning ....................................................................................... 1 AC Connections ............................................................................................................................... 4 Power Amplifier (& Powered Subwoofer) Connections................................................................ 5 Introduction - Front Panel Controls & Displays ................................................................
DTS LFE Settings ........................................................................................................................... 53 DTS LFE Adjustment Enable .................................................................................................................. 53 DTS LFE Adjustment ............................................................................................................................... 53 Tone Controls ...........................................................
AC Connections Before You Begin As you remove the Cinema Rhapsody Mach II from its packaging, inspect the condition of the component prior to proceeding with the following steps for AC connection. In the event that the Cinema Rhapsody Mach II appears to have suffered cosmetic damage due to shipping, please contact your Authorized ADA Dealer immediately and do not proceed to plug the unit into an AC outlet.
Power Amplifier (& Powered Subwoofer) Connections Audio Connections The Cinema Rhapsody Mach II’s Audio Outputs are clearly marked in a white field on the back of the unit. ADA strongly suggests not using directional interconnects that lift the grounds. This diagram includes ADA’s PTM-8150 Eight Channel Power Amplifier.
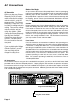
Introduction - Front Panel Controls & Displays Overview The Cinema Rhapsody Mach II is factory set for optimum operation. This section details the front panel features of the Cinema Rhapsody. All component functions can be operated through the five control knobs located on the units front panel. The front panel displays are also explained in this section. Active Incoming Channels Mode Indicator Lamps Welcome The Cinema Rhapsody Mach II is the world’s most advanced audio video surround sound preamplifier.
Power On, Mute, Off, & Master Volume Control When the Cinema Rhapsody is off, turning any knob or pushing any knob other than the Volume knob will cause the Cinema Rhapsody's center LCD display to indicate: Power On Press the Cinema Rhapsody's Volume knob to engage power on. PUSH VOLUME FOR POWER ON Front Plate To turn on the Cinema Rhapsody, providing the unit is not in Mute, press the Volume knob once. Pressing of the Volume knob performs only three functions.
The Cinema Rhapsody Mach II permits you to scroll to the next input without having all of the components you are passing actively process through the Cinema Rhapsody Mach II. This prevents the clicking that is commonly associated with changing TV channels up and down. To best access another component from the front of the Cinema Rhapsody, turn the Input Selector knob.
R RECORD nt The Cinema Rhapsody Mach II incorporates a record selector that operates independently from the actual source component selected for the home theater room. This record selector can be used in several ways. o Select Anot T n Compo he ne ur cord e r T Record Selector 1 Use the Record Selector to send audio and video signals from a particular component to a recording device (i.e. VCR) 2 Use the Record Selector to send a video signals to a second monitor or TV set.
Rear Panel Connections Composite Video Inputs (8) VIDEO INPUTS 3 5 1 S-Video Inputs (4) VIDEO OUT 1 REC 7 PIN +/1 / 14 2 / 15 3 / 16 4 / 17 5 / 18 6 / 19 CHAN PIN +/- CHAN LT 7 / 20 SBL CT 8 / 21 SBR RT 9 /10/22 SHLD SB 11 / 23 R.T.A SL 12 / 24 R.T.B SR 13 / 25 R.T.
Out of the Box Input Configuration The Cinema Rhapsody Mach II is an incredibly flexible home theater controller that can accommodate a wide array of components. For easy and quick setup, one can use the “Out of the Box” input configurations shown on the following pages. One can also elect to do a completely “Custom” input configuration or a combination of “Out of the Box” and “Custom” input configurations.
DVD Player Connection The Out of the Box input configuration for a DVD player is set to use the digital coaxial audio output of the DVD player as most DVD players have this type of RCA jack. DVD Player PCM/AC-3/DTS Video Digital Out Out S-Video Out Component Video Output Y Cr Cb S-Video Cable (Primary Video Connection providing TV has S-Video Input) Video Cable Component Video (Optional video connection providing that TV has component video inputs.
DVD Audio/SACD Player Connection The Out of the Box input configuration also has provisions for a DVD Player that is capable of playing DVD Audio and/or SACD. These multi-channel high-resolution discs are designed to offer superior sound quality. Because of concerns regarding copy-protection, the decoding of the material actually takes place in the DVD player.
DSS Receiver Connection The Out of the Box input configuration for a DSS receiver is set to use the optical digital audio output of the DSS receiver as most DSS receivers have this type of TOS-Link jack. In the event your DSS receiver features a digital audio coaxial jack, you may wish to use this connection instead of the optical connection. Coaxial connections are better than optical connections, especially when basic optical interconnects are all that are available.
DSS Receiver Connection - Coaxial Connection DSS/SATELLITE Digital Audio Out Video Out S-Video Output HD VGA Output S-Video Cable (Primary Video) Video Cable (When driving the TV with S-Video, this cable may not be required and can be used for another source.) VIDEO INPUTS 3 5 2 1 VIDEO OUT 1 REC 7 PIN +/1 / 14 2 / 15 3 / 16 4 / 17 5 / 18 6 / 19 CHAN PIN +/- CHAN LT 7 / 20 SBL CT 8 / 21 SBR RT 9 /10/22 SHLD SB 11 / 23 R.T.A SL 12 / 24 R.T.B SR 13 / 25 R.T.
DVR/PVR Connection The Out of the Box input configuration for a DVR (Digital Video Recorder) are sometimes called PVRs (Personal Video Recorders). There are several different models available and the diagram below shows connection of the most basic type of models. These units feature analog audio outputs along with both composite video and S-Video outputs.
VCR Connection The Out of the Box input configuration for a VCR permits for both composite and S-Video as well as right and left analog audio. Use inputs number 4. VCR Stereo Audio Out R Video Out S-Video Output L S-Video Cable (Primary Video) Audio Cable Video Cable (When driving the TV with S-Video or component video, this cable may not be required and can be used for another source.
CD Player Connection The Out of the Box input configuration for CD Player provides for analog audio connections. Connect your line-level audio outputs from your CD player to the Cinema Rhapsody Mach II’s Analog Audio input #6. CD PLAYER Stereo Audio Out R L Audio Cable VIDEO INPUTS 3 5 1 VIDEO OUT 1 REC 7 PIN +/1 / 14 2 / 15 3 / 16 4 / 17 5 / 18 6 / 19 CHAN PIN +/- CHAN LT 7 / 20 SBL CT 8 / 21 SBR RT 9 /10/22 SHLD SB 11 / 23 R.T.A SL 12 / 24 R.T.B SR 13 / 25 R.T.
CD Player Digital Connections For TOS-Link connections use Optical Input #1. For Coaxial connections, use Digital Input #2 if it is not already assigned to the DSS. You will also need to reassign the CD PLAYER 7 input label from Analog Input #6 to the appropriate digital input. To do so, follow these steps.
Tuner (Radio) Connection The Out of the Box input configuration for a Radio Tuner provides for analog audio connections. Connect your line-level audio outputs from your Tuner to the Cinema Rhapsody Mach II’s Analog Audio input #7. TUNER Stereo Audio Out R L Audio Cable VIDEO INPUTS 3 5 1 PIN +/- CHAN PIN +/- CHAN 1 / 14 LT 7 / 20 SBL 2 / 15 CT 8 / 21 SBR 3 / 16 RT 9 /10/22 SHLD 4 / 17 SB 11 / 23 R.T.A 5 / 18 SL 12 / 24 R.T.B 6 / 19 SR 13 / 25 R.T.
Multi-Room System Connection The Out of the Box input configuration for a Multi-Room System provides for analog audio connections. Connect your line-level audio outputs from your Multi-Room System to the Cinema Rhapsody Mach II’s Analog Audio input #2. MULTI-ROOM Stereo Audio Out R L Audio Cable VIDEO INPUTS 3 5 1 PIN +/- CHAN PIN +/- CHAN 1 / 14 LT 7 / 20 SBL 2 / 15 CT 8 / 21 SBR 3 / 16 RT 9 /10/22 SHLD 4 / 17 SB 11 / 23 R.T.A 5 / 18 SL 12 / 24 R.T.B 6 / 19 SR 13 / 25 R.T.
Video Game Connection The Out of the Box input configuration for a Video Game provides for digital audio as well as composite and component video connections. Connect your Digital audio output to Digital input #3. For video connect your Composite video output to input #6. If your display device is capable of showing a component video signal, connect the video games component video output to input #3.
Computer Connection The Out of the Box input configuration for a Computer provides for digital coaxial audio as well as a composite video connection. Connect your Digital audio output to Digital input #4. Connect the video output of your PC to the Cinema Rhapsody Mach II’s Video input #1 (providing that your video game is not already connected to this video input).
Laserdisc Player with Internal RF Demodulator The Out of the Box input configuration for a Laserdisc player has several different options depending on the type of laser disc player you are using. The most current laser disc players feature an internal AC-3 RF demodulator which is necessary to play Dolby Digital laser discs in a Dolby Digital mode.
Laserdisc Player with only an AC-3 RF Output The Cinema Rhapsody Mach II features an input label for connection to an AC-3 RF demodulator, needed for laserdisc players that have a Dolby Digital AC-3 RF output. Some players manufactured after 1994 feature this output while others may have been modified with an additional AC-3 RF Output (MSB Technologies provided this modification). These players require an external AC-3 RF demodulator (ADA’s RFD-1) for playback of Dolby Digital (a.k.a.
Theater (Main) Video Connections To connect the Cinema Rhapsody Mach II to your video display or line-doubler, first determine what connections your device has. Generally speaking, this section will discuss the following three options: an HD capable TV or projector, a line-doubler, or a TV or projector with only composite and S-Video inputs. HD Capable TV or Projector With this type of display device, you will most likely have a host of video inputs.
Because the line-doubler is handling all the video processing, you will need to run Video Video S-Video VGA/HDTV Component Video Input separate feeds to the lineInput 1 Input 2 Input Input Y Cr Cb doubler for composite video, S-Video, and component video. If your line-douS-Video Video Cable (Video 1 for normal bler has two composite viewing. Video 2 Component Video for OSD output video inputs, you can conduring setup.
Recording Output The Cinema Rhapsody Mach II features a recording output which permits selection of a stereo (analog) audio signal, as well as composite and S-Video, independent of the output playing in the theater environment. This is useful for either sending a signal to a recording device, a high-end two channel audio system, a second monitor, a second zone, or perhaps even a multi-room system. There are some rules that must be considered when working with the Cinema Rhapsody Mach II’s record output.
DSS Receiver Analog Record DSS RECEIVER Connection ANALOG AUDIO RECORDING CONNECTION (IN ADDITION TO OTHER DIGITAL AUDIO AND VIDEO CONNECTIONS) If you do not have a multi-room Stereo system’s output connected to Audio Out R L the Cinema Rhapsody's analog audio input #2, proceed to connect the DSS receiver’s analog audio output as noted in the Audio Cable diagram. Again, this cable is in addition to the other digital audio and video cables connected to the Cinema Rhapsody from the DSS receiver.
CD Player Analog Record Connection If you connected your CD PLAYER to the Cinema Rhapsody using an optical digital audio connection, you will still need to connect the CD’s analog audio output to the Cinema Rhapsody's analog input #6 as in the diagram. If you did not connect your CD player digitally, ignore this step as it is already in place.
Reassigning Record Audio Inputs If you are limited on the number of open analog inputs on the back of the Cinema Rhapsody Mach II, ADA suggests making certain that the DSS receiver takes precedence to the DVD player. Because you may only get questionable results from attempting to record a DVD to VCR, ADA recommends first connecting the DSS. To begin: 1 Find an open analog audio input on the back of the Cinema Rhapsody and connect the DSS receiver’s analog audio output to it.
Custom Input Configuration The Cinema Rhapsody Mach II’s input configuration can also be completely customized to suite your specific system. ADA suggests to begin connecting components to the Cinema Rhapsody Mach II using the Out of the Box options discussed on the previous pages. You can then modify your setup to best suit your needs. This will save some time. When desiring to work with a Custom input configuration, you may want to consider the following items prior to making any changes to the setup.
4 Turn the Mode knob clockwise until the display’s second line reads FINAL INPUT and press the Mode knob. 5 Turn the Mode knob counterclockwise until the display’s second line reads the appropriate final input number. This number is displayed after the input label name. For this step, disregard the name of the input labels as these can be altered later.
To enter the Label Inputs setup mode, turn the Mode knob clockwise until the display’s second line reads SETUP MENU and then press the Mode Knob. You then turn the Mode knob clockwise until the display’s second line reads LABEL INPUTS and then again, press the Mode knob. The display will now read: LABEL INPUTS DVD PLAYER 1 You navigate out of this level by turning the Mode knob all the way clockwise until the display reads BACK TO MAIN and then pressing the mode knob.
4 The second line of the display will now show where the <...> indicates that you are in the select character position mode. Here the A will be underlined and blinking. 5 To change the A to a D, as in DSS RECORD, press the Mode knob. The second line of the display will now change to >AUXILIARY 8<, where the >...< indicates that you are in the change character mode. Again, the A will be underlined and blinking, indicating that you can now change the A to a D.
20 Turn the Mode knob counterclockwise until the R is replaced with letter O and then press the Mode Knob. 21 With the display now reading , turn the Mode knob clockwise one click until the Y is flashing and press the Mode knob. 22 Turn the Mode knob counterclockwise until the Y is replaced with letter D and then press the Mode Knob. 23 With the display now reading , turn the Mode knob clockwise one click until the blank space is flashing and press the Mode knob.
DSS RECEIVER ANALOG AUDIO RECORDING CONNECTION Assuming that the DSS RECORD setup was followed as outline under the Record section of this manual, the DSS receiver’s analog audio output has already been connected to the Cinema Rhapsody's Analog input #2 as in the diagram. This connection is in addition to the standard DSS connections in the Out of the Box setup.
S-Video Input Configuration As with the composite video input, the S-Video for the DSS RECORD input label needs to be set to track the S-Video input for the DSS’s normal input. As the DSS is set to track S-Video input #2, proceed with the following: 9 Turn the Mode knob clockwise until the display’s second line reads SVIDEO INPUT and press the Mode knob. 10 Turn the Mode knob until the display reads SVIDEO INPUT 2 and then press the Mode knob.
To setup and verify the Aux DC Triggers: 1 Turn the Input knob to the input label you wish to set the trigger for and press the Input knob. 2 Turn the Mode knob clockwise until the display’s second line reads SETUP MENU and press the Mode knob. 3 Turn the Mode knob clockwise until the display’s second line reads either AUX TRIGGER1 or AUX TRIGGER2 and press the Mode knob. 4 Turn the Mode knob to turn the AUX TRIGGER # ON or OFF, then press the Mode knob. Repeat this step as necessary.
Turn On Input When controlling the Cinema Rhapsody Mach II from a remote control or control system, the action of first selecting an input, causes the Cinema Rhapsody to turn on and switch to that input. However, when turning the Cinema Rhapsody on from its front panel, by pressing the Volume knob, the Cinema Rhapsody's Out of the Box default setting will cause it to turn on to the last input that was used.
Speaker Size Setup 1 Once you have your inputs configured properly, you will need to setup the Cinema Rhapsody Mach II’s outputs which pass to your power amplifier and then the speakers. In this section, you will need to proceed with several steps that focus on the type of speaker you are using in your system. The Cinema Rhapsody Mach II uses the description of SMALL, LARGE, and NONE with respect to the speakers. SMALL refers to speakers that are not designed to handle low frequencies.
c When trying to decide what type of surround speakers to utilize, either dipole or directional speakers, there is much discussion as to which will perform better with 5.1 digital source material. Some suggest placing directional speakers in the back left and right corners.
Subwoofer Crossover Point Setup The Cinema Rhapsody Mach II is permits you to set the subwoofer to best match the speakers in your system. While the THX crossover frequency point (roll off point) is 80Hz, some speakers my operate better with a slightly lower roll off and others with a slightly higher roll off. For example, ribbon speakers typically operate best at frequencies above 180Hz. ADA suggests consulting with the manufacturer of your home theater speakers prior to altering this setting.
Multi-Pin Speaker Setup The Cinema Rhapsody Mach II has a secondary Large/Small setting for multi-channel DVD Audio or SACD connections. This crossover applies only to the Multi-Pin (25 pin D connector) and takes place in the analog domain because the DVD Audio or SACD input completely bypasses the DSP and D/A convertors. As such, the crossover has more limited features than those internal to the DSP.
Multi-Pin Input LFE Boost Switch For the Multi-Pin input, the Cinema Rhapsody Mach II has a special bass setting that will permit you to increase (or decrease) the presence of the LFE (“.1”) channel by a differential of 10dB. For the Multi-Pin input, speakers that are set to the Small option have their bass information below 80Hz summed with the LFE channel and sent to the subwoofer. When the LFE gain switch is set to the left, the LFE is not boosted.
Speaker Level Setup 2 The Cinema Rhapsody Mach II’s next step involves the balancing of the speaker channels for the optimum home theater experience. This step permits you to make certain that the individual speaker levels are balanced appropriately. Prior to entering this step, you should already have completed the positioning of your speakers and programmed their size into the Cinema Rhapsody Mach II. The Cinema Rhapsody Mach II has been calibrated in the factory for optimum operation.
8 Turn the Mode knob clockwise one click until the display reads NOISE R BACK. If the meter is reading 75dB, proceed to the next step. If the reading is not on 75dB, press the Mode knob to adjust the right back-surround channel’s level up or down so that the meter reads 75dB. When completed press the Mode knob. 9 Turn the Mode knob clockwise one click until the display reads NOISE L BACK. If the meter is reading 75dB, proceed to the next step.
Balance Presets The Cinema Rhapsody Mach II features four balance presets which store the channel levels settings. At this time, with the channel balance settings in place, ADA strongly suggests storing Balance Preset 1. This will preserve the work you have just completed in Speaker Level Setup 2 . To proceed: 1 Turn the Channel knob clockwise until the display reads RECALL/STORE BAL PRESETS. Do not stop on the option PUSH RECALLS BAL PRESET 1.
Delay Level Setup 3 The adjustment of the Delay setting can be configured independently for each of the Cinema Rhapsody Mach II’s eight channels (including the subwoofer channel). The goal of setting channel delays is to have the sound from each speaker reach the primary seating position at the same time or perhaps better put, the correct time.
To proceed, you will first determine where your primary listening viewing seating position will be. Next you will want to measure the distance from the primary listening/viewing position each speaker using a tape measure. Your measurements need to be accurate to within 1 foot. Use can use the accompanying blank chart to fill in your speaker distances. Once you have filled in the speaker distances on the second line, take the highest value distance and insert it into the top row of each speaker column.
Bass Setup 4 The Cinema Rhapsody provides you with the ability to engage a Bass Peak Limit Manager that operates in a range from 0 dB (decibels) to -24 dB. The function of the Bass Peak Limit Manager is to reduce the possibility of overloading the subwoofer in cases of extreme volume and/or software that provides extremely dynamic bass information. If your subwoofer is capable of providing a large level of bass without bottoming out, you may not need to engage the Bass Peak Limit Manager.
THX Ultra Setup 5 The Cinema Rhapsody permits the adjustment of features that are specific to THX Ultra 2. These two elements include Boundary Gain settings and Advanced Speaker Array settings. Boundary Gain Control (BGC) When the chosen listening room layout (for practical or esthetic reasons) results in the listener being too close to the rear wall, the resulting bass level can be sufficiently reinforced by the boundary that the overall sound quality becomes “boomy”.
DTS LFE Settings The Cinema Rhapsody permits the adjustment of the DTS LFE level prior to the summing of the bass information from all speakers that are set to small. This LFE level adjustment applies only to DTS decoding modes. When listening to DTS encoded software, you may notice a preponderance of bass as compared to non-DTS material. Based on laboratory testing, ADA has determined that some DTS material has an increased LFE level of 10dB.
Tone Controls In a perfectly acoustic room environment, a THX system (electronics and speakers) would not require any tone control, as the film experience would be delivered across a controlled system, providing a sound field as intended by the film maker. However, in the real world, no room is acoustically perfect.
The thinking behind these four presets is: Tone Preset 1 - All speakers are active to only Speaker Group A. Here, one can simply adjust levels up and down for bass and treble, effecting all speakers. Tone Preset 2 - The front three speakers are on Group A (where the center channel is more similar in size, driver configuration, etc. to the front right and left speakers) and the surround speakers are on Group B.
Speaker Groups In this section, we will determine which speakers are in Group A and which speakers are in Group B. Please note, that there are no set rules here. A speaker can be disengaged from both groups so that it is not effected at all by any tone control. Alternately, speakers can be engaged to both tone groups. Here you can set the frequency points for treble and bass to different values (as well as different levels), providing a four-band tone equalizer.
Treble Group A In this section, we will set the Treble Level and Frequency point for Treble Group A. 1 Turn the Channel knob clockwise until the display’s second line reads TREB GROUP A and then press the Channel knob. 2 The top line of the display will read TREB GROUP A and the second line will display the LEVEL in DB. To skip the Level adjustment and move directly to adjustment of the treble frequency, skip to step 3.
11 Turn the Channel knob one click such that the display’s top line reads TREB GROUP B and the second line reads FREQ in K HZ. To skip the Frequency adjustment and move directly to adjustment of Bass Group B, skip to step 12. To adjust the Treble Frequency, press the Channel knob and then dial in the frequency you desire using the Channel knob (1KHz to 30KHz). When set, press the Channel knob. 12 Turn the Channel knob clockwise until the display’s second line reads BACK TO MAIN and press the Channel knob.
Volume Setups Once all of the system features have been set, you can proceed to set volume related features on the Cinema Rhapsody Mach II. The order for these settings is specific. Follow the steps below in order to best setup the Cinema Rhapsody Mach II. Storing Volume Presets The Cinema Rhapsody Mach II features four volume presets. These are easily stored and can be used to quickly recall different volume levels depending on how loud you want the system to play.
2 Turn the Mode knob clockwise until the display’s second line reads TURNON VOL and press the Mode knob. 3 Turn the Mode knob to select either LASTUSE or RECALL1 through RECALL4. 4 Turn the Volume knob to completely exit the setup menu. Maximum Volume Level The Cinema Rhapsody Mach II also permits you to set the systems Maximum Volume Level. This will prevent the system from ever playing too loud, averting distortion or damage to the speakers.
Channel Volume Adjustment The Cinema Rhapsody also permits you to adjust volume levels of specific channels while you are listening to a component. This will allow you to for example, raise the center channel volume level, if the movie you are watching has dialogue that is not loud enough.
RS-232 Control Options The Cinema Rhapsody Mach II is capable of being fully controlled via RS-232, providing status feedback of all preamplifier aspects. This makes the Cinema Rhapsody Mach II ideal for integration with advanced control systems. It also permits the Cinema Rhapsody Mach II to be setup and controlled from its custom PC software setup and test program (Cinema Ref. II PCOS).
RS-232 Connection with Other ADA Bus Systems/Components When a Cinema Rhapsody Mach II is connected to a control system that is also controlling an ADA multi-room system (i.e. Suite-16), a single ISO-232 can be used to communicate to several ADA components including the Cinema Rhapsody Mach II. Here the important consideration is to make certain that all ADA components are set to the same baud rate.
IRT-232 IR Transceiver to RS-232 Wireless I/O Device The secondary two-way data port on the Cinema Rhapsody Mach II is the IR transceiver located in the front panel. Not only does this transceiver receive infrared commands, it also transmits the Cinema Rhapsody's feed back out in IR form.
External IR Receiver Options ADA manufactures two different IR receivers that can be connected to the Cinema Rhapsody Mach II. When using an external IR receiver, ADA recommends turning off (Inactive) the Cinema Rhapsody's front panel IR transceiver. IRT-3000 IR Transceiver The IRT-3000 is both an IR receiver and emitter (transceiver) much like the front panel IR transceiver. The IRT-3000 fits a single-gang decora plate and can be remotely located away from the equipment rack.
IRR-5000 IR Receiver The IRR-5000 is a peep-hole size IR receiver that features an RJ-45 jack and is run to the equipment rack via Cat. 5 cable. In order to connect the IRR-5000 to the Cinema Rhapsody Mach II, you will require a WH-2000 Cat-Link Wire Harness. The WH-2000 features both ADA Bus and RJ-45 connectors and is required if you are going to use the IRR-5000. The IRR5000, unlike the IRT-3000, is a receiver only, one-way IR receiver.
BRT-1 Baud Rate Translator The BRT-1 is used when your Cinema Rhapsody is set to run at 19200 for control system reasons, yet you also wish to control the unit via IR. The BRT-1 will upconvert a 1200 Baud IR signal to 19200 Baud. It does not down-convert a 19200 signal to 1200 and as such, will only permit the Cinema Rhapsody to receive commands. It will not down-convert feedback to IR. The BRT-1 is a passive device that connects to an open ADA Bus port on the ADA Bus wire harness.
IR Transceiver (Front Panel) Settings When connecting the Cinema Rhapsody Mach II to an external control system, you may run into a data conflict resulting from sending data into the Cinema Rhapsody while it’s front panel IR transceiver is active. If you are having difficulty establishing communication with the Cinema Rhapsody Mach II serially, ADA suggests turning the Cinema Rhapsody's front panel IR transceiver off. The Out of the Box default is set so that the IR Transceiver is active.
Cinema Rhapsody Mach II (Address 0) VIDEO INPUTS 3 5 1 PIN +/- CHAN PIN +/- CHAN 1 / 14 LT 7 / 20 SBL 2 / 15 CT 8 / 21 SBR 3 / 16 RT 9 /10/22 SHLD 4 / 17 SB 11 / 23 R.T.A 5 / 18 SL 12 / 24 R.T.B 6 / 19 SR 13 / 25 R.T.C VIDEO OUT 1 REC 7 13 1 25 14 8 CHANNEL DB-25 INPUT MAIN PIN POINTS Y MULTI-PIN LFE SUM 0dB +10dB REC PB/B-Y COMPONENT VIDEO Y PR/R-Y PB/B-Y 1 S-VIDEO INPUTS 1 2 4 3 PR/R-Y 3 4 6 8 2 OSD L L 2 1 3 4 R L LS 7 6 PR 3 Lucasfilm Ltd. U.S.
Output Channel Indicator Lamps The Cinema Rhapsody Mach II is extremely flexible when it comes to decoding today’s advanced multi-channel digitally encoded signals. While the process of selecting decoding modes on its surface may appear confusing, there are several aspects of decoding that the Cinema Rhapsody Mach II does automatically. To even further simplify the mode selection process, ADA has also included several default options that will make it easy to operate.
Mode Selection The Cinema Rhapsody Mach II is first and foremost an auto-detecting processor. As such, when it receives an input signal, it will automatically determine its makeup and in turn, engage the appropriate decoding mode. There are three primary types of signals that the Cinema Rhapsody is capable of decoding, a Dolby Digital encoded signal, a DTS encoded signal, and a stereo or mono audio signal (PCM digital audio {Pulse Code Modulation} or analog audio).
Multi-Channel Formats Dolby Digital and Dolby Digital Surround EX A Dolby Digital bit stream most typically contains a 5.1 channel mix or upon closer inspection, a 3.2.1.0 mix. To examine this further, the 3 refers to the front three channels (left, center, right), the 2 refers to the surround channels (left and right), and the 1 or “.1” refers to the subwoofer (also often called LFE - Low Frequency Effects).
Cinema Modes & Indicator Lamps Some multi-channel material you play on your home theater system offer only one type of audio track. From a HDTV or DSS broadcast, this will be Dolby Digital. When playing a DVD, you may have several audio track options also known a Language Selections. Most DVD discs indicate the available audio tracks on the back of the disc jacket/box.
Dolby Digital 5.1 Discrete + EX/ES Dolby Digital 5.1 THX + EX/ES Dolby Digital 5.1 THX Ultra 2 Dolby Digital 5.1 THX Music Dolby Digital Surround EX Page 74 DISCRETE +EX/ES - This mode will engage the two back surround speakers which will then receive mono information contained in the left and right surround channels. This mode is ideal when viewing a movie that is Dolby Digital 5.1 encoded (without EX), where still want the additional back surround speakers to be active.
DTS 5.1 Surround Source material encoded in DTS 5.1 Surround operate in a manner similar to Dolby Digital 5.1 Surround material. When playing software encoded in DTS 5.1 Surround, the DTS lamp will illuminate along with the L, C, R, LFE, LS, and RS Input lamps. Selecting a more basic Discrete mode will engage the L, C, R, SUB, LS, and RS Output lamps. DTS 5.1 Surround Direct or Discrete Again, like Dolby Digital 5.
Two Channel Modes & Indicator Lamps Dolby Surround 2.0 While many discs offer an alternate stereo Dolby Digital track, often older films on DVD only feature this track, as these movies were never mastered in more than two channels. The Cinema Rhapsody Mach II indicates this type of audio track by illuminating only the L & R Input channel lamps along with the Dolby Digital lamp. If you see this combination when playing a DVD of a more current film, one which most likely features the more advanced 5.
PROLOGIC - Pro Logic decoding is a matrix decoding mode for two-channel sound-tracks and works best with material that was specifically encoded in Dolby Surround. Here the surround channels have a mono, not stereo type of sound field. Here, the L, C, R, SUB, LS, and RS Output channel lamps are on. PROLOGIC THX - This mode is the same as Pro Logic and includes the addition of THX enhancements.
4 Turn the Mode knob one click so that the display’s second line reads PLII OPTIONS and press the Mode knob. 5 The second line of the display will now read PANORAMA. To alter the Panorama settings, press the Mode knob. To alter another setting skip to Step 7. To completely exit the setup menu, turn the Volume knob. 6 Turn the Mode knob to either turn Panorama ON or OFF. Then press the Mode knob. 7 Turn the Mode knob one click so that the display’s second line reads CENTER WIDTH.
SURROUND FILTERS - There are three surround filters which in the Cinema Rhapsody's menu are marked 0,1, & 2. 0 refers to all filters off, where the surround channels receive full range audio. 1 refers to the low pass filter being active and set to 7KHz (as in the Pro Logic mode). 2 refers to the high pass filter and shelf filter being active. You can select one of the three options under this setting. RS INVERTED - When this setting is on, the polarity of the right surround sound speaker is inverted.
11 Turn the Mode knob one click so that the display’s second line reads AUTO BALANCE. To alter the Auto Balance setting, press the Mode knob. To alter another setting skip to Step 13. To completely exit the setup menu, turn the Volume knob. 12 Turn the Mode knob to set the Auto Balance ON or OFF, then press the Mode knob. 13 Turn the Mode knob one click so that the display’s second line reads SURR DELAY. To alter the Surround Delay setting, press the Mode knob. To alter another setting skip to Step 15.
Proprietary Two Channel ADA Modes QUAD BYPASS - Quad Bypass is a proprietary ADA Mode that will permit you to engage your entire speaker array (7.1) when playing a two channel source. Quad Bypass is ideal for music playback and utilizes the entire sound field. Here, the L, C, R, SUB, LS, RS, SBL, and SBR Output channel lamps are on and all speakers are active.
MONO ENH - Mono Enhance is a proprietary ADA Mode that is applied to a mono signal and is useful for playback of source material with no stereo separation. There are two adjustments that can be made to the Mono Enhance mode, Effect Delay and Effect Level. In this mode, the two channels are first mixed mono together, then the mono enhancement feature is applied, with the delay set to the left channel (after mixing down to mono) and prior to the Pro Logic decoding.
Fun Modes The Cinema Rhapsody Mach II also features seven Fun Modes that may prove interesting to you. Stereo 5, Mono 5, Stadium, Theater, Hall, Club, & Church STEREO 5 - Stereo 5 is only capable of being engaged when playing two-channel source material. This mode applies the stereo image across the entire sound field and will also play out of the back surround speakers. Here, the L, C, R, SUB, LS, RS, SBL, and SBR Output channel lamps are on.
On Cinema Rhapsody Mach II preamplifiers with a Release Version of 3.46 or less, these five modes are not accessible directly when playing a multi-channel source. To determine the Release Number, turn the Cinema Rhapsody Mach II completely off and then turn it on again. The Release Number will briefly appear on the front panel display. To access these modes, you need to: 1 Pause your player such that 5.1 material is no longer detected by the Cinema Rhapsody Mach II.
THX Enhancements For either Dolby Digital, Dolby Digital EX, DTS, or DTS ES, THX enhancements can be turned on or off. If THX is present, the THX mode lamp will be lit. When playing a two channel source signal, the IN indicator will display the L and R for Left and Right. The only mode lamp that might be illuminated is THX, identifying the engagement of THX enhancements.
Adaptive Decorrelation™ - In a movie theater, a large number of surround speakers help create an enveloping surround sound experience, but in a home theater there are usually, only two speakers. This can make the surround speakers sound like headphones that lack spaciousness and envelopment. The surround sounds collapse into the closest speaker as you move away from the middle seating position.
Dynamic Range For all Dolby Digital (AC-3) and DTS Modes, you can opt to alter the setting for Dynamic Range, which when set to either DYNAMIC MID (Medium) or DYNAMIC MIN (Minimum), causes for some compression of the sound field. The Out of the Box setting for Dynamic Range is set to maximum (DYNAMIC MAX). The ability to lower the Dynamic Range of these modes in essence, narrows the liveliness of the home theater system.
Default Modes The Cinema Rhapsody Mach II, while being among the most sophisticated of all home theater controllers, is also designed to be easy to use. As such, when properly setup, the end user need only select an input label without having to adjust any other parameters. The Default Mode setup feature permits you to assign specific modes to an Input Label, such that, whenever that Input Label is selected, the appropriate mode is automatically recalled. This feature is extremely useful and most advanced.
4 The display’s second line will now read NON2 CHANNEL referring to non-Two Channel source material (5.1). To alter the non-Two Channel Default Mode for this Input Label, press the Mode knob. To alter the Two-Channel Default Mode for this Input Label, skip to step 6. 5 Turn the Mode knob to select the desired non-Two Channel Default Mode for this Input Label.
User Modes The Cinema Rhapsody Mach II features special modes called User Modes. These are not additional modes that can be created using filter adjustments. Instead, User Modes represent an instantly selectable mode (one push from a remote control) that activates a specific Cinema Rhapsody mode. As such, a single button on a control can be labeled User Mode, which when pressed, will activate a specific mode that is most preferred by the end user for that Input Label.
5 Turn the Mode knob to select the desired non-Two Channel User Mode for this Input Label. When done, press the Mode knob to continue with setting the Two-Channel User Mode for this Input Label. To completely exit the setup menu, turn any knob other than the Mode knob. 6 Turn the Mode knob clockwise one click until the display’s second line reads 2 CHANNEL and then press the Mode knob. 7 Turn the Mode knob to select the desired Two Channel User Mode for this Input Label.
Appendix A - Out Of The Box Settings Overview Input Labels - AV Jacks - RGB Output - Low Voltage Triggers The Cinema Rhapsody does not defeat composite video, S-Video, or RGB input jacks from being assigned to each and every input label. Only the Component Video Input can be turned off per Input Label. As such, all Input Labels will have a composite video, S-Video, and RGB input jack assigned to them, even if that device does not output (or connect) in that manner to the Cinema Rhapsody Mach II.
Appendix B - Custom Setup Work Sheet The work sheet below is provided for you to complete your own Custom Input Configuration. Please note that the numbers in the lower left hand corner of each box indicate the Out of the Box input assignment as a reference. Note that A1 refers to Analog 1, while D1 refers to Digital 1, and O1 refers to Optical 1. ADA recommends using a pencil to fill in this work sheet in the event you find yourself altering your configuration along the way.
Appendix C - Resetting Factory Defaults The Cinema Rhapsody has a Factory Default recall options which will reset all Cinema Rhapsody Mach II features to configurations programmed at the factory. Please note, that resetting your unit to the Factory Default settings will void any changes that you may have made during the Cinema Rhapsody Mach II’s setup. To recall the Factory Default settings: 1 Turn the Mode knob clockwise until the display’s second line reads SETUP MENU and press the Mode knob.
Appendix D - Master Reset Power Button (Vacation Switch) The Cinema Rhapsody Mach II has a hidden front panel power button that permits you to remove power from the Cinema Rhapsody without unplugging the Cinema Rhapsody's power cord.
Appendix E - Cinema Rhapsody Mach II PC Program The Cinema Rhapsody Mach II is capable of being controlled and setup from a special PC program provided by ADA, the Cinema Ref. II PCOS. You will need to communicate with the Cinema Rhapsody as outlined in this manual under PC Setup & Control. This section will assist you in understanding the software application.
Under the Download Labels and Parameters sub-tab, you can proceed to alter the Input Labels to customize your Cinema Rhapsody Mach II. To do so, select an input number from the column on the left. The Input Label will display and you can then highlight the name using your mouse and type in your own Input Label. ADA strongly suggests leaving the one or two digit numeric input number reference in place. You may also select the audio and video jacks assigned to this Input Number/Label.
Under the Mode Selection sub-tab, you have the opportunity to select Modes directly. If the Cinema Rhapsody Mach II is playing a non-Two Channel source (5.1), the Cinema Modes in the lower half of the window will be active. If the Cinema Rhapsody Mach II is playing a Two-Channel source (2.0), the 2 Channel Modes in the upper half of the window will be active. Under the Enhancement subtab, you can: Turn Re-EQ, Timbre Match, and Decorrelation on or off providing that you are not in a THX mode.
When playing Two-Channel source material in the Pro Logic II Music mode you adjust Center Width control, Dimension Control, and turn Panorama on or off. These features will be unavailable in other Pro Logic modes (other than Custom PLII modes). For Pro Logic II Custom I, II, or III (with or without THX), these additional features become active in addition to those just mentioned.
Under the Tones sub-tab, there are two addition sub-sub tabs marked Group A and Group B. Under the Group A tab, you can determine which speakers are active in Group A, the Frequency point for Treble and the Treble Level. You can do the same for Bass, setting both the Bass Frequency point and the Bass Level. Under the Group B tab, you can determine which speakers are active in Group A, the Frequency point for Treble and the Treble Level.
Under the Pro Setup tab, there are six sub-tabs which are in order according to THX setup suggestions. The 1-Speaker tab permits you to determine the size of the speakers. For the subwoofer, you can determine if one exists in your system and also set the Crossover Frequency point. Under 2-Levels, you can set the balance levels using an SPL meter. Here you can engage the Cinema Rhapsody Mach II’s internal pink-noise generator to facilitate this setup.
Under the 4-Bass tab, you can set the Bass limiters level and even engage subwoofer pink noise. Under the 5-THX sub-tab, you can turn Boundary Gain on or off and also adjust the ASA setting. Under the Remote sub-tab, you can use single steps to proceed through all of the Cinema Rhapsody Mach II steps one by one, using a Execute,. Previous, and Next step button. These features exist to permit the Cinema Rhapsody Mach II to be setup using the OSD output in conjunction with a hand-held IR remote control.
Appendix F - Cinema Rhapsody Mach II Hex Codes AUDIO DESIGN ASSOCIATES DEVICE NAME: CINEMA REF MACH II / CINEMA RAP II GENERAL COMPLEX FEEDBACK FORMAT 0F CHARACTER 1 CHARACTER 2 CHARACTER 3 CHARACTER 4 CHARACTER 5 CHARACTER 6 CHARACTER 7 CHARACTER 8 CHARACTER 9 CHARACTER 10 CHARACTER 11 CHARACTER 12 03 ADDRESS F0 GENERAL COMMAND FORMAT FF 03 ADDRESS COMMAND HIGH BYTE COMMAND LOW BYTE FF DSP CINEMA MODE COMMANDS 1 (commands are ignored if system is in quad mode) RESERVED RESERVED RESERVED RESERVED RESERVE
vol - master-up @ 0.5db vol - master-dn @ 0.5db vol - left-up @ 0.5db vol - left-dn @ 0.5db vol - center-up @ 0.5db vol - center-dn @ 0.5db vol - right-up @ 0.5db vol - right-dn @ 0.5db vol - ls-up @ 0.5db vol - ls-dn @ 0.5db vol - rs-up @ 0.5db vol - rs-dn @ 0.5db vol - sub-up @ 0.5db vol - sub-dn @ 0.5db vol - lcs-up @ 0.5db vol - lcs-dn @ 0.5db vol - rcs-up @ 0.5db vol - rcs-dn @ 0.
vol - balance recall 1 vol - balance recall 2 vol - balance recall 3 vol - balance recall 4 vol - balance store 1 vol - balance store 2 vol - balance store 3 vol - balance store 4 solo - center solo - sub solo - left solo - right solo - leftsurr solo - rightsurr solo - leftsurr & rightsurr solo - lcs solo - rcs tone - update include / exclude & freqs & levels in group a tone - left include / exclude toggle in group a tone - right include / exclude toggle in group a tone - leftsurr include / exclude toggle i
update - PII music and PII custom parameters PII CUSTOM MODE/MUSIC MODE - DIMENSION CONTROL UP PII CUSTOM MODE/MUSIC MODE - DIMENSION CONTROL DN PII CUSTOM MODE/MUSIC MODE - PANORAMA ON PII CUSTOM MODE/MUSIC MODE - PANORAMA OFF PII CUSTOM MODE/MUSIC MODE - CENTER WIDTH UP PII CUSTOM MODE/MUSIC MODE - CENTER WIDTH DN PII CUSTOM MODE - AUTOBALANCE ON PII CUSTOM MODE - AUTOBALANCE OFF PII CUSTOM MODE - FILTER FULL SURROUND PII CUSTOM MODE - FILTER 7kHz CUTOFF LPF PII CUSTOM MODE - FILTER SHELF PII CUSTOM MODE
RESERVED RESERVED RESERVED RESERVED RESERVED RESERVED RESERVED RESERVED RESERVED RESERVED RESERVED record - Select record 1 record - Select record 2 record - Select record 3 record - Select record 4 record - Select record 5 record - Select record 6 record - Select record 7 record - Select record 8 record - Select record 9 record - Select record 10 record - Select record 11 record - Select record 12 record - Select record 13 record - Select record 14 record - Select record 15 record - Select record 16 record
The chart below indicates all possible feedback in ASCII. The Cinema Rhapsody Mach II provides this feeback in Hex which then needs to be converted to ASCII. GENERAL 12 CHARACTER COMPLEX FEEDBACK (all possibilities) "RELEASE #.##" #.## is subject to change DSP CINEMA 12 CHARACTER COMPLEX FEEDBACK (all possibilities) "SYSTEM OFF " "PNG "PCM "DD "DTS "OUT "DIR #.#.#.#" #.#.#.#" #.#.#.#" #.#.#.#" #.#.#.#" 3.2.1.